Sunday, December 27, 2009

Daring Bakers' December Challenge - Gingerbread House

The December 2009 Daring Bakers’ challenge was brought to you by Anna of Very Small Anna and Y of Lemonpi. They chose to challenge Daring Bakers’ everywhere to bake and assemble a gingerbread house from scratch. They chose recipes from Good Housekeeping and from The Great Scandinavian Baking Book as the challenge recipes.


“Hoooo boy” is what I thought when I first saw this month's Daring Bakers' challenge. A gingerbread house. It sounded exciting, but it also sounded like a lot of work. And I had precious little time to get this done before leaving on my trip.

But eventually, excitement took over, and I have to say, I had a blast doing this challenge. I had never made gingerbread, let alone built a house out of it. But it was such a fun seasonal activity, I think I'll make it a Christmas tradition!


We had two choices, for the dough. The one from Good Housekeeping called for molasses and cream, while the one from The Great Scandinavian Baking Book called for butter and boiling water. I chose the first one, because it seemed more straightforward, and I'd been looking for an excuse to use the molasses in my cupboard.


A lot of Daring Bakers complained that the dough was too dry, and I have to agree. After resting it in the fridge overnight, I found that it was absolutely impossible to roll: it kept crumbling in all places. I didn't want to start over and waste all the ingredients I had used, so I tried to salvage the whole thing by adding water. I knew my dough might come out tough, but I was willing to take the risk.

I let the dough rest another night, and it was much easier to work with the next day. Using the paper template I had made, I cut up the separate roof and wall pieces, and used the leftovers to make mushrooms and bunnies. Why mushrooms and bunnies? Because those were the only more-or-less appropriate cookie cutter shapes I had on hand. I figured I would make this a forest-themed house. Call it “Bunnies on Mushrooms,” or something.


I made the mistake of making my roof exactly the same size as the corresponding pieces of the house, when in fact I could have made them bigger, to ensure a more comfortable fit. As a result, with the uneven shrinkage and bloating my pieces suffered in the oven, my roof came up a little short. I had to fill the gap with royal icing, which was what I used to glue the rest of the house together. I was afraid it wouldn't hold, but I have to say, royal icing is solid stuff.

For the decorations, I used marshmallows and Holiday M&M's for the roof. Predictably, the marshmallows dried up and were inedible within a few hours. But I wasn't really planning to eat the house anyway. To be honest, the mushroom-shaped cookies I nibbled didn't taste very good: they were tough, and rather bland. But we had been warned that the dough was more suitable for decorating than for snacking on. Usually, my baked goods taste good, but look bad. For once, it was the opposite.


Overall, I'm fairly pleased with my House of Bunnies on Mushrooms. It's a little rustic (more of a shack than a house), but not bad for a first try. I did have a little bit of trouble assembling it, and it even fell apart a couple of times when I tried to manipulate it before the icing had set (which is why one of the walls is a little damaged). But it held together in the end, and I really couldn't ask for more this time around.

I have been asked what the bunny on the roof is doing. It isn't about to commit suicide, if that's what you were thinking (although I have to admit, it did end up tumbling off the roof at the end of the photoshoot, breaking its ears off in the process). I figure it's either being the lookout, or it's planning on stealing the chocolate carrot the other bunny is standing on (you can't really tell from the picture, but yes, it's a giant chocolate carrot leftover from Easter). My interpretation depends on how cynical I'm feeling.


So thank you, Y and Anna, for this lovely holiday challenge! Thanks to you, my apartment looked a little more Christmas-y this year.

Check out the other Daring Bakers' gorgeous gingerbread houses here. And if you feel up to making a post-holiday gingerbread house of your own, you can find the challenge recipe here at the Daring Kitchen.

Happy holidays to everyone!

Wednesday, December 23, 2009

Official Holiday Greetings


Greetings from Central Europe!

It feels like I was here not that long ago (in early October). I usually don't travel so often, but it just worked out that way this year. I have been here a little under a week, mostly lounging at my parents' house in Bratislava and enjoying my mother's cooking - as well as her taste in restaurants. :-)


We've made a couple of trips to nearby Vienna, which is very nicely decorated this year.


So, you'll pardon the short silence here at The Chocolate Bunny, at least until I return to Montreal in a few days.

I'm not sure how many food-related gifts I'll be getting this year. But this is definitely one I hope I don't get:


I spotted it in a window in Vienna. It's a silver casing, to cover up that tacky Tabasco bottle at the dinner table. I'm all for proper (or even snooty) table dressing, but this is a bit much, don't you think? At any rate, it made me smile.

Happy holidays to all of you! I hope the next few days are full of cheer and warmth!

Monday, December 14, 2009

Daring Cooks' December Challenge - Salmon en Croûte


The 2009 Daring Cooks challenge was hosted by Simone of Junglefrog Cooking. Simone chose Salmon en Croute (or alternative recipes for Beef Wellington or Vegetable en Croute) from Good Food Online.

As with last month’s Daring Bakers’ challenge, I was really happy to find that one of my favourite bloggers, Simone from Junglefrog Cooking, was hosting the December Daring Cooks’ challenge. Simone is an incredible cook and photographer: her recipes nearly always inspire me, by which I mean that they are both appetizing and accessible (which isn’t as easy a combination as you might think).

The recipe she chose for the challenge was a true reflection of her style of cooking: simple and fuss-free, yet visually impressive and full of possibilities. The concept of salmon en croûte is straightforward: a skinless filet of salmon, brushed with sauce and wrapped in shortcrust pastry, then baked. But it makes a great impression at the dinner table, because it just looks – and sounds – so sophisticated. “This evening’s menu features salmon en croûte.” See?


This may be the very first time I have no mishaps to report on a challenge. Everything went perfectly. Yes, I could have done a prettier job at folding my pastry around the salmon and brushing it with egg wash for that nice, even, golden colour. And yes, little hearts aren’t exactly seasonal – but I didn’t have any stars or Christmas tree cookie-cutters around. And hearts seemed like a better idea than rabbits or flowers.


But other than that, everything went just fine. I usually have trouble with baked fish: they often come out underdone and I have to pop them back in the oven. This time, however, the salmon was perfectly cooked: look at how nicely it flakes, while still being moist!


I didn’t innovate much with the sauce, because it’s hard to think of a better salmon-compatible combination than cream cheese, dill, and spinach. I used a little light sour cream to thin down the sauce and make it easier to spread (plain yogurt would also have done the trick). I served the dish with a side of sautéed asparagus.


Simone had provided us with an alternative recipe: beef wellington. I would have tried it if I’d had time, but it’s been kind of a rush, this month. Plus, although I love beef in nearly all its forms (tartare, carpaccio, steak, burger, stew), roast beef doesn’t rock my boat quite as much: I’ll choose baked fish over it on most days.

And that’s really all there was to this month’s challenge. The concept of anything “en croûte” is definitely appealing, and I’d love to adapt it with different ingredients and shapes.

Please check here at the Daring Kitchen for the challenge recipe, and here for the other Daring Cooks’ realizations. Thank you Simone, for this fun and delicious challenge!

Friday, December 11, 2009

Dealing with Winter: Beef Stew with Guinness and Leeks


We’ve had our first big snowfall of the season. While I love looking at fresh snow from the comforts of my couch, I have to admit I’m not much of a snow bunny: I don’t practice winter sports (I’m so clumsy, skiing would probably kill me), so to me winter mostly means cold feet, wet hair, and freezing ears.

Well, OK… It also means soft scarves and pretty hats, which I do like – I’m not much of a fashionista, but I do enjoy accessorizing. And winter also means Christmas, which I’m still un-cynical enough to enjoy.

But more important, winter means stews. It’s stew season, baby! Time to whip out the ol’ Dutch oven (or, in my case, painfully lift up the enormous, beautifully heavy monster I keep under the counter) and fill the house with the scents of slow-cooking!


I’ve made this beef stew several times. I saw the recipe by Eric Akis in The Gazette a while back, and have adapted it since then (the original recipe called for much fewer vegetables, among other things). Carrots and leeks are a fixture in stews, but they blend especially well with the Guinness beer, which gives this stew a deep, slightly tangy flavour. You can use any kind of mustard you wish, but I’m having trouble imagining a better fit than whole-grain moutarde à l’ancienne; it also adds to the stew’s visual aspect.

The recipe recommended serving this stew with mashed potatoes, but since I add potatoes to the stew itself, I usually serve it with buttery couscous, for the ultimate comfort meal.

One more thing, though, before moving on to the recipe: what kind of meat to use. I had often been told that stews were a healthy and economic meal, because simmering the meat for hours meant that you could use the toughest, cheapest, leanest cuts of meat available, and still have a tasty dish. So, being both health- and budget-conscious, I used to buy extra-lean beef cubes, which were marked “for stewing.” However, I always found myself having to simmer the meat for much longer than indicated in the recipes, and it was never quite as tender as, say, veal osso bucco, or lamb shanks. But I figured it was because beef was inevitably tougher than other meats.

Then, one day, the butcher at my supermarket saw me browsing the meat aisle and asked me what I was looking for. When I told him I was making beef stew, he immediately steered me away from the extra-lean section. He came from France, and upon learning that I was from Belgium, he confided in me:

“People in North America are so afraid of fat. But you need a little fat in your meat, even for stews. Otherwise, your meat will be dry, there’s no getting around it. You can add all the juices and sauces you want, it’s still going to be dry. You want a nice, marbled cut of meat, like chuck. And don’t buy those pre-cubed packages, because the pieces tend to com from various cuts of meat that’ll cook differently.”


And so I bought a big, fat, marbled piece of chuck, which the butcher kindly cubed for me. And I have never looked back. The improvement was blatant: the meat was much more tender and tasty than the extra-lean beef had ever been, and with less cooking time. Really, there was just no comparison.

But if you still want to cut back on the fat, you can always do this: make the stew a day ahead and refrigerate it. Any excess fat will float up to the surface and congeal, making it easier to remove it. You’ll lose some flavour in the sauce, but your meat will already be nice and tender.


Beef Stew with Guinness and Leeks
Adapted from a recipe by Eric Akis

Serves 8

900g (32 oz) cubed stewing beef, such as chuck
3 tbsp vegetable oil
2 large leeks, white part only
5 carrots
5 celery ribs
5 large potatoes
2 onions
3 garlic cloves
4 tbsp flour
2 tbsp tomato paste
500 ml (2 cups) beef stock
440 ml (2 3/4 cups) Guinness beer
2 tbsp whole-grain Dijon mustard
1 tbsp chopped fresh rosemary
Salt and fresh-ground black pepper

Preheat oven to 160ºC (325ºF).

Slice the leeks lengthwise in two, clean them and cut them cross-wise in 1/2-inch slices. Peel the carrots and cut them into 1/2-inch slices. Peel the potatoes and dice them into 3/4-inch cubes. Slice the celery into 1/2-inch pieces. Slice the onions. Mince the garlic cloves.

Season the beef with salt and pepper. Heat the oil in a Dutch oven over medium-high heat. Brown the meat on all sides, in batches, and set aside in a bowl.

Add the onions, garlic, leeks, celery and carrots to the pot and cook for a few minutes. Stir in the flour and tomato paste and cook for 3 more minutes. Slowly stir in the beef stock, then the beer. Add the potatoes. Stir in the mustard and rosemary. Return the beef to the pot and bring to a simmer. Cover, place the pot in the oven and cook for 90 minutes to 2 hours, until the meat is very tender.

Monday, December 7, 2009

Disaster à la di Stasio - Eggs in Ramekin and Mushroom Cappuccino


Any foodie who lives in Quebec knows about Josée di Stasio. We often turn to her book Pasta Et Cetera when we’re short on ideas to make pasta interesting. Her Italian-inspired recipes are always simple and full of flavour, with lots of useful tips and variation ideas.

This is even truer of her previous book, À la di Stasio, which we purchased a couple of weeks ago. Two whole pages on how to roast specific vegetables may not be of much use to seasoned chefs, but I’m certainly grateful for all that information. The recipes in this book are more diverse and less exclusively Italian, with a few Asian-inspired dishes and a couple of decidedly Northern recipes (duck and turkey tourte, anyone?).


I haven’t had much time to actually do many of the recipes in here, but there was one which I was particularly eager to make: her eggs in ramekin, where the ramekin is a flattened slice of bread lined with ham, buttered and baked in a muffin tin. Ever since I first saw this recipe (and the lovely pictures) over at Coco Bean, I’ve been curious to try it. Admittedly, since Christie and Ian were kind enough to post their adapted recipe, I suppose I could have just tried it then and there, without waiting to buy the actual book – I guess it sort of slipped my mind.

But, after I got the book, I procrastinated no more and made the eggs for Saturday brunch.


They were exquisite! So pretty to look at, and very tasty! It takes a bit longer than scrambled or fried eggs, but it’s still very easy to make, relatively healthy, and the presentation definitely makes an impression on people!

Not to be outdone, Laurent insisted on executing one the book’s recipes himself, the very same day. He opted for this:


You’re probably thinking he chose to make us cappuccinos, to go with that brunch. But no: this is actually mushroom soup, which we had for dinner that night.

“Mushroom cappuccino” had been on our radar for quite some time. We were first introduced to the concept at a potluck party, where a gourmet guest treated us to this lovely surprise. His version was quite different from the one in Josée di Stasio’ s book, consisting of a consommé, rather than a soup. The version we used is generally similar to the one found here, on Josée’s website (translation follows), except that the book recipe called for steamed milk, rather than whipped cream. We also added a sprinkling of Espelette chili pepper.

Laurent insisted on taking charge of supper, so I let him. Everything seemed to be going fine: the ingredients had simmered, and all that was left was to run them through the blender, and make the steamed milk with the espresso machine.

I was reading in the living room, when I heard the blender turn off, and Laurent gasp. It wasn’t a normal gasp. We often express ourselves vocally in the kitchen, whenever things go wrong, spill, or burn. But this sounded particularly drastic. When I asked what was wrong and got no answer, I dropped my book and ran into the kitchen.

The blender was covered in mushroom soup, which was slowly spreading across the counter, while Laurent was staring at it, in shock. It was as if the bottom of the pitcher had detached – which, as it turned out, was exactly what had happened. It had unscrewed at the worst possible time, just as Laurent was about to lift the pitcher from the base.

We stared in silence for a few seconds, then proceeded to doing something which I really shouldn’t be admitting to in public: we scraped the soup from the counter back into the pan and reheated it. Yes, it sounds gross, but… Laurent had spent over an hour working on that soup, in addition to shopping for all the ingredients, it would have broken his heart to throw it away! And honestly, haven’t we all done something similar when we thought no one was watching? Like scarf down the cookie that fell on the floor? Or taste the pastry cream with a finger? Besides, our countertop was clean… sort of.


At any rate, the soup didn’t seem too affected by this ordeal. It tasted delicious, and we will definitely be making it again – hopefully with less trauma. The steamed milk is definitely what makes this soup special. Next time, however, I might try to go with a consommé-type base, rather than a puréed soup, for a smoother, more cappuccino-like texture.

And in case you were worried about our blender… it made it out just fine. Laurent rinsed it and picked soup out of it for 20 minutes, and it’s as good as new.


Mushroom Cappuccino
From À la di Stasio

Serves 4

1 onion, minced
1 leek, white part only, minced
2 tbsp butter
450g (16 oz) mushrooms, sliced
1 small potato, peeled and diced
Salt and pepper, to taste
250 ml (1 cup) heavy cream
1 tbsp fresh thyme (or substitute with 1 tsp dried thyme)
30g (1 oz) dried porcini, ground (optional)
750 ml (3 cups) chicken broth

In a large saucepan, melt the butter over low heat and cook the onion and leek until soft. Add the mushrooms, raise the heat to medium-high and sautée until the vegetables release their liquid and it evaporates. Add the potato, salt, pepper and thyme.

Reserve 1 tbsp of ground porcini, and add the rest to the pan. Add the broth, bring to a boil and simmer half-covered for 15 minutes.

A few minutes before serving, stir in half the cream. Purée the soup with a hand-mixer or a blender, and keep warm.

Whip the remaining cream. Serve the soup in coffee cups, topped with a dollop of whipped cream and sprinkled with ground porcini.

Variation: Substitute half the cream, or all of it, with steamed milk, made with an espresso machine. Substitute the sprinkling of ground porcini with Espelette chili.

Sunday, November 29, 2009

In defense of sandwiches for dinner: BLT and English Roast Beef Sandwich


Last winter term, my Wednesdays were particularly tiring: I had a three-hour seminar in the afternoon, followed one hour later by another seminar of equal length. Now, I know what the “real world” people (i.e. those who have regular jobs) are probably thinking: “Kid, most people work eight hours a day, five days a week. Grow up and quit yer whining.” This would be fair enough, if all graduate seminars could consist in hiding in the back of the room and pretending to pay attention. Unfortunately, my classes counted between 4 and 12 students, and were largely participation-based. In other words, my brain was drained by the end of the day, in a way that a full day of translating PR texts (a job I used to do) never achieved.

My last class ended at 9 pm, which meant that I was also very, very hungry by then. I could have just packed a sandwich and scarfed it down between classes or during break, but I couldn’t bring myself to do it: I love food too much to eat it under time constraint, especially when it comes to dinner. Inevitably, I’ve found myself in situations where breakfast and lunch had to be rushed, but dinner is sacred to me: even when the preparation is quick (because, like everyone, I don’t always have the time to make elaborate suppers), I like to take my time savouring it.

Of course, I probably couldn’t afford to be such a diva if I didn’t have Laurent to help me out. Every Wednesday night, when I finally got home, he would be waiting for me with a hot meal, usually comfort food like pasta or homemade pizza. Every time I walked through the front door and breathed in the scent coming from the kitchen, and saw him waving at me from the stove with a ladle or a spatula in his hand, I felt like the weight of my day was being lifted off me. That moment alone was worth being hungry for a couple of hours.

One evening, near the end of my second class, my stomach was rumbling even more than usual, and I complained out loud about being hungry. A classmate kindly offered me some almonds from her bag, but I thanked her and refused, explaining that my boyfriend was cooking for me that night, and I didn’t want to spoil my appetite.

“You guys still have time to cook?” she marvelled. “My boyfriend and I have stopped trying. We just eat sandwiches for dinner all the time.”

I didn’t think much of it at the time, but lately I’ve grown to realize that having sandwiches for dinner doesn’t have to rhyme with bad eating habits. On the contrary, I’m quite a fan of sandwiches for dinner, these days.


I think it began when I got into bread baking. I started off making flatbreads like focaccia and fougasse, which had a lot of fillings and toppings, and were great on their own. But this was also around the time where I started making soups more often and freezing them; thus, soup and homemade bread eventually became a pretty regular feature on the dinner table, usually accompanied by some light protein, like eggs or a mixed salad.

Eventually, I started making loaves instead of flatbreads. Now, homemade bread is fun to bake and it makes the house smell amazing, but it doesn’t keep all that long, so we had to figure out ways to use it up fairly quickly. And that’s when I started warming up to the idea of having sandwiches for dinner, with a soup or salad.


One of my first loaves was Marcy Goldman's BLT Bread (pictured above), which she claims is the perfect bread for tomato sandwiches. It’s enriched with milk, butter and egg, and is dusted with cornmeal for a crunchy crust. Mine came out looking a little more brioche-like than I would have thought (I added too much butter, perhaps), but it was still excellent for a BLT dinner.


Aah, the BLT… It took me years of living in North America to learn what a BLT is. In Francophone Europe, bacon is not much of a sandwich fixture: we see it in club sandwiches, but that’s about it. It’s a shame, because BLTs may well be one of my favourite North American discoveries (along with baby back ribs, hash browns, and cheesecake): a smidgen of mayonnaise, soft romaine lettuce, ripe tomatoes, über-crispy bacon (the only way I ever eat it), and my personal addition of alfalfa, what’s not to love? It’s not something I would have for lunch, because eating heavier meals during the day makes me want to take a nap, but I love it for dinner.

Another kind of sandwich I can’t have for lunch but will gladly indulge in after 6 pm is the grilled cheese. We do have this in Europe, most famously in the croque-monsieur version: ham and gruyere, sandwiched between two slices of white bread, buttered on the outside and fried in the pan until golden. There is also the croque-madame, which has a fried egg on top. Yum.

A couple of years ago, while I was building up my then-meagre cookbook stack, I discovered the Quebecer collection “Tout Un Plat!”, which consists in a series of books, each one centered on a particular dish or ingredient (pizza, chocolate, garlic, cookies, etc.). This isn’t an original concept by any means, as a lot of publishers now use it, but this was the first one to catch my eye. And one of the first books I bought was the “grilled cheese”-themed one.

A book filled with nothing but grilled cheese sandwich recipes seems a little ridiculous at first. For one thing, who needs a recipe to make grilled cheese? Or any kind of sandwich, for that matter? It’s true that, most of the time, the recipes in this book aren’t necessary; what’s important is the list of ingredients. The value of this book lies in the ideas it offers, in the inspiration it provides. I like to turn to it when I’m looking for a change from ham and gruyere or cheddar, and feel like mixing it up. You’d be surprised how many different kinds of spices and condiments can successfully combine in a simple grilled cheese.


Some of the recipes are indeed quite complicated, and require marinating or pickling things in advance. This is one of the simpler ones: roast beef, blue cheese and watercress. Very British, but cooked panini-style in a sandwich press.

You really don’t need a recipe for this, all the ingredients are in the description (and in the picture). For the cheese, I’ve tried both Bleu Bénédictin and Stilton; I was expecting the latter to be a better fit (since it hails from England), but the Bleu Bénédictin came out on top. For the bread, I used a (storebought) walnut loaf in this picture, which added a very nice flavour. I also once tried it on black olive fougasse, expecting the olives to be too strong alongside the blue cheese – but in fact, they complemented each other well. I still can’t decide which combination I prefer.

This seems to be a long post for something as basic as sandwiches, but I felt like reminding myself that good food, even for dinner, doesn’t have to involve complicated technique and preparation: just good ingredients, and the time to savour it.

Friday, November 27, 2009

Daring Bakers' November Challenge: Cannoli

The November 2009 Daring Bakers Challenge was chosen and hosted by Lisa Michele of Parsley, Sage, Desserts and Line Drives. She chose the Italian Pastry, Cannolo (Cannoli is plural), using the cookbooks Lidia’s Italian-American Kitchen by Lidia Matticchio Bastianich and The Sopranos Family Cookbook by Allen Rucker; recipes by Michelle Scicolone, as ingredient/direction guides. She added her own modifications/changes, so the recipe is not 100% verbatim from either book.

I was so happy to find that our hostess for this month’s Daring Bakers’ challenge was none other than the delightful Lisa Michele! Her blog is one of my favourites, because of her sense of humour, her mind-blowing pictures, and her creativity. And, because of that creativity, I’m not surprised that she pushed the limits of the Daring Bakers by making us turn away from the oven and toward the stovetop: this month was all about deep-frying!


Cannoli are one of those many desserts that I’ve always been aware of, but don’t gravitate toward very often. The last time I had them was at some or other celebration a few months ago (probably a birthday), when my father-in-law brought some from Boulangerie Roma, an Italian bakery here in Montreal. On that occasion, he mentioned that he used to make cannoli himself, once or twice a year, but had fallen out of the habit.

That’s right. My father-in-law, the Italian Super-Chef who lives three blocks away from my place and owns every single kitchen gadget imaginable, is an old hand at making cannoli.

You’ve already figured out that I didn’t do this challenge by myself, haven’t you? And if you remember the last time my father-in-law helped me with a challenge, you’ve probably guessed that I didn’t do a lot of work at all, right? Congratulations, you win a prize!

Initially, I only wanted to borrow his cannoli tubes, which were stowed away in the darkest corner of a bottom kitchen drawer. But he insisted that we make them together and use his kitchen. And since I’m not all that comfortable with deep-frying (I can do it, but I make little girly shrieks throughout the whole process), I was pretty grateful to have an expert around.


So, first “cheat:” I had a lot of help. Second “cheat:” I didn’t really use the recipe we were given (sorry, Lisa Michele!). My father-in-law had a favourite recipe on his bookshelf, and since he knew what he was doing and I clearly didn’t, we used his method. Actually, it turned out to be generally similar to the challenge recipe, except that we used butter instead of oil, and substituted ground espresso for cinnamon (because no one in the family is that big on cinnamon). Third “cheat:” we didn’t let the dough rest, because we were short on time. It didn’t seem to affect the result, though.


This was one of the very few times I’ve ever used a food processor to make dough. I can’t explain why, but I’m very reluctant to use the food processor for anything. I think it has to do with having to take it apart and clean it afterwards. I know how much easier it makes a lot of things, but my first instinct is always to reach for the bowl and wooden spoon. But since this wasn’t my kitchen, I followed suit this time.


Now, normally I would have rolled out the dough with a rolling pin, but… my father-in-law has a pasta-making machine! Of course he does, didn’t I say he has everything? I had never even seen one of these up-close (like the cannoli tubes, the machine was stored away – just because my father-in-law has everything doesn’t mean he uses all of it), and had no idea how it worked. It turned out to be pretty simple, really; maybe a little more time-consuming than rolling by hand, but definitely less strenuous.


The only thing we didn’t have were large round cookie-cutters, so instead we just cut the dough into large rectangles, which we rolled around the cannoli tubes and sealed with egg white. Then, it was deep-frying time!


The first couple of batches came out a little too browned, and without the pretty blisters and puffs one associates with cannoli. But by reducing the oil temperature (which we hadn’t really monitored), we were able to get a beautiful result for the last batch.


I took the cannoli shells home (both puffy and non-puffy), and finally did something on my own: the filling. OK fine, Laurent helped me, but at least I was in control for this part of the challenge. I didn’t want to use ricotta, because no one really likes ricotta around here. In fact, cannoli are the only preparation in which we sort-of-kind-of enjoy ricotta – but why not use something we enjoy in all its forms? Enter: mascarpone.

Mascarpone by itself is too thick and heavy to use as a filling (in my opinion), so we beat it and folded in some sweetened whipped cream. And I had some dark chocolate ganache leftover from a previous project, so I reheated it and incorporated it. The result was a light, silky, luscious concoction that lay somewhere between a mousse and a cream. I am definitely making this type of filling again: I can totally see it in an éclair.


I filled the cannoli shells with a star-tipped pastry bag (I am notoriously bad at piping, but even I could handle this), garnished with crushed pistachios, and sprinkled with confectioner’s sugar. It was finally time to dig in. And to describe the result, I think I’m going to have to use an adjective I rarely utter: heavenly.

The contrast of textures, between the crispy fried shell and the smooth, airy filling, was to die for. I’m also glad we used a recipe which, like the one Lisa Michele gave us, barely added any sugar to the batter (unlike others, which can add up to a cup of the stuff): the neutral shell and the sweet cream played off each other perfectly; even the overcooked shells had a note of bitterness that fit well.


So, it looks like I have taken another step towards becoming an official part of "La Famiglia." I mean, if I can make cannoli (or at least, help make them), it means I’m getting closer to being a Perfect Italian Bride, even if I’m not Italian by birth (no, Laurent hasn’t proposed to me, but that’s just a detail). Pretty soon, I’ll be making my own pasta, growing and canning my own tomatoes, and going on vendettas against those damned Portuguese bakeries.

Long live my (God)father-in-law!

Hehe… I swore to myself I wouldn’t make a reference to The Godfather, because if you’re going through the DB blogroll, I’m sure you’ve read the line “Leave the gun, take the cannoli” at least fifty times – but I couldn’t help myself!

Speaking of the DB blogroll, be sure to go see what everyone else has fried up this month! If you’re willing to face up to the deep-frying pan, go check out the challenge recipe at the Daring Kitchen. And in closing, a huge thanks to Lisa Michele for this awesome challenge!

Sunday, November 22, 2009

Macaron Mania - Green Tea, Chocolate, and Apricot Macarons

I waltzed into the conference room an hour early. I smiled at the conference’s organizer, who nodded approvingly as I made my way to the table at the back of the room, where coffee cups and plates were already laid out. I set down the bag I had carefully carried all the way from home, took out three large Tupperware containers, and began to gingerly transfer its contents onto a platter.

The platter began to fill with colourful little macarons. A fellow graduate student walked up to me and looked on.

“You didn’t bake for us today?” she asked. “I thought for sure you would make us one of those specialties of yours.”

“I did.” I replied with a grin. “I made these.”

“… Wait, you made these?!”

I’ve baked for Laurent. I’ve baked for my parents, my in-laws, and their friends. I’ve baked for my own friends. But I’ve rarely baked for my university colleagues, and never for events. But last week, the university reading group I’m part of was organizing a conference, and I had been asked to bake something sweet for the lunch and coffee breaks. Given how often I talk about food, word had gotten around that I like to cook and bake.


Macarons seemed like the obvious choice. They’re fancy, trendy, and of all the treats I have ever shared, they have earned me praise most consistently. On the other hand, I only ever publicly share the ones that come out from the oven looking pretty: the rest are discreetly stowed away in the fridge and nibbled in private, in front of the TV.

The consensus on macarons is that they are unstable, unpredictable, and capricious. In other word, they are total prima donnas. Until recently, I’ve had two kinds of outcomes with these cookies: batches where every single shell was misshapen and cracked, and batches where about half the shells looked smooth and round, while the other half was an irregular bust. In light of this, offering to make macarons for a public event seemed like a terrible idea.

But just before this, something had happened that made me think I could pull this off. This “something” was a perfect batch. A 100% perfect batch.

A couple of weeks ago, still fresh from last month’s Daring Baker’s challenge, I had decided to tackle the green tea macarons again. You’ll recall that my attempt at these for the challenge hadn’t turned out well at all as far as texture and looks went, but I had really liked the flavour. So I got to work.

However, a friend of mine popped by while I was whisking and folding. We hadn’t seen each other in a long time, and had a lot to talk about. As a result, I lost track of time and ended up leaving my macarons out to dry for much longer than usual. A thick crust had formed on the surface, much thicker than I was used to.

Feeling somewhat worried, I popped the first baking sheet into the oven. Nine minutes later, I was looking at rows of perfectly smooth, pale green shells, with lovely little feet. My negligence had led to a discovery: all this time, I simply hadn’t been letting my macarons dry for long enough.

My confidence was still riding on this success when I was asked to bake for the conference. And so I decided to make chocolate macarons – because everyone loves chocolate.

Unfortunately, I had forgotten that chocolate macarons have a reputation for being the absolute most difficult of all macarons. This has to do with the inclusion of cocoa in the batter: not only does cocoa have to be very carefully sifted, but it can also release oil during the baking process, which results in loss of crispiness. One way to prevent this is to roast the cocoa in the oven. I was aware of all this, but laziness got the best of me (I get lazy at the worst possible times): I didn’t roast the cocoa, and I did a half-assed job of sifting it. The result: lumpy, overly chewy macarons that I didn’t even bother photographing.

Luckily, my confidence wasn’t so high that I hadn’t given myself room for failure: I still had a couple of days before the conference. This gave me time to make two other batches, this time without any flavouring. I made a 
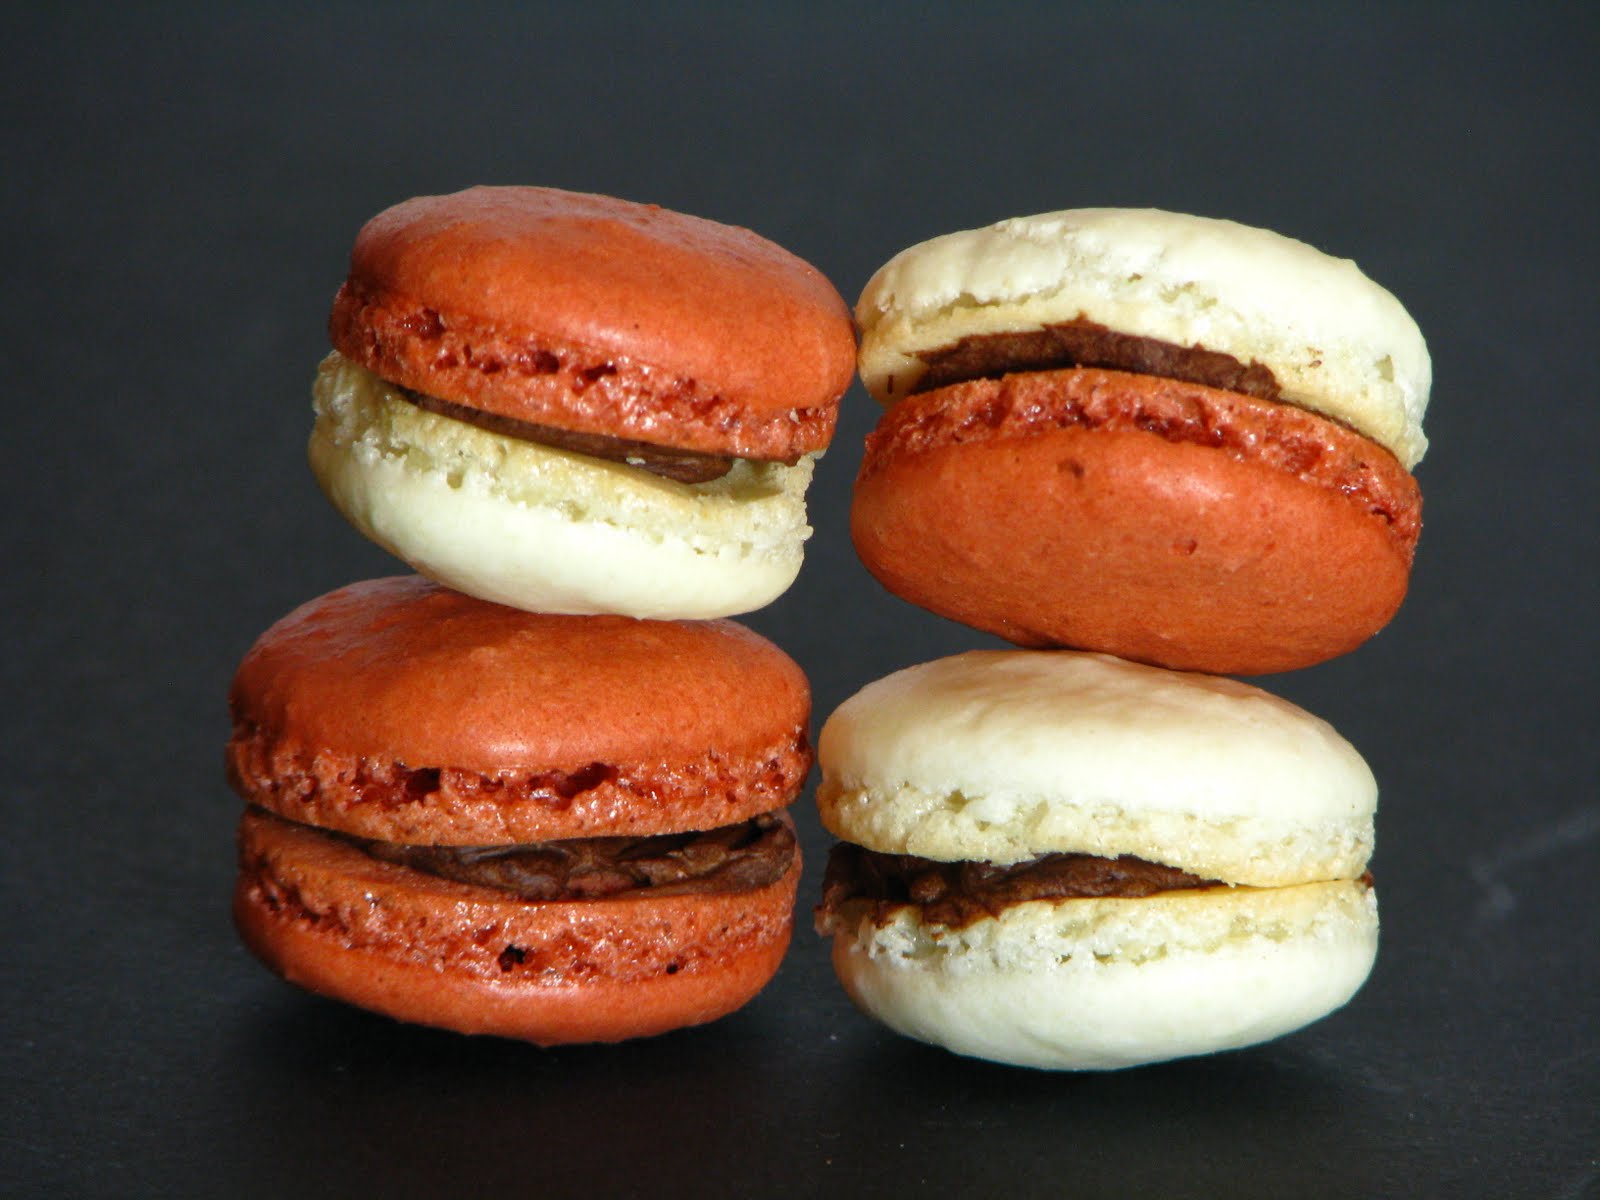
plain white batch, and a rose-coloured one (which was initially supposed to be brown, but I went a little overboard with the red colouring). Then I sandwiched them with a simple dark chocolate ganache, and packed them for the conference.

I was one of the speakers at the conference, and gave a presentation related to my PhD research. But to be honest, I got way more comments on my macarons than on my presentation! Most people thought they were storebought. One of our colleagues from France even compared them to the macarons in French pâtisseries – a hell of a compliment, from one who hails from the Land of Macarons!

Barely a week later, I had to make another batch: a friend of Laurent’s was defending his thesis, and they wanted to celebrate afterwards. Being short on both time and chocolate, I opted for an apricot filling. Fruity fillings are always a convenient solution for me, mostly because I rarely (if ever) make my own jam. I’ve done it before, so I know how simple it is – I just don’t enjoy doing it. Whenever I have fresh fruit, I’d rather just eat them as they are, or incorporate them in a dessert, than stew them in sugar. This time, to add a personal touch, I added some cardamom and powdered ginger to the apricot jam, which added a nice kick.

I’ll probably have to make another batch next week, for a meeting with my thesis advisor (my boss, basically): he has recently discovered that I bake, and I fear he will be quite angry if I don’t bring him something very soon… Oh well, any excuse to make macarons is fine by me!


So, it looks like macaron production has shifted into high gear. Having made so many batches in a row, I am much less nervous about making them than I used to be: I no longer stare through the oven glass while they’re baking, anxiously watching for the dreaded cracks or holes. And I know all the measurements for the basic recipe by heart.

However, don’t think my ego will be getting out of hand any time soon. In fact, Laurent has made sure of that, by buying me Pierre Hermé’s wonderful book Macaron. This beauty was recently reprinted. We saw stacks of it in Belgium, last month, but since it’s a heavy hardcover and we were already bringing home kilos of chocolate, I reluctantly put it back on the bookshelf. However, it’s finally made its way here! I have to say, just flipping through this book makes me feel like a total beginner – as I should. Every recipe is a work of art: such creative flavours, fillings and concepts! And I can’t wait to try as many as possible!


Below is the standard recipe I’ve been using for macarons. I’ve posted it before, but it’s a little more precise this time. However, I have always used weights, so my measured quantities may not be as reliable. Also, I am aware that it is recommended to age your egg whites by separating them at least a day ahead, but so far I have always omitted this step, without too dire consequences.
The apricot and chocolate fillings are here as well. You can find the green tea ganache recipe over here.


Basic Macaron Recipe

Yields about 50 small macarons (100 individual shells)

110g (3.8 oz, 3/4 cup) almond meal
225g (7.9 oz, 1 5/8 cup) icing sugar
4 egg whites, room temperature
50g (2.75 oz, 1/4 cup) granulated sugar
Food colouring (preferably powdered or gel) (optional)

Line four baking sheets with parchment paper. In a medium bowl, combine the almond meal and icing sugar, then sift them together.

In a large bowl, whisk the egg whites into soft peaks. Gradually add the granulated sugar (about one third at a time), and continue whisking until stiff peaks form. At the end of the process, you should be able to turn your bowl upside down, without having the meringue fall out.

Sprinkle about a third of the sifted almond-sugar mixture over the meringue. Using a flexible spatula, carefully fold the dry ingredients into the meringue, making vertical circular motions. Avoid crushing the egg whites. Remember to scrape the bottom and sides of the bowl from time to time. When the dry ingredients are more or less incorporated (but not completely), add another third of the almond-sugar mixture. Continue until all the dry ingredients have been folded in.

Keep folding until you end up with a smooth, shiny batter, that ribbons off your spatula, but is not too liquid. You want to be able to pipe shells that will not spread too much on your baking sheet. On the other hand, you want the batter to be just liquid enough that any imperfections you wind up with while piping your shells will eventually settle down and vanish.

If you are using food colouring: If using powdered colouring, add it towards the end of the folding process. If you are using gel (or liquid), wait until you have folded in all the dry ingredients, but your batter is still rather gritty, and transfer a couple of spoonfuls of batter into a small bowl. Add the colouring to the small bowl and mix. Return the coloured batter to the large bowl and continue folding. By the time you are finished, the colour should be uniform.

Spoon the batter in a pastry bag fitted with a 1 cm (1/2 inch) round tip, and pipe domes of around 3 cm (1 1/2 inch) in diameter on the prepared baking sheets. Alternately, you can simply use a small spoon: the batter should be liquid enough to slowly drop from the spoon onto the sheet (you can also use a second spoon to gently scrape it off). Try to pipe the domes in staggered rows, and remember to leave enough space for spreading.

When you have filled a baking sheet, bang it firmly on the counter a few times, so as to remove any air bubbles. However, don’t overdo it, or your batter will spread too much, and your shells will be too thin, which increases the risk of crackling.

Let the domes rest at room temperature for about 45 minutes, or as long as it takes for a solid crust to form on the surface (this depends on how humid your kitchen is). You need to be able to touch the domes without having them stick to your finger. In the meantime, preheat your oven to 150°C (300°F).

Bake your macarons, one sheet at a time, for 9-11 minutes, rotating the sheet halfway. Do not let them brown too much on the bottom. When done, immediately remove the parchment paper from the baking sheet (and the macarons with it), and let cool completely.

If you want to sandwich your macarons with a filling, you may do so as soon as they are cool. You can pipe your filling onto the macaron base, or gently spread it (depending on the consistence of your filling). It is recommended to wait until the next day to serve the macarons, as they will be chewier the next day, having absorbed moisture from the filling. Store in the refrigerator, in an airtight container.


Basic Chocolate Ganache

Yields enough to generously garnish 50 macarons

300g (10.5 oz) dark chocolate, chopped
200ml (4/5 cup) heavy cream

Melt the chocolate in a double boiler. Bring the cream to a boil, remove chocolate from heat and pour the cream over the chocolate. Whisk until the mixture is smooth and uniform. Let cool at room temperature, then refrigerate until the ganache is the right consistency (in this case, easily spreadable, but not too liquid).

Garnishing the macarons:
When ready, pipe or gently spread the ganache over the center of a macaron shell, allowing room for spreading, then top with another shell and press gently.

NOTE: If you are using very dark chocolate (chocolate that has a high percentage of cocoa), you may find that your ganache appears a little gritty, and that oil has separated and formed a layer on top of the mixture. You can fix this by whisking in some extra cream (preferably heated, although I’ve made this work with cold cream), one spoonful at a time, until the ganache pulls together again.


Spicy Apricot Filling (Lazy Version)

Yields enough to garnish 50 macarons

125ml (1/2 cup) smooth apricot jam
1 tsp ground cardamom
1/2 tsp powdered ginger

Combine all the ingredients.

Garnishing the macarons:
Spread or spoon the mixture across the center of a macaron shell, allowing room for spreading, then top with another shell and press gently.

Saturday, November 14, 2009

Daring Cooks' November Challenge - Sushi

The November 2009 Daring Cooks challenge was brought to you by Audax of Audax Artifex and Rose of The Bite Me Kitchen. They chose sushi as the challenge.

How could I not fall in love with this month’s Daring Cooks challenge? I may not have mentioned it here before, but I have a deep interest in Japanese culture. Part of this interest is linked to my PhD research, which deals with manga, anime and Japanese video games. That’s right, I have the best job in the world!

Now, given my love of food (which should be obvious by now), and my love of manga, it’s not hard to see why culinary manga and I are a match made in heaven. I only got into them recently, and they are a dangerous, dangerous combination for me: I have to restrain myself from bingeing on them and reading them all in a single afternoon!

One of the best reads I’ve come across is the Oishinbo series. I’ll write a separate post about it later, but basically it’s about a team of food journalists who go all over Japan, trying and comparing all the specialties and delicacies – come to think about it, maybe they have the best job in the world! But the great thing about Oishinbo is that it includes tons of detailed information about every aspect of Japanese cuisine – including about sushi and sashimi.

Also, a book called The Story of Sushi (by Trevor Corson) had been sitting on my shelf for months, and I decided to finally read it, in preparation for this challenge. If anyone reading this is interested in sushi (how it was born, how it evolved, how it is made today, and what the industry is like), I highly recommend this book. It has a few narrative and stylistic weaknesses, but if it’s sheer information you’re looking for, you’ll find it there. I came out of that book feeling totally ready to take on this challenge.


Now, Audax and Rose, our hosts this month, made a point of letting us know that sushi does not have to include raw fish. They gave us a lot of freedom regarding the ingredients we could use, as well as many suggestions. However, my love of raw fish (and meat, for that matter) knows no bounds, and I was prepared to make my sushi as traditional and conservative as possible. It would have been fun to make a funky, weird variation, but in this case I felt I would benefit more from doing things simply, but well. Plus, after all that being reminded, through my readings, that Japanese cuisine is all about delicate, clean flavours and minimalism, I wasn’t feeling up for weird experiments.

I’d made sushi once before, but had been discouraged from making it again, because it had been quite a bit of trouble, and even though we had kept the quantities and variety to a minimum, we had ended up with way more food than we could possibly eat – and sushi, obviously, doesn’t keep. But, jolted by my readings, I was ready to give it another try.

It’s fairly easy to find the basic ingredients for making sushi in Montreal. Every supermarket in my neighbourhood has a small “sushi section,” with round rice, nori (seaweed) sheets, wasabi, and bamboo mats for rolling. However, it’s not quite as easy to find ingredients for other Japanese dishes. Our Chinatown has pretty much everything you need for Vietnamese and Chinese cooking, but not Japanese: would you believe I’ve even had a hard time finding miso? Fortunately, the other days, Laurent stumbled on a Japanese market fairly close by, where he was able to find pretty much everything I had been looking for: dried bonito, kombu (seaweed), different types of miso, and other things… Expect more Japanese recipes here in the future!

Furthermore, when learning that I was planning on making sushi, my mother told me about a Japanese store in Westmount, where they sell hard-to-find Japanese items, from food to utensils. The same day, as fellow Montrealer and food blogger Judy (from Culinary Escapade) confirmed this, and also informed me that this place sells sushi-grade fresh fish. Whenever I plan to eat raw fish, I usually just go to my nearby supermarket and trust the fishmonger; but sushi is definitely a case where it is worth going the extra mile – literally. And that’s how, on morning of the day I was planning on doing this challenge, I found myself going to Miyamoto Foods.

My sources weren’t kidding: this place has a lot of unique stuff. Most of it is a little pricey, to be sure, but I guess that is to be expected. I was in a rush, so I didn’t take the time to browse as I normally do, and just grabbed all the stuff I needed for the challenge. I did look longingly at a gorgeous sashimi knife, as I have been realizing that my life would be so much easier if I invested in some good, sharp blades – but this wasn’t an investment I was willing to make on the spot. I will definitely be coming back to this place, though.

Miyamoto Foods get their supply of fresh fish on Thursdays, and I got there on a Sunday, which meant that there wasn’t much left. But I was lucky enough to find an absolutely gorgeous piece of tuna. I can’t afford fresh tuna often, but this was definitely the time to splurge a little. I usually have a hard time cutting raw fish with my dull kitchen knives, but this one was a dream to slice. And it didn’t smell fishy at all.

OK, enough advertising for books and stores: let’s get to the actual challenge, shall we? The first, and arguably most important part, was making proper sushi rice. This meant rinsing, draining, and soaking the rice, before cooking it (with optional kombu seaweed and sake), seasoning it with a vinegar concoction, and fanning it until cool. And, obviously, no crushing or smushing the rice at any time. It sounds like a lot of work for plain old rice, but it’s definitely worth it: the result had a fresh, clean taste, and a texture that was just sticky enough. By the way, here’s a little trick to cool the rice: if you can, use a small electric fan – or, do what I did (thanks to Laurent’s brilliant idea), and use a hair dryer with a “cool” setting (obviously, do not use the regular, warm setting).

So, I succeeded in making good rice, but that’s just about the only part I was really satisfied with. My actual sushi making skills need a lot of work.

We were challenged to make three kinds of sushi. The first was the Spiral Roll. Ideally, your fillings should form a spiral pattern inside your roll. As you can see, mine (crabstick, tuna, scallion, salmon, and cucumber) sort of got squeezed together, and the pattern isn’t all that clear.


Next were nigiri, which are not rolls, but clumps of rice topped with fish (or anything else). Mine certainly looked a lot better than my Spiral Rolls, but I wasn’t completely happy with them, either. As I recently learnt from The Story of Sushi, a good nigiri should not be too tightly packed: the rice clump should hold together, but easily disintegrate in your mouth. I tried my best, but the nigiri were still too heavy for my taste. Nonetheless, this was my favourite sushi of the bunch, because it really allowed us to savour that amazing tuna. The salmon, which I had bought at a regular store, was chewier than the tuna, but still very fresh and tasty.


Finally, there was the Dragon Roll (or Caterpillar Roll). This is an inside-out roll (with the rice on the outside), topped with avocado and decorated to look like a dragon or caterpillar. As you can see, mine doesn’t quite look like either.


The thing is, I did this challenge under more stress than I would have liked. Knowing that making sushi usually yields a lot of food, we had invited Laurent’s parents over to share the meal. But since sushi can’t be shaped too far in advance (otherwise the nori sheets absorb too much moisture), I had to make it on the spot, with everybody waiting. Our guests were as nice and accommodating as could be, but I just can’t cook well under pressure, especially when the preparation requires precise, delicate gestures – like rolling sushi. I got all fidgety and just made a mess. And I didn’t take nearly as many pictures as I normally do, because I didn’t want to keep everyone waiting too long.

However, I did give the Dragon Roll another shot – after everyone had left. This time, I topped it with sesame seeds and smoked salmon, with a fresh salmon and cucumber filling, and took the time to decorate it. It was better, but you’ll notice I took the picture without cutting it. That’s because my knife completely destroyed it. Seriously, I’m asking for knives for Christmas. However, I have to day: sesame seeds + smoked salmon = yummy.


OK, so I’m not quite the sushi chef yet. But I was very happy to reconnect with sushi and with Japanese cuisine in general. So I’m thinking of this as a long-term, ongoing challenge, with this month being merely the first step. In fact, I think I’ll be paying Miyamoto Foods another visit very soon.

Check here for the original (very detailed) instructions, to make sushi of your own. And don’t forget to check the Daring Cooks Blogroll! A huge thanks to Audax and Rose for this great challenge!

Monday, November 9, 2009

Late in the trend - Butternut Squash Soup


Halloween has come and gone, and I have nothing to show for it.

It seems like every food blogger out there was doing a pumpkin series. Except me. Why? To tell you the truth, I have never used pumpkin in anything. Ever.

I’m not sure why. When I was growing up in New York, there was pumpkin pie everywhere during the holiday season, but I was never a fan. Once, when I was five, my kindergarten class took a trip to a pumpkin farm just before Halloween. We were allowed to pick one pumpkin each from the patch and bring it home. I chose the biggest one I could find, so huge I could barely wrap my arms around it and carry it back to the schoolbus. My mom turned it into soup – soup that lasted for days and days. By the end, I was sick of pumpkin soup.

So, no pumpkin pie, and no pumpkin soup. And it never occurred to me that pumpkin could be used in any other way. Until I started foodblogging and discovered the wonderful preparations everyone came up with this month. Pumpkin bread, pumpkin doughnuts, pumpkin macarons, pumpkin shortbread, pumpkin cupcakes – and yes, soup and pie, too. Seeing so many people turn to pumpkin made me think that maybe it was time I revised my opinion on the Big Orange Guy.

But time got away from me, and before you knew it, Christmas decorations were being put up at the drugstore. Phooey.

So, still no pumpkin-related experimenting. However, I did get around to trying out another vegetable (technically a fruit) that I’ve been dancing around for a while now: the butternut squash.


I know. Everyone has cooked something with butternut squash at least once in their lives. Except me. I just seem to have something against cucurbitaceae. I’ve avoided pumpkin and squash and, while I do like melons, I rarely go out of my way to buy them. Cucumbers are the exception: I could eat cucumbers every day.

Honestly, the only time I ever bought a butternut squash was years ago, when I was an undergrad. My roommate and I were having a Halloween party, and I had bought some pumpkins to decorate – and also a butternut squash. I didn’t even know what it was called back then, I just thought it had a funny shape.

And then I tried to carve it.

How was I supposed to know a butternut squash doesn’t have the same structure as a pumpkin? I ended up with a sprained wrist, and a strong dislike of “whatever the hell that weird, pear-shaped vegetable was.”

But time has passed, and the proliferation of butternut squash recipes piqued my curiosity. So, a couple of weeks ago, I decided to try out this simple soup recipe from Christine Cushing. It was a bit rough getting the hang of peeling the squash, and I half-sprained my wrist again – but it was worth it this time.


It was delicious! I often make soups, whenever I have extra vegetables lying around, but this one was a real hit. I made it again barely a week later, and froze the (massive) leftovers for a rainy day. It has such a wonderful flavour! Laurent and I have decided that the butternut squash is a keeper.

I ended up tweaking the original recipe, namely omitting the pear C.C. puts in: while it certainly sounded good, I found it didn’t add much, and actually subdued the flavour of the squash. However, the inclusion of toasted pine nuts was definitely a plus.


Butternut Squash Soup
Slightly adapted from Christine Cushing

Serves 8-10

30 g (2 tbsp) butter
1 leek, white part only, chopped
2 medium carrots, peeled and chopped
1 onion, chopped
2 celery nibs, chopped
1 large butternut squash, or two small ones, peeled, seeded and chopped
1 1/2-1 3/4 liters (6-7 cups) chicken or vegetable broth
2 bay leaves
1/4 tsp nutmeg
Salt and pepper
1/2 cup pine nuts

Melt the butter in a large pot, over medium heat. Add the onion, leek, carrots and celery, salt lightly, and sauté until they begin to soften.

Add the stock, bay leaves and nutmeg, bring to a boil and simmer until the vegetables are very soft, almost done (about 15 minutes). Add the squash and continue simmering until tender (about 5-10 minutes).

Meanwhile, toast the pine nuts. Put them in a skillet over high heat, stirring constantly, until they begin to brown. Do not let them burn. When ready, immediately transfer the nuts to a bowl or plate, and let cool.

When the vegetables are done, remove the bay leaves. Purée the soup in a blender, or with a hand mixer. Reheat the soup and salt to taste. Divide into bowls, decorate with a few toasted pine nuts, sprinkle some freshly cracked pepper and serve immediately.

Monday, November 2, 2009

Autumn in Europe - Belgium


OK, time to continue with my vacation tales – because this time, it’s food-related!

Last month, after visiting Croatia, we drove all the way to Belgium. I was born there, and most of my father’s family lives in that country. Laurent is also half-Belgian, on his mother’s side, and he still has relatives there as well. Before you ask: no, I did not begin dating Laurent because he is Belgian like me. If anything, I would have preferred to end up with someone from a completely different part of the world! Oh well, love works in mysterious ways. At least he’s half-Italian…

The roadtrip took two days. My parents often make this journey, and they usually stop in the same town: Höchstadt, near Nuremberg. They know a comfortable hotel there, and best of all, there’s a good Vietnamese restaurant right across the street, even though the town is quite small. The owner is a first-generation Vietnamese immigrant, like my mother. It’s quite unsettling (and a little surreal) to listen to two women, who don’t know each other that well, chatting away in Vietnamese in the middle of a tiny German town…

Incidentally, I impressed the owner with my tolerance for spicy food. After warning me about the sweet-and-sour soup, and seeing me scarf it down without a hitch, she gave me a nod of respect and asked me if I wanted her to make my main dish extra-hot. I guess I have a little bit of Vietnam in me after all… Although I have to admit, the meal brought tears to my eyes – in a good way.

Bruges

We only stayed a week in Belgium, and spent most of it with family. Even though it’s always good to see everyone, I’m also often a little overwhelmed when we visit the homeland, because I am not used to having so many relatives so close by – after all, I’ve spent most of my life at least 6,000 km away from them! But as I’ve grown older, and my teen rebellion finally faded away, I’ve learnt to appreciate the fact that I have family at all, and coming home isn’t as stressful as it used to be.

The good part about living abroad is that you get to be a tourist in your own country – but at the same time, you aren’t as lost and clueless as you are when you are discovering a new region. We visited Bruges, which I always enjoy seeing again: the canals, the pretty cobbled streets, the typical “stair-shaped” roofs…

Canal in Bruges

We also briefly went to Ostend, my father’s hometown, on the coast. I always knew the North Sea was grey and bleak, but after gazing upon the Adriatic Sea mere days before, the contrast was stark. Still, I had some good summers on that beach, with my cousins, many years ago.

Beach in Ostend

And, of course, we spent a few days in Brussels. Although many neighbourhoods in Brussels are quite dreary, the heart of the old town, with the Grand-Place, remains rather stunning. We even had a spot of sunshine, for pictures

Grand' Place in Brussels

We passed some familiar landmarks, such as this statue of Everard t’Serclaes, whose arm you have to stroke for good luck (though most people just rubbed the entire statue, to make sure they got enough luck).

Everard t'Serclaes

And of course, we passed by the Manneken Pis (“little boy peeing”), that ever-famous, tiny little statue. There are many stories about the inspiration behind this quaint landmark. Until recently, I was only familiar with the version according to which he saved a city by peeing on the lit fuse of a bomb, but apparently, there are other explanations. This little guy is a cliché by now, but I hadn’t seen him in a while. These days, he’s so popular that the city has taken to dressing him up everyday. On that day, he was wearing the Royal Military School uniform.

Manneken Pis

And right across from the Manneken was a larger-than-life reproduction, made entirely out of chocolate – courtesy of Leonidas chocolates!


Which brings us to the food. I’m not especially patriotic, but I have to say: Belgian cuisine is damn good.

I had a whole list of things I needed to eat before leaving. The first was crevettes grises, which translates as “grey shrimp,” but is apparently known as “sand shrimp,” “brown shrimp” or, more scientifically, “crangon crangon.” They are tiny little shrimp which are only found in the North Sea. And they are delicious. They have a strong, salty flavour that has almost nothing in common with the mild taste of regular shrimp. They can be eaten in a sandwich, or in a salad. A typical Belgian preparation is tomate-crevette, where a tomato is hollowed out, filled with shrimp and mayonnaise, and served on a bed of lettuce. For our first Belgian meal, we made a kind of deconstructed version of this dish (see below). But we had these shrimp many more times before leaving.


Also on my list were mussels. I have to say, Montreal does have some good places to eat mussels, so I don’t miss this dish quite as much as I miss the shrimp. Still, it’s a Belgian classic that I couldn’t pass up. There are infinite variations and recipes, with added cream, tomatoes, or exotic spices, but I personally tend to prefer the most basic version, à la marinière: just celery, onions, a lot of salt and pepper, and an optional touch of white wine. And, of course, a side of fries, which are nearly always perfect (and served with mayonnaise – ketchup is a sin in Belgium).

I had sole meunière, as well. It’s the easiest dish to prepare, really: just dredge your fish in flour and cook it in loads of butter, adding a squirt of lemon. But we don’t have that type of large sole around here: we have limande-sole, a.k.a. lemon sole, its smaller, much cheaper, much flakier cousin.

I also had a waffle, of course. Not from anywhere fancy, just off the street from a random stand. But it was fresh off the iron, nice and hot, and full of bits of caramelized sugar. I think I know why Belgians eat their waffles that way: it’s a real pick-me-up on a cold, rainy day.

And I had filet américain, which is like steak tartare, but automatically seasoned with a bit of mayo and some spices, which extra seasonings on the side. It was good (especially the French fries), but not necessarily better than what I make myself at home.

And finally, I just had to have a Dame Blanche. This dessert, whose name means “white lady” in French, is basically just a couple of scoops of vanilla ice cream, topped with hot chocolate fudge sauce and an optional side of whipped cream. Now, I have a confession to make: I am not a vanilla ice cream fan. Never have been. And I’m not even that crazy about whipped cream. But for some reason, the Dame Blanche will make me swoon every time. Something about the way the hot, thick fudge melts the vanilla ice cream just makes this dessert absolutely irresistible to me. I will choose it over profiteroles, tarte tatin, or mousse au chocolat any time!

Speaking of chocolate, I really wonder how all the chocolate stores manage to make a profit: there are so many of them! Of course, we brought home loads and loads of chocolate, especially Godiva and Corné Port Royal. Yes, I know, we have Godiva here in Montreal, but my mother keeps telling me it’s not the same: the Godiva here is manufactured in North America, and tastes much sweeter and less subtle. Mind you, I have to confess I have never bothered to put this claim to the test. I should get around to that. After all, who am I to spit on overly sweet chocolate?


I definitely miss Belgian food when I’m here in Montreal. The chocolate, the seafood, the crispy fries… And more accessible, everyday things, like the dairy section of the average supermarket: Belgium (like France, and presumably other nearby countries) simply has an incredible variety of yogurts and fromage blanc.

And there’s also the charcuterie, or cold cuts and other meat-based products. Here in Montreal, Laurent and I once spent hours going from store to store, looking for lardons, little pieces of cooked diced bacon for adding to salads and quiches. In Belgium, the first supermarket we walked into had at least 10 varieties of lardons. We stared for a full two minutes.

And then, of course, there’s the cheese

Nevertheless. Montreal has its gastronomic perks, and I don’t take them for granted. We don’t have the same kinds of seafood as Europe, but we have our own – including really affordable salmon. And we have our own really tasty cheeses. And maple syrup! Not to mention unique game dishes, and a wide array of vegetables. Frankly, I can’t complain: I almost never feel constricted by a lack of ingredients around here. Provided I don’t ask for crevettes grises, of course…

So, that’s the wrap-up on our late-summer / early fall holiday. We’ll return with your regular recipes shortly.