Showing posts with label cakes. Show all posts

Tuesday, February 28, 2012

Daring Bakers' February Challenge - Quick breads

The Daring Bakers’ February 2012 host was – Lis! Lis stepped in last minute and challenged us to create a quick bread we could call our own. She supplied us with a base recipe and shared some recipes she loves from various websites and encouraged us to build upon them and create new flavor profiles.

I’ve been feeling under the weather these past couple of weeks. Nothing serious at all, but one of the consequences is that I have been completely uninterested in food. I’ve been completely absent from the kitchen, picking at my dinner plate in spite of Laurent’s efforts to make me something I would enjoy, and generally not being myself. It’s finally starting to get better, though – just in time for this month’s Daring Bakers’ challenge!


It helped that quick breads are really easy to make. They are breads which require no yeast, and rise in the oven thanks to baking powder and baking soda. Our hostess, Lis, had to put this challenge together at the last minute, but she managed to find a bunch of fun recipes. However, in my convalescent state, I was not in the mood for anything adventurous. Normally, I would have gone straight for the cheddar, green onions and asagio beer batter bread, but the thought of beer and cheese somehow turned my stomach under the circumstances.

So, once again, I turned to my old friend chocolate. Even when I’m feeling sick, I still love it.

Back when I was a teenager living with my parents, we would often visit Pâtisserie de Gascogne, a local bakery. They had the most delicious pastries… One of my favourite treats was a slice of moist chocolate quick bread, so rich with cocoa flavour it was almost overpowering.


Unfortunately, I wasn’t quite able to recreate it. The recipe I followed wasn’t nearly heavy enough on the chocolate. But drizzling it with syrup kept it nice and moist, and it was still a very acceptable treat. Only problem is, I forgot to take a picture until it was already half-eaten. Oh well, you get the idea.

Thank you Lis, for putting together this challenge under pressure! Please check out the Daring Kitchen for the challenge recipes, and look at g to see what everyone else whipped up this month!

Monday, August 22, 2011

The Particular Sadness of Lemon Cake - Lemon Pound Cake


As mentioned before, I’ve been reading a lot of food books lately: chef memoirs, books about specific foodstuffs, but also fiction about food. I’ve decided to add a new partial focus to this blog: commenting on these books (I don’t want to say “reviewing,” because I don’t plan on being nearly that systematic or authoritative) and including a recipe taken from or inspired from the book in question. Basically what I did with Devil’s Food Cake Murder last month. This way, I get the best of both worlds I love: cooking and reading.

The Particular Sadness of Lemon Cake was one of those books that I came upon accidentally at the store. The greenish-blue cover, quirky title font, and, of course, the title and the striking slice of triple-layer cake caught my eye as I was skimming the shelves, looking for Kate Atkinson’s latest novel. I had never heard of Aimee Bender, but after reading her book’s synopsis, I was too intrigued to leave it behind.


The narrator, Rose, is a happy, carefree nine-year-old girl at the beginning of the novel. The first scene is the kind of childhood memory everyone either cherishes or would like to have: she comes home from school to her smiling mother, who is just about to start baking her a birthday cake. But after one bite, Rose realizes something is very wrong: although the cake is objectively delicious and made from quality ingredients, she can taste something else in it, too. Hollowness, emptiness. Her mother’s mal-de-vivre.

Rose soon discovers, much to her despair, that, no matter what she eats, she can now taste the emotions of the person who prepared the food – even in something as basic as a sandwich. Imagine eating a bakery cookie and tasting the boredom and frustration of the person who made it. Or, even worse, finding out your mother’s deep, dark secrets by way of her roast beef.

The novel follows Rose through the years, as she deals with this gift/curse. The focus is also on her family, which appears fairly average, in that dysfunctional way that is so frequent in contemporary novels: her father, a pragmatic lawyer who seems to have achieved most of his personal ambitions, and who remains a distant figure most of the time; her mother, who struggles to discover what she wants in life and hides her inner void as best as she can; and her older brother, Joseph, a reclusive teen genius who grows up to be an even more reclusive young adult, with, as it turns out, a gift of his own.

The Particular Sadness of Lemon Cake, despite its title and premise, is much less about food than it is about human relations. Descriptions of food revolve more around feelings than flavours, which may disappoint foodies looking for mouth-watering depictions, but which also makes the mind wander to interesting places: what would depression, joy, infatuation, or excitement taste like?


Ultimately, the novel is about how people navigate around and with each other – a fairly common theme, but a seemingly infinite one. Rose’s problem is that, no matter how much she would like to shut the world out, she can’t: she has to eat, and although she relies as much as possible on vending machine snacks and factory-made food, she can’t forever avoid tasting other people’s feelings and having to deal with them. Her circumstances are unique, but she remains a relatable protagonist in that way. It also helps that, although her chipper personality takes a sarcastic turn after she discovers her gift, she never resorts to whining about her condition, and remains stoic, almost wise at times. I also very much liked her father, despite his complacency: he too, in his own way, is at heart someone trying to find his place. The character of Joseph was harder for me to enjoy (although you’d think I’d relate to an anti-social nerd who insists on reading at the dinner table), in part because of what his gift turns out to be: I won’t spoil it, but I thought it was a bit far-fetched, and not very useful to the story (or in the real world, for that matter).

Despite the book’s qualities, I closed it with a feeling of emptiness – maybe like the one Rose tasted in that fateful birthday cake. It had started out strong, a real page-turner, but I felt the book fizzled out in the end, with much potential left untapped. This is probably because the story ends just as Rose is starting to discover something her gift might be good for. I would have liked to see that part be more explored. In fact, I would have liked more development in general: the ingredients were there for a great story, and there are little gems scattered throughout, but somehow the richness was lacking to bring them all together.

Although the title lemon cake is explicitly a round cake, iced with chocolate, I took this as an opportunity to revisit an old favourite: lemon pound cake. My father-in-law gave me this recipe, and, although it is a classic, it’s still delectable. The syrup at the end is all-important, as it gives the cake its lovely moisture and terrific lemon flavour. I’m told it works best with margarine, but I refused to try this, as margarine make me shudder.


Lemon Pound Cake
From my father-in-law’s kitchen (possibly taken from somewhere else)

Yields one 22 by 11 cm (8.5 by 4.5 inch) cake

250g (2 1/2 sticks, 9 oz) unsalted butter, softened
250g (1 1/3 cup, 9 oz) granulated sugar
5 whole eggs, beaten
The zest of two lemons, grated
250g (1 3/4 cuo, 9 oz) flour
2 tsp baking soda
Pinch of salt

For the syrup:
The juice of 4 lemons
100g (3/4 cup, 3.5 oz) confectioner’s sugar


Preheat oven to 180ºC (350ºF).
In a large mixing bowl, cream the soft butter with the sugar, until pale yellow in colour. Gradually beat in the eggs and lemon zest. Combine the flour, baking powder, and salt in a medium bowl, and gradually stir the dry ingredients into the butter and egg mixture.

Butter a 22 by 11 cm (8.5 by 4.5 inch) cake mould. Pour the batter into the mould, place it on a baking sheet, and bake for 60 to 65 minutes. The cake is ready when a knife inserted into the center comes out clean.

Meanwhile, make the syrup: gradually stir the confectioner’s sugar into the lemon juice, until all the sugar is dissolved.

When the cake is baked, unmould it and prick its top and sides with a fork while it is still very warm, and brush with syrup, until most or all of the syrup is absorbed. Let cool on a rack. Store at room temperature, wrapped in plastic wrap.

Wednesday, July 27, 2011

Daring Bakers' July Challenge - Fraisier

Jana of Cherry Tea Cakes was our July Daring Bakers’ host and she challenges us to make Fresh Frasiers inspired by recipes written by Elisabeth M. Prueitt and Chad Robertson in the beautiful cookbook Tartine.

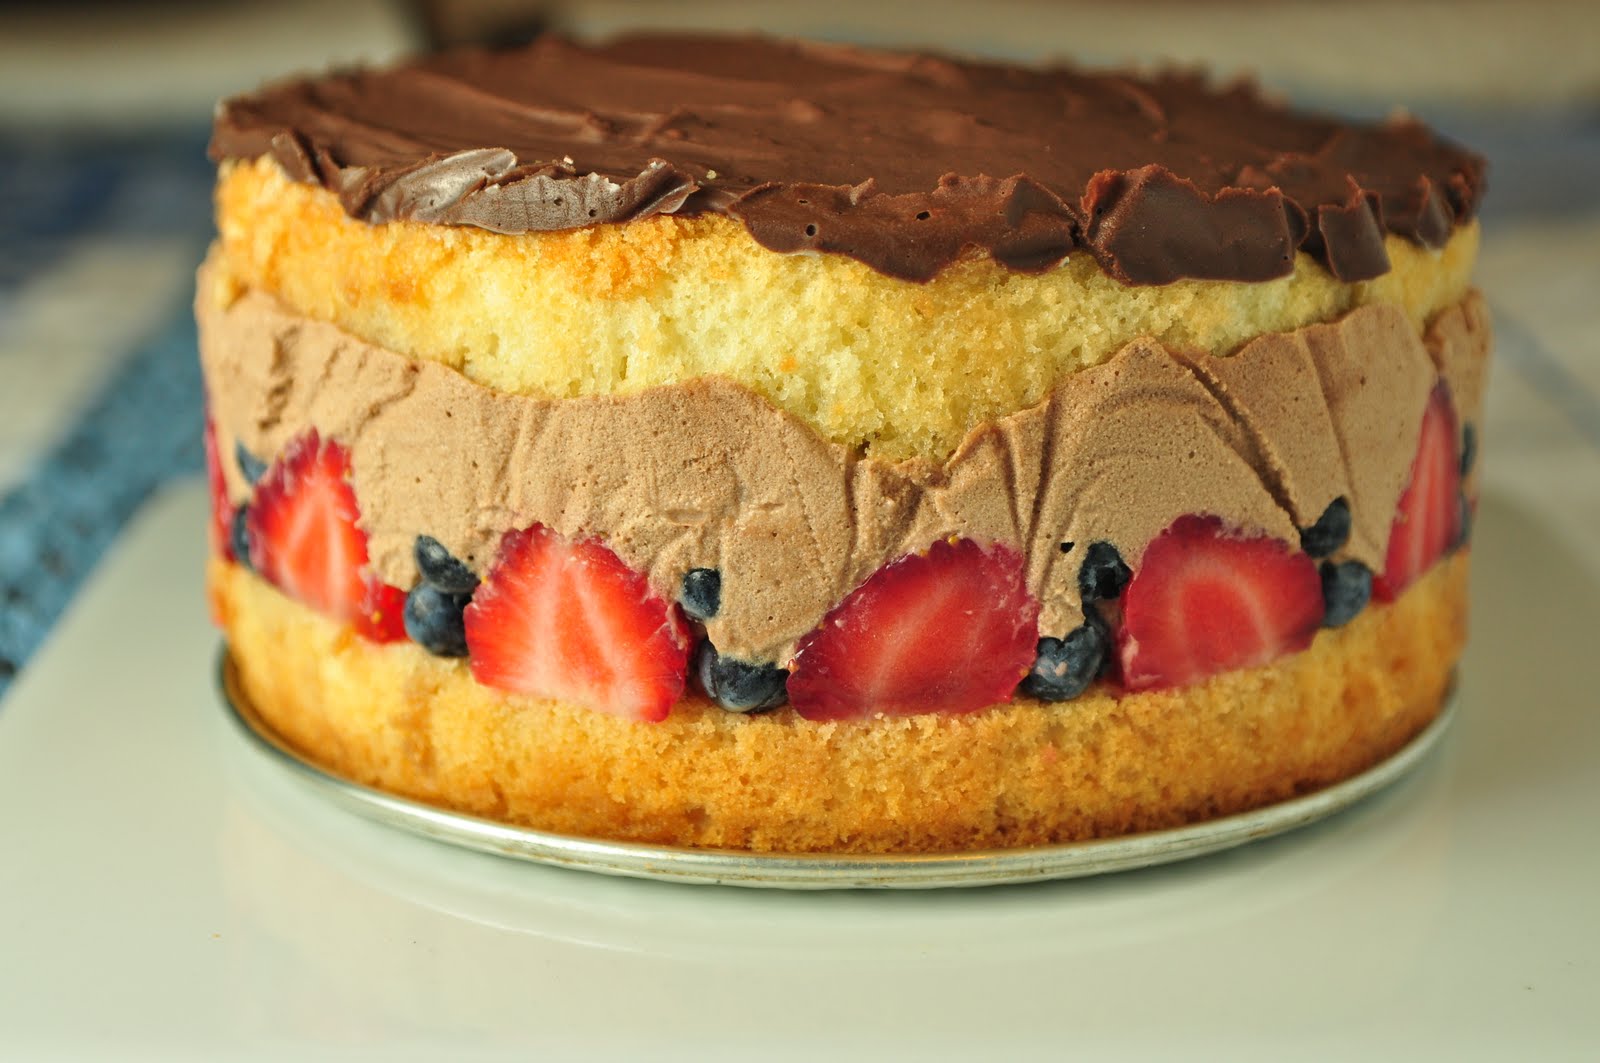
This month’s Daring Bakers’ challenge, fraisier, looked too pretty to be easy – but it was actually fairly straightforward: solidified pastry cream and fresh fruit, sandwiched between two layers of chiffon cake. I loved that this dessert featured fruit, as the season is booming right now.

I really liked the chiffon cake, which came out moist and extremely light. I wanted to make a lemon-flavoured version, but found out halfway through the mixing that I was out of lemons (which almost never happens). So, to add at least one personal touch, I made a chocolate filling.

I know, I know: I’m incredibly predictable. I put chocolate in everything. Even in the dead of summer, when chocolate is one of the least appropriate of all the flavours out there, I have to use it. I simply can’t help myself. Sure, I thought about using cardamom, or orange blossom – but no, it was chocolate that won out. In my defence, the resulting pastry cream was still quite light, and not too sweet.


I bought some beautiful strawberries from Île d’Orléans, as well as some wild blueberries, and raspberries. I had to use a slightly smaller mould than indicated in the recipe, so my cake was rather too high to be cut into two layers. So I cut out three layers, used two for the fraisier, then cut out smaller rounds out of the third layer, to make an individual-sized version with raspberries – I guess you could call it a “framboisier”?

I imbibed the cake layers with diluted maple syrup, instead of simple syrup. Finally, I iced the top of the larger fraisier with dark chocolate ganache, left over from making the chocolate pastry cream.

I have to say, this was a pretty ideal summer dessert: light, refreshing, and pretty as a picture (or, at least, it could have been, if my plastic wrap hadn’t left marks all over the filling). My thanks to Jana for challenging us to make this classic treat!


Please check out the Daring Kitchen to look at the challenge recipes, and don’t forget to look through the blog roll, to see some lovely fraisiers!

Monday, March 28, 2011

Daring Bakers' March Challenge - Yeasted Meringue Coffee Cake

The March 2011 Daring Baker’s Challenge was hosted by Ria of Ria’s Collection and Jamie of Life’s a Feast. Ria and Jamie challenged The Daring Bakers to bake a yeasted Meringue Coffee Cake.


Sometimes, my behaviour doesn’t make any sense. I’ve been very busy these past couple of weeks, among other things preparing for my predoctoral exam (which I passed, yay!) – hence the lack of posting. I took my exam on Thursday, crashed and rested on Friday, motivated myself to do this month’s Daring Bakers’ challenge on Saturday… and just completely forgot to post about it on Sunday. Actually, I remembered at some point during the day, then just forgot all about it again. Anyways, I’ve posted later than this before, so I’m sure you’ll forgive me.


This yeasted, meringue-filled coffee cake looked intimidating when I first skimmed the recipe, but it turned out to be pretty easy in practice. The rich bread-like dough (almost like a light brioche) was a dream to work with, so smooth and flexible. I love that the recipe used the word “sexy” to describe it, it’s pretty accurate! After rising, the dough was rolled flat, smeared with meringue and sprinkled with a sweet filling. Out of two filling options, I chose the cashew-based one, with garam masala. I was very curious about how garam masala would taste in a sweet bread – I’d only ever used it in curries. I was afraid it might be too strong, but it was actually really subtle, and went well with the dark chocolate and nuts.


The cake came out looking pretty good, but I could have baked it a tad less, as the crumb was a tiny bit dry. As I mentioned, I loved the filling, but I’m puzzled by what happened to the meringue. You can see it in through the decorative cuts all around the edges of the cake, but I was expecting to see a swirl on the inside of each slice. Where did the meringue go? Laurent and I both liked the fact that this cake wasn’t too sweet. In fact, Laurent, who usually dislikes having pastry for breakfast other than the occasional weekend croissant (muffins and scones are banned from the breakfast table, much to my dismay), volunteered to eat it every morning!


Thank you, Ria and Jamie, for hosting a pleasant, original challenge! Please check out the Daring Kitchen for the challenge recipes, and the Daring Bakers’ blogroll to see what all the other bakers concocted this month!

Thursday, January 27, 2011

Daring Bakers' January Challenge - Biscuit Joconde Imprimé / Entremets


The January 2011 Daring Bakers’ challenge was hosted by Astheroshe of the blog accro. She chose to challenge everyone to make a Biscuit Joconde Imprime to wrap around an Entremets dessert.

I was not looking forward to making this month’s Daring Bakers’ challenge. In fact, I put it off until the last possible minute. Why? Because it looked freaking hard.

To me, an entremets was something you serve between courses in a meal, to cleanse the palate, like a sorbet, or a shot of liquor. But the kind of entremets we were required to make this month was actually a dessert. The core of the challenge was to make a decorated biscuit Joconde, to wrap around a mould and then fill with whatever kind of sweet filling we chose.


It was the decorating part that had me scared. Making desserts look fancy and pretty has never been my forte, and I’d never worked with décor paste. In fact, I did have some trouble with that part. I wanted to make a simple striped pattern, but somehow my stripes all but disappeared during the baking process. Oh well, at least my Joconde is a cool, funky pink!

Once the tricky Joconde part was done with (and it really wasn’t all that difficult to make, apart from the disappearing stripes), I had some fun with the filling. I made three separate layers: lemon curd, raspberry mousse, and chocolate mousse – three of my favourite flavours. They half detached from the Joconde wrapping when I cut out pieces, but other than that I was quite pleased with the combination.


So, Asteroshe, thank you for pushing me to make more of a presentation effort with this challenge – even if I didn’t quite succeed in reproducing the picture I had in my head, it was still a great learning experience.

Don’t forget to check out the challenge recipes at the Daring Kitchen, along with the Daring Bakers’ blogroll!

I’ve decided to include the recipes for filling components, since they were initially components of different desserts. This filling would actually make a great dessert on its own, without the Joconde wrapping: just pour the layers in individual ramekins or glasses. The recipes were somewhat adapted for the purpose of this particular project. Namely, I slightly overcooked the lemon curd, and purposefully made the chocolate mousse drier than if it had been a standalone dessert, so that the entremets would hold together.


Lemon curd
Adapted from Tout un chef! Patrice Demers

The juice of 3 lemons
3 eggs
100g (3.5 oz, 1/2 cup) granulated sugar
100g (3.5 oz, 1/2 cup) butter, cut into pieces
1 sheet of gelatine

Soak the gelatine in cold water until softened (about one minute), then drain and reserve.

Combine the lemon juice, eggs, sugar, and butter in a saucepan, and whisk over medium heat until butter is melted. Whisking constantly, bring to a boil and cook until thickened (you should be able to make visible, lasting traces with your whisk). Remove from heat and stir in the gelatine. Strain, pour into mould, and chill.


Raspberry mousse
From José Maréchal’s Macarons

125g (4.5 oz) frozen raspberries, thawed
4 sheets of gelatine
240 ml (1 cup) heavy cream
2 egg whites
60g (1/3 cup) granulated sugar

Soak the gelatine in cold water until softened (about one minute), then drain and reserve.

Purée the raspberries with a blender or hand mixer. Transfer to a saucepan, cook over low heat, and stir in the gelatine until dissolved. Remove from heat, let cool, and reserve.

Whisk the egg whites into stiff peaks, adding the sugar gradually.

Beat the cream into stiff peaks.

Using a flexible spatula, gently fold the raspberry coulis into the whipped cream. Fold in the egg whites. Pour into mould, and chill.


Chocolate mousse
From Patrice Demers’ La carte des desserts

500 ml (2 cups) heavy cream
125 ml (1/2 cup) whole milk
125 ml (1/2 cup) heavy cream
2 tbsp granulated sugar
3 egg yolks
350g (12 oz) dark chocolate discs or chips

Beat the 500 ml of cream into stiff peaks. Reserve.

In a small bowl, whisk the egg yolks together with 1 tbsp sugar. In a saucepan, bring the remaining cream, the milk, and the remaining sugar to a boil. Pour the boiling liquid gradually over the egg yolks, whisking constantly. Return to the saucepan and cook, stirring constantly, until thick enough to cover the back of a wooden spoon. Pour the mixture through a strainer onto the chocolate, and let sit for one minute. Whisk the chocolate and cream mixture together, until smooth.

With a flexible spatula, fold the whipped cream into the chocolate mixture. Pour into mould and chill.

Tuesday, August 31, 2010

Daring Bakers' August Challenge - Browned Butter Pound Cake and Ice Cream Petits Fours


The August 2010 Daring Bakers’ challenge was hosted by Elissa of 17 and Baking. For the first time, The Daring Bakers partnered with Sugar High Fridays for a co-event and Elissa was the gracious hostess of both. Using the theme of beurre noisette, or browned butter, Elissa chose to challenge Daring Bakers to make a pound cake to be used in either a Baked Alasa or in Ice Cream Petit Fours. The sources for Elissa’s challenge were Gourmet magazine and David Lebovitz’s “The Perfect Scoop”.

I’m here! I’m here! I’m four days late and probably nobody cares at this point – but I do! The challenge is done!

For the second time in a row, the monthly Daring Bakers’ challenge featured ice cream. Which finally gave me the push I needed to go buy an ice cream maker. It’s a purchase I’d been meaning to make for a while, and every time I came upon a fellow blogger’s post featuring delicious homemade ice cream I would feel the urge to finally go for it… and then I’d put it off again. But now, it’s here, and Laurent is making his first batch of raspberry sorbet as I’m typing. (He’s really happy about the new gadget – had I known, I’d have gotten one months, maybe even years ago.)


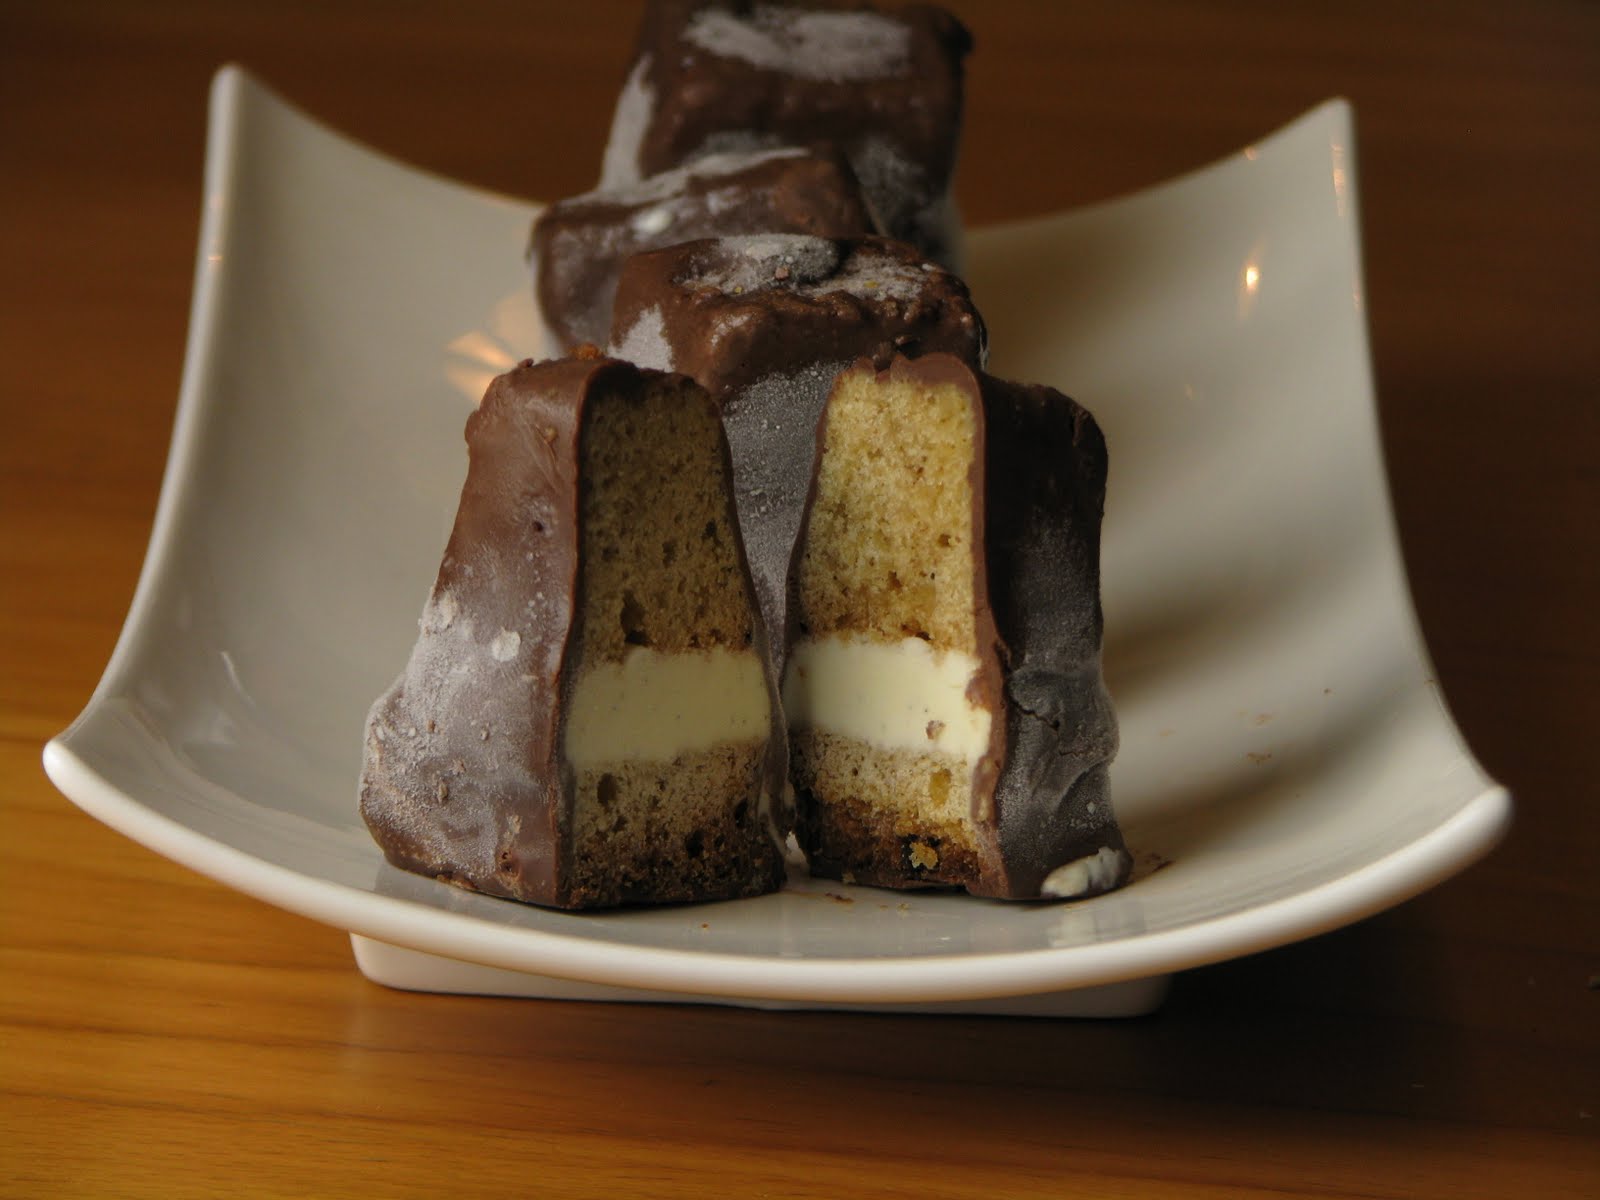
This month’s challenge was a bit long, but worth the effort. Let’s start with the browned butter pound cake. We were supposed to make it and then pair it with ice cream, but it was so delicious I was tempted to just keep it plain and eat it as it was. I’d been hearing people rave about how insanely good browned butter made everything – they weren’t kidding!

But, well, I had the ice cream machine and everything, so I carried on. I stuck with vanilla ice cream, because I’ve never been a huge vanilla fan, and was curious as to whether the homemade variety would win me over. And I had some good vanilla beans lying around. The verdict: not bad at all! I still think vanilla ice cream is at its best when paired with chocolate sauce, but then, I’m a chocolate lover.

I’d made Baked Alaska once (one of my most memorable kitchen disasters), but the Petits Fours seemed more attractive to me – not to mention easier to store and eat in small portions. I have to say, cutting the frozen cake and ice cream into bite-sized pieces was hard work, and I ended up hurting my hand from the pressure. Glazing the pieces was literally a balancing act: my petits fours were a tad too tall, and kept tipping over from the edge of my fork and diving into the (very yummy) chocolate glaze. I also had issues with the ice cream melting while I was working. There were definitely some logistics to work out here.

The results were worth it, though. These petits fours are a great snack or dessert, and the different textures are great together. Not to mention that it’s muggy and humid as hell right now, so frozen treats are more than welcome!

Thanks, Elissa, for this lovely challenge! And my apologies to the Daring Bakers for being so late!

Thursday, January 7, 2010

Celebrating the Epiphany - Cocoa-Pear Royal Galette

Yesterday marked the official ending of the holiday season. Not just because everyone is back to work by now (even students), but because it was the Epiphany. Historically, January 6th is the celebration of the Three Magi’s visit to Bethlehem. But nowadays, for most people, it’s an excuse to eat a very special cake.


La Galette des Rois, or King Cake (though I personally prefer to call it Royal Galette), apparently exists in several versions. The one usually encountered in Belgium and France consists of puff pastry filled with frangipane. But its most distinctive trait is that it contains a fève. “Fève” translates as “broad bean,” but it’s not really a literal designation anymore: nowadays, the fève is usually a small porcelain or ceramic figurine, which is hidden inside the galette. When the cake is divided among the guests, the person who gets the fève becomes King (or Queen), and is allowed to choose a consort.

As far as I remember, being King never really got anyone special privileges, other than that of wearing a nice paper crown, and maybe not having to clear the table. But it’s a fun tradition. Normally, to ensure randomness, the youngest person of the group has to hide under the table and call out people’s names as the pieces of cake are distributed. But when I was little, my mother always cheated and made sure I got the fève. She never made the galette herself, but she would poke around to find the fève and give me the winning piece.

For some reason, it had never occurred to me to make the Royal Galette myself. But just a few days ago, we saw a short news report on galettes, and I was shocked at how… simple it was: a disc of puff pastry, covered with frangipane, and topped with another disc of pastry. “That’s it?!” I exclaimed. “I can totally do that myself!”

And that’s how I wound up baking la Galette des Rois this year.


We needed a fève. Fortunately, we had been served an early galette a few days ago, and Laurent had been crowned King. No shame in recycling the fève, after all. Besides, I have no idea where I could buy one… And I’d be afraid to use just any old figurine, for fear that it wouldn’t be ovenproof!

Even though making puff pastry no longer scares me, ever since that Daring Bakers’ vols-au-vent challenge, I used storebought pastry, out of sheer convenience. For the frangipane, I based myself on the recipe we were given for the Bakewell Tart challenge (gosh, I’ve learnt so much by being with the DBs!). But I wanted to make it a little different, so I added some cocoa and diced canned pear.


Everything went fine, and I was happy with the results: good blend of textures (flaky pastry against moist filling), nice combination of flavours. And yes, it’s a decadent treat, but it’s only supposed to be eaten once a year (or twice, in our case).

So, who took the fève? So far, no one: it was just me and Laurent, and neither of our pieces had the hidden prize. We couldn’t eat the whole thing, so we saved the rest and will try again tonight. Not particularly exciting, since the winner will inevitably choose the other as consort…

But like I said: the Epiphany is an excuse to eat galette!


Cocoa-Pear Royal Galette

Serves 8

500g (17 oz) puff pastry, thawed in the fridge

For the frangipane:
50g (1.75 oz, 1/4 cup) butter, softened
50g (1.75 oz, 1/3 cup) icing sugar
50g (1.75 oz, 1/3 cup) almond powder
1 egg
1 tbsp flour
1 tsp almond extract
1 tbsp rum (optional)
2 tbsp powdered cocoa
2 small canned pear halves, drained and diced

For assembly and finishing touches:
1 fève, or small ovenproof figurine
1 egg, separated


Preheat oven to 200ºC (400°F).

Prepare the frangipane:
Cream the softened butter with the sugar, until very fluffy and light yellow. Stir in the egg, until well combined. Add the almond extract and the rum, if using.

Gradually stir in the almond powder, then the flour, and finally the cocoa. Set aside.

Assemble the galette:
Divide the pastry in two equal parts. Roll each half into a 25cm (10 inch) disc, about 5mm (1/4 inch) thick.

Put a baking sheet on top of another baking sheet, and line it with parchment paper. Place one disc of pastry in the center of the prepared sheet. Spread the frangipane mixture over it making sure to leave a 1cm (1/2 inch) margin at the edge.

Take the diced pear and pat the pieces dry. Scatter the pear evenly over the frangipane, pressing the pieces slightly into the almond mixture.

Take the fève and press it into the frangipane in a random spot, at an approximately equal distance from the center and the edge of the disc. DO NOT place it at the center.

Take the separated egg and lightly beat the white. With a pastry brush, lightly brush the edge of the pastry with egg white. Place the second disc of pastry on top of the first, and press all around the edge to seal the frangipane in.

Whisk a tablespoon of water into the egg yolk. Lightly brush the top of the galette with this egg wash, being careful not to let it drip down the sides, which would inhibit the pastry from rising.

With the edge of a sharp knife, make decorative patterns on top of the galette.

Bake for 25 minutes. Then lower the oven to 160ºC (350ºF) and bake for another 10 minutes, keeping an eye on the galette to make sure it doesn’t colour too quickly. The pastry should be risen, crispy and golden.

Serve warm, or at room temperature.

Wednesday, September 2, 2009

What happens in the kitchen stays in the kitchen - Torta alla Caprese

As I bake more often, I find myself growing a little better at covering up my little accidents.

For example, could you tell this cake exploded in the oven?


Actually, it didn’t explode: it erupted. Originally, this flourless chocolate cake is called a Torta alla Caprese, popularized in Quebec by the fabulous Josée di Stasio – but after this ordeal, we have renamed it Mount Vesuvius (you know, the volcano).

Laurent and I have often made this cake together. It’s often our go-to recipe when we need to bring dessert for a potluck. It’s both fluffy and rich, always moist, it keeps like a dream, and contains enough dark chocolate and caffeine to keep you jittery all night long. If I had to take one chocolate recipe with me on a desert island, this might just be it.

The Torta alla Caprese is also very simple to make. It has never let us down before, so I’m really quite confused about what happened this time. As the cake baked, the batter rose so much that it completely overflowed from the mould and covered it entirely. Laurent has been known to be a little heavy-handed with the baking powder, but this was ridiculous.

Well, a major trim with a small knife was enough to make the cake look just about normal again (and we got to eat all the leftover trimmings, tee hee). The people at the potluck never knew they were eating a wannabe-volcano.

Sorry for the poor quality of the picture, but we were in a hurry. I also wish I had a picture of a slice, so I could show you the cake’s wonderful texture. But it never made it back from the potluck, so you’ll just have to trust me: this torta is a pure delight. Go make it. Now.

The recipe is available here in French, but here’s a loose translation:

Torta alla Caprese
From Josée di Stasio’s Pasta et Cetera

Serves 8 to 10

200g (7 0z) dark chocolate, chopped
200g / 250ml (7 oz / 1 cup) butter
60ml (1/4 cup) espresso
280g / 500ml (9.5 oz / 2 cups) almond meal
1 tbsp baking powder
190g / 250ml sugar
5 large eggs
Cocoa or icing sugar, for dusting

Preheat oven to 180 ºC (350 ºF). Butter and flour a 25cm (10 inch) pie mould with a removable bottom.

In a double boiler, melt the butter and chocolate. Remove from heat, add the espresso and let cool.

In a medium bowl, combine the almond meal and the baking powder. Reserve.

In a large bowl, with an electric beater, whisk the whole eggs with the sugar until primrose in colour, about 5 minutes. Incorporate the almond mixture. Then incorporate the chocolate mixture.

Pour mixture into the prepared mould. Bake about 40 minutes, until the cake is firm to the touch. It will solidify further as it cools, so don’t worry if the center still looks a tad soft. Let cool in mould for at least 4 hours.

Dust with icing sugar or cocoa before serving.

Thursday, August 27, 2009

Daring Baker's August Challenge - Dobos Torte


The August 2009 Daring Bakers' challenge was hosted by Angela of A Spoonfulof Sugar and Lorraine of Not Quite Nigella. They chose the spectacular DobosTorte based on a recipe from Rick Rodgers' cookbook Kaffeehaus: ExquisiteDesserts from the Classic Caffés of Vienna, Budapest, and Prague.

This month’s DB challenge is really one I wish I could have spent more time on. I was very excited when I saw that our hostesses had chosen the Dobos Torte, a six-layer, buttercream-frosted, toffee-topped monster of decadence. All too rarely do I have an excuse to make a huge cake – which is a shame, because I could use the practice. I had only made a layered cake once before, and it was much simpler than the Dobos: only three thick layers. This was definitely going to be a challenge.


I stuck to the original recipe, because absolutely everything was new to me. For one thing, I had never made sponge cake. Génoise, yes, but not sponge cake – the difference being, as I recently discovered, that for génoise the eggs are beaten whole with sugar, whereas they are separated for sponge cake. The recipe gave us the following technique for making regular sponge cake layers: draw a circle on a sheet of parchment paper (using a template), spread a thin layer of batter within the limits of each circle, and bake for 5 minutes per baking sheet. Then, the layers had to be trimmed to down to equal diameters with the help of a pie tin or some other circular object. I wonder if it would have been easier to bake each layer directly in a parchment-lined pie tin, in order to obtain fool-proof regular circles…

Well, at any rate, the tracing method worked well enough, and I was pleasantly surprised by the texture of the sponge cake: quite sticky (peeling it off the parchment was a little tricky), but solid (even in my clumsy hands, it didn't come close to tearing). I could tell the layers would be good for stacking. I actually ended up with eight layers, instead of the predicted six, because I used a slightly smaller diameter.

I had never made buttercream, either. At least not this type, which required whisking eggs over a double boiler until thickened, adding chocolate, then incorporating butter when cooled (does that make it a German buttercream?). I cooked my eggs and chocolate mixture for longer than indicated, because it didn’t seem to be thickening. In fact, I worried about the result being too liquid until the very last stage, when the butter finally turned the runny mixture into a creamy, thick frosting that was just begging to be licked off the spoon.


And finally, there was the toffee. The task was to slice one of the sponge cake layers into portions, then pour hot caramel over it, spread it around and cut through it quickly, so as to obtain separate toffee-covered cake pieces, to decorate the top of the Dobos. Having burnt my fair share of caramel in the past, I erred on the side of caution this time, and didn’t cook the caramel long enough. As a result, it was too liquid when I poured it over the cake.

I looked at my cake portions as they bathed in the liquid-caramel-filled cake pan I had placed them in. I fully expected them to turn soggy and dissolve – but they didn’t. Instead, the caramel very slowly solidified… under the cake pieces. So, in the end, I wound up with more or less what I was aiming for, just upside down (which was easy enough to fix, obviously). Well, the toffee was definitely too chewy and nearly impossible to eat at first, but a night in the fridge hardened it a bit.

I made a rookie mistake while assembling the cake: I put more frosting at the center of the layers than at the edges, resulting in a domed cake. So, of course, when I put the toffee pieces on top of the final frosted layer, they started to slip. So I did what I always do when something in the kitchen starts to slip, stick, or tear: I tried to keep everything in place as best as I could, while screaming for Laurent to get me something – in this case, aluminum foil. We formed a cylinder around the cake to hold it together, then let it set in the fridge. No fancy decorations this time, I was just happy it looked more or less normal.


Knowing how much buttercream I’d smeared over and inside it, I was expecting the Dobos to be really heavy on the stomach, but it wasn’t: I actually find ganache-covered cakes to be much heavier. This buttercream very much reminded of the kind used on bûche de Noël: not too strong, with a pleasant, melting texture. I’d really like to experiment more with buttercream, maybe make it more chocolaty, or try a different flavour altogether. But, like I said, I ran out of time this month.


Given that I made the full recipe, I shared this cake with a lot of people, and it was very well received. It also kept really well (although, given that it’s been pretty warm here, I had to store it in the fridge), and the sponge cake kept its texture until the end. I really learned a lot with this challenge, and I’m really grateful to our hostesses for it!

As usual, check out The Daring Kitchen for the full recipe, and don't forget to check out the other participants on the blogroll.

Monday, April 27, 2009

Daring Bakers: Creative Cheesecakes

The April 2009 challenge is hosted by Jenny from Jenny Bakes. She has chosen Abbey's Infamous Cheesecake as the challenge.

One of the reasons I started this food blog was that I recently joined The Daring Bakers. I'd been following this group for a while now, admiring the monthly challenges. Last month, with the advent of their new website and the approaching end of my graduate seminars, I finally decided to join them, to improve my baking skills. I sometimes need a little incentive to go the extra mile, and joining The Daring Bakers has turned out to be just the thing.


I was thrilled to discover my first challenge: cheesecake! The recipe, which can be found at The Daring Kitchen, or on Jenny's blog, was very simple and basic, and allowed for infinite variations. The main order was: "Be creative!" I want to thank the hostess for such a stimulating (and delicious) challenge!

Cheesecake has always been one of my favourite desserts. It isn't very common in Belgium (which has more than enough decadent desserts to offer as it is), but I grew up partly in New York City, where I discovered classic, no-frills cheesecake and fell in love with its creamy texture and tangy sweetness. After I came to Montreal, I was exposed to all kinds of variations and flavour combinations.

Before this challenge, I had only baked a cheesecake once in my life - an orange-chocolate swirl. I had shared it with my in-laws, despite knowing that they had a pronounced dislike of cheesecake. As it turned out, however, it was ricotta cheesecake they had tried and disliked; they had never tasted the cream cheese version. When they did, they asked me for more.

In light of this, I was sure they would not object if I brought a "creative" cheesecake over for Easter lunch.

I settled rather early on the flavour combination I wanted: chocolate and raspberry, one of my favourites. Some day, I would make a plain cheesecake like the ones I loved as a child, but this wasn't the time for that. This was the time to go all out.

After debating whether I should make a raspberry batter and chocolate ganache, or a chocolate batter and raspberry glaze, I decided on the latter. For the crust, I used crushed speculoos. Speculoos are Belgian cookies, with a distinctive clove taste. I knew for a fact they would go well with the raspberries, because I used to dunk them in raspberry yogourt, growing up. As for chocolate, well, what kind of cookie doesn't go well with chocolate?

I made a few mistakes along the way, but the result was very good. I made a special effort with the presentation, which is normally my weak point. Initially, I had planned a whole, extravagant design, but ended up making something much more simple. Still, it's prettier than most cakes I've made in my life!

And the in-laws? Not only did they love it, but Laurent's father's head is now swimming with ideas on how to adapt and improve the concept of the cheesecake. I may have created a monster...

Adapted Challenge Recipe:
Chocolate-Raspberry Cheesecake

For the crust:
180g (6 oz) speculoos
30g (1 oz) unsalted butter

For the batter:
680g (24 oz) cream cheese, room temperature
210g (1 cup) sugar
3 large eggs
240ml (1 cup) heavy cream
150g (5 oz) dark chocolate
1 tbsp vanilla extract
2 tbsp Chambord (raspberry liquor)

For the topping:
2 cups raspberries (fresh, or frozen and thawed)
50g (1/4 cup) sugar
1 tsp cornstarch
Whole raspberries, slivered almonds, and fresh mint leaves, for decorating

Preheat oven to 180ºC (350ºF). Start boiling a large pot of water.

To prepare the pan: Cheesecakes are said to be best baked in a waterbath, i.e. with the baking pan partially immersed in water. This apparently gives the cake a creamier texture, and helps prevent cracks. This is problematic when using a springform pan, as water will often seep in, even when you wrap your pan in foil. There have been many alternatives and tips from the other Daring Bakers, but I really wanted to use my 9-inch springform pan. So I wrapped it in four layers of heavy duty, extra-length foil, which is more resistant than regular foil, and large enough so that each layer completely covers the pan, save for the very top. The water never had time to reach the pan.

To make the crust: Run the speculoos through a food processor until they are reduced to crumbs; transfer to a bowl. Melt the butter in a small ramekin using your preferred method, pour it over the cookie crumbs and mix until combined. Press the mixture into the bottom of your prepared pan.

(Note: the original recipe called for four times the amount of butter that I indicated in this recipe. I followed it, but forgot to take into account the fact that speculoos already contain a good amount of butter. And it seemed like a lot of butter, regardless. I made the mistake of not following my instincts, and ended up with a mixture that was much too liquid. At the end of the baking process, a lot of butter leaked out, too, and the crust was not as crispy as I would have liked. So I think an ounce of butter should be enough in this case.)

To make the batter: Melt the chocolate in a double boiler, and let cool. Combine cream cheese and sugar in a large bowl and cream together until smooth (I mixed it by hand, but should have used an electric hand mixer in retrospect, to obtain a smoother texture). Add the eggs, one at a time, fully incorporating each before adding the next. Mix in the cream, melted chocolate, and liquor.

(Note: Some of the other Daring Bakers have mentioned that their batter was on the thin side. I actually had the opposite problem: it seemed too thick. But I think that was because I miscalculated the amount of cream cheese necessary (damn those conversion tables!), and put in 750g, rather than 680g. After all, it's a pretty big difference. As a result, my cheesecake came out a little heavier.)

Pour the batter into the prepared pan, over the crust. Gently tap the pan on the counter to eliminate any air bubbles. Place the pan into a larger pan, and pour boiling water into the latter, until the water reaches halfway up the sides of your cheesecake pan.

Place in the oven and bake 45-55 minutes, until the edges of the cheesecake are set, but the center is still very jiggly (the cheesecake must not be quite done at this point). Turn off the oven, take the cheesecake out and run a knife around the edge of the cake, to separate it from the mold (to prevent cracking). Put the cheesecake back in the turned off oven and let it cool in there for another hour (still to prevent cracking). Remove from the waterbath, unwrap and let finish cooling on the counter, before placing the cake in the fridge for a few hours, until completely chilled. Unmold carefully.


To make the topping: Combine raspberries, sugar, and cornstarch in a small saucepan, and cook over medium heat until the fruit has dissolved into a smooth mixture, about 10 minutes. Purée with a hand blender if necessary. Let cool completely and chill in the fridge.

(Note: I think I will add some gelatin to the mixture next time, as my topping was still liquid enough to slide off the cheesecake if tilted for too long!)


When ready, spread the raspberry mixture evenly over the cheesecake, making sure not to spill over (like I did). Line the edges with whole raspberries and have fun making patterns with the almonds and mint!