Saturday, December 24, 2011

Merry Christmas! - Orange Lard Cookies

Whoosh! Christmas rather caught me by surprise this year. Maybe it's the lack of snow, but it took me longer than usual to get into the spirit of things. And yet, with just a few hours to go till Christmas Eve officially starts, everything seems to be on track: the tree is trimmed, the gifts are wrapped, and I've got bread baking in the oven.

As usual when we stay in Montreal, we're spending Christmas Eve with Laurent's parents. They always invite quite a crowd over, and there's always a mountain of food, prepared by Laurent's father. This year, however, I wanted to contribute in some way. I thought about something I can make that no one else around me does; and it had to be something appropriate for an Italian Christmas, so Asian food was out. So I settled on bread. Bread isn't an essential part of supper, but I find homemade bread always adds a nice touch.

So I spent part of today making two kinds of bread from my favourite Marcy Goldman book: pull-apart buttery rolls, which I have made before, and buttermilk biscuits. They're almost ready, so perhaps I'll snap a picture and add it to the end of this post.

I haven't done much holiday baking this year. I did make gingerbread men, for the very first time, and am quite pleased with the flavour, although I may have overbaked them a bit. And I made lard cookies.


I'm quite into Jennifer McLagan's cookbooks at the moment. As you may know, she's been specializing in unpopular foods for several years: Bones (or rather, cooking on the bone), Fat, and, most recently, Odd Bits (not just offal, but generally all the parts of the animal people tend to not use anymore). While flipping through Fat, I came upon a recipe for Spanish-style lard cookies, and decided to give it a try. I'd never cooked with lard before, and was even very surprised to discover how available it is, found in the pastry aisle at most supermarkets - too bad, I was already having visions of rendering pork fat.

The cookies were as simple to make as cookies can be. I substituted orange liqueur for brandy, as I don't keep the latter in the house. Honestly, I'd be prepared to be that no one, save an expert baker, would ever guess that these cookies were lard-based: you can't taste it at all. But it apparently gives a unique texture, and while I would have to make a butter version to compare and really determine the difference, I'd describe the ones I made as crispy, but not brittle or hard, and not sandy either. Not sure this description is very useful, but I would definitely make these again.


Oooh, look at that, my bread is ready! The biscuits taste good, but to be honest they're rather unattractive. Oh well. The pull-apart rolls, on the other hand, look fabulous. (Sorry for the saturated pics, I'm in a hurry.)


Merry Christmas and Happy Holidays to everyone!


Orange-flavoured Lard Cookies
Slightly adapted from Jennifer McLagan's Fat

Yields around 20 cookies

125g (4.2 oz, 6/8 cup) all-purpose flour
60g (2 oz, 1/2 cup) almond flour
100g (3.5 oz 1/2 cup) granulated sugar
2 tsp ground cinnamon
Pinch of salt
100g (1/2 cup, 3.5 oz) lard, diced, at room temperature
1 whole egg
Zest of one orange, finely grated
1 tbsp orange liqueur (Cointreau or Triple Sec)
Icing sugar, for dusting


Preheat oven to 180ºC (350ºF). Line baking sheets with parchment paper.

Mix the flour and almond flour together in a mixing bowl, then spread them on a baking sheet in an even layer. Roast them in the over, stirring occasionally, until they are fragrant and just beginning to brown. Remove from the oven and let cool completely.

Lower the oven to 150ºF (300ºF).

Put the cooled flour and almond mixture in a large mixing bowl, stir in the sugar, cinnamon, and salt. Add the lard and work it into the flour mixture with a wooden spoon or dough whisk, to obtain a homogenous mixture.

In a smaller bowl, whisk together the egg, orange zest, and liqueur. Incorporate this mixture into the flour and lard mixture, and stir to obtain a soft dough.

Take tablespoonfuls of dough, form them into balls, and place them on the prepared baking sheets, about 4 cm (1 1/2 inches) apart, and slightly flatten them with the palm of your hand. Bake until firm to the tough and slightly browned on the bottom, about 30 minutes.

Transfer the cookies to a wire rack and cool completely. Dust with icing sugar and store in an airtight container for up to one week.

Tuesday, December 6, 2011

The Honeymoon, pt 1 - Momofuku

Okay, boys and girls, let's get back on track! It's been an emotional and disorienting couple of weeks, as I have been without a computer: my laptop got stolen. I was at a café with my friends and took out my computer to show them my wedding pictures, which I had finally received. Then I put it back in my bag, which was on the floor right next to me. When I got up to leave, my bag was open and the laptop was gone. The amazing thing is that one of my friends was sitting right opposite me, and she didn't see a thing. Apparently this sort of thing happens a lot in the neighbourhood, with professional thieves preying on students. The worst part is, I practically never bring my laptop to work in cafés, there's too much noise and I'm always scared I'm going to spill something on it. It really was rotten luck...

Anyways, after the first twenty minutes of hyperventilating and being paralyzed by the sheer effort of wrapping my mind around what had happened, while my awesome friends took action on my part and talked to the staff and surrounding customers, after a weepy call to Laurent and a trip to the police station to report the theft, after a couple of days of feeling blue, and finally after taking advantage of Black Friday sales to order a new laptop (a fine piece of hardware which I'm typing this on), I started putting the incident behind me. Fortunately, I had backed up most of my important documents (including the wedding pics and my thesis), so there was no big personal loss. The thought of someone going through my data made me feel sick, but I knew the thieves would most likely be interested in the hardware, not my vacations photos or articles on Japanese pop culture...

And then, a few days ago, I got a call from the police informing me my laptop had been found! I'm picking it up tomorrow. Apparently, it's still in one piece, but they haven't tried to open it, so I don't know if the hard drive has already been wiped or not. Fingers crossed... But honestly, given that less than one in ten stolen laptops is recovered, I wasn't expecting mine to ever be found, so I'm happy either way. The good luck has balanced out the bad!

The moral of the story: always report stolen items, you never know.

So, on with our regular programming. Well, not that regular, as today's post is the first part of the Honeymoon Chronicles. Laurent and I couldn't get away for very long, so we decided to just spend a few days in New York. I grew up there, and Laurent has never really visited the city, so I was looking forward to showing him around. We had a wonderful time. I showed him the classics (the view from the Staten Island Ferry, Time Square, etc.), and also some places which were more personal to me (my old school, specific spots in Central Park). Over the course of five days, we pretty much covered the list of places I had compiled in my head.

My list of restaurants, however, was comparatively shorter. I was just a kid when I lived in NY, and fresh from Europe. At the age of five, I was impressed by things like grape juice, deli sandwiches, pizza, hot dogs, and frozen yogurt, most of which I had never tasted. Then we discovered ethnic takeout, especially Indian and Mexican food, which was not really available in Belgium at the time. My parents took me to a few restaurants, but I can't say I recall whether they really were good, or just conveniently close; and anyway, they've probably been closed for years. My parents lived in New York again several years ago, but none of us, myself included, really kept track of the food scene. No particular place stood out in my memory.


Our hotel was conveniently located near a Pain Quotidien, a chain I was familiar with, so Laurent and I often had lunch or breakfast there. It's ironic, because Le Pain Quotidien is actually a Belgian concept, so it kind of felt like eating, say, McDonald's in Tokyo. Except that Le Pain Quotidien is a million times tastier and healthier than McDonald's (and more expensive, unfortunately, but hey, we were on our honeymoon), and the setting is a billion times more attractive, with its wooden hues and cute little spreads. Besides, I have to admit I never feel bad about eating "foreign" food in North America, probably because immigrant cultures are such a huge part of this continent, and hence the concept of "local cuisine" has always seemed a lot looser here than it does in other regions.


Even though I don't really know much about the current New York restaurant scene, there was one place I knew we had to visit: Momofuku Noodle Bar. Back when I was making David Chang's ramen a few months ago, I took the time to read the non-recipe parts of the book, specifically how the restaurant came to be. I liked how things apparently really kicked off when the chefs decided to stop trying to be "authentic" and just started to make whatever they wanted, according to the seasons and their own whims. And the ramen I had whipped up in my kitchen had been really very good, so I could only imagine how great the real thing would be.


If we could get in, that is... I knew the place was hugely popular but not correspondingly huge, and fully expected to find people lined up in front. Which we did. I asked the hostess how long the wait would be for two people, prepared to wait for over an hour if need be (I've done it for Kazu on more than one occasion), and nearly fell over when she answered that she could seat us right away. And smack in the middle of the counter, no less! Luck of the newlyweds!


We started off with some shiitake buns. They were great, with very salty mushrooms, soft steamed buns, and crunch pickles.


But the real treat was watching the cooks prepping bowl after bowl of ramen. These guys were maintaining a serious rhythm!


I ordered the shoyu (soy) ramen, while Laurent ordered a miso version. I knew Chang had recently changed his broth recipe, to make it more environmentally and economically friendly, which I can only applaud; he now makes the broth with only chicken bones, no more pork bones. The result was still very good, with strong umami and smokiness compensating for the lack of meatiness. The noodles were awesome, firm bordering on chewy, as far from limp, sissy noodles as you can get. The pork was tender and deliciously seasoned. But... I have to say this: how I wish I could have tasted the original version! I get that it uses a lot of meat and generates a lot of waste, but I was honestly blown away by what I managed to make myself with the old recipe, and have no doubt the served far superior bowls at Momofuku back then. This new version is definitely great, but the difference is nonetheless felt...


Laurent's miso ramen, however, was spectacular. Neither of us had anything bad to say about it: it was simply perfection, with ideally balanced flavours. It's right up there with the burnt miso ramen we had in Tokyo and have been fantasizing about ever since. Maybe we just have a special weakness for miso... But Jesus, it was good.


So, that was one of the high culinary points of our trip. More to come!

Sunday, November 20, 2011

My kind of bachelorette event - A bread baking class at Mezza Luna

I’m back from the honeymoon! Ok, I’ve actually been back for quite a while now… Getting back into real cooking, after a month of predictable standards and eating out (wedding preparations take up SO much time!), has taken some time, and I’ve been pretty busy with my thesis as well. I’ve even been taking a break from the Daring Kitchen, although I plan to get back into it next month.

Then I realized I have a lot of food-related stuff to write about that doesn’t involve cooking and recipes. I’ve never been an event blogger, and I very, very rarely write reviews about anything, but desperate times call for desperate measures! So let’s try something different for a few posts, to give me some time to build up my stock of recipes and photographs.

If you’re eager to see wedding pictures, you’ll have to wait a bit. We have quite a few pics taken by our guests, but the official photographs will take a little longer to arrive. Besides, before we get to the wedding, we have the bachelorette party to deal with!

My two bridesmaids and I have been friends since we were fifteen. Ironically, I was the one who had moved around the most at the time, and I ended up being the only one to stay in Montreal all this time: both of the others ended up moving out of the country at different times. But we always kept in touch, and one of them eventually came back, while the other visits every now and then, and flew all the way from London just for the wedding.

One thing these longtime friends of mine have probably figured out about me by now, is that I am not really a party girl. I’ve had my clubbing period, but I was never completely comfortable with it, and was mainly tagging along with the other. I’ve always had a lot more fun at house parties, and now that I’m more in the dinner party years (probably a little prematurely, but it suits me just fine), I’m completely in my element.

So I was pretty happy when my friends suggested a daytime bachelorette party. However, I was a little taken aback when they told me to meet them at Jean-Talon Market at nine o’clock in the morning on a Sunday. What on earth were they going to make me do? Give me a grocery list and make me cook them breakfast? Then they told me to bring a bathing suit, so I thought maybe we would be going to a spa.

Well, it turned out the bathing suit was just a red herring, and I wasn’t that far off the mark with my first guess. They didn’t exactly make me cook for them, but the activity involved cooking, more precisely baking: they took me to the Mezza Luna cooking school, run by local chef Elena Faita (mother of cookbook author Stefano Faita), for a bread baking class.


My apologies in advance for the uneven pics, but since I thought we were going to a spa, I hadn’t brought my camera, and the lighting wasn’t good enough for the point-and-shooter my friends had brought.

The class was led by "baker on the go" Marc-André Cyr (sous-chef at Olive + Gourmando), and we covered three kinds of bread: basic white, English muffins, and cranberry-ginger scones. Now, longtime readers might be thinking: “But don’t you already know how to make bread?”. Indeed, but so did most of the other people attending. It’s one thing to read up on bread, and I do believe that bread is one of those things you can only perfect by rolling up your sleeves and just going for it as often as you can. But there are benefits to taking the occasional class, even if it’s only a demonstration. I definitely learned a few things.


My friends pulled some strings (ok, one of them just got up and talked to Elena) and got me an authorization to get up there and touch the dough. I was amazed at how much stickier Marc-André’s dough was compared to the kind I usually end up with (with the exception of Chad Robertson’s bread, where the dough is so wet you can’t properly knead it on a surface and have to keep it in a container). I was also surprised by how gently he handled the dough: I’ve always instinctively put my whole weight into kneading, whereas he just seemed to flip it around. It wasn’t easy, either: when I tried it myself, the dough kept sticking to the counter and tearing. It was mildly humbling, but I left with a pretty good idea of how to improve my breads. I also left with the recipes...


The class included coffee and breakfast. My friends had thoughtfully brought along a bottle of prosecco, which we downed in celebration; after all, nothing says “bachelorette” like getting tipsy before noon. As for the meal itself, it was good to be reminded how crazy good homemade bread still warm from the oven can taste – even better when it’s served with homemade jam and quality capicollo!


I’m actually glad to be posting about this so much later after the event: it gives me a chance to feel grateful all over again for the wonderful day my bridesmaids put together! The fun didn’t end there, but the food-related part does, so… I’ll leave you on that note!


Wednesday, September 28, 2011

Daring Bakers' September Challenge - Croissants

The Daring Bakers go retro this month! Thanks to one of our very talented non-blogging members, Sarah, the Daring Bakers were challenged to make Croissants using a recipe from the Queen of French Cooking, none other than Julia Child!

This is probably going to be the shortest post I’ve ever written. And my last post as a single gal!

I was excited that the Daring Bakers chose to re-visit an old challenge this month, especially because it was the croissant challenge. I had time to do the challenge, but now, between practicing the waltz, finalizing the seating arrangements, folding and assembling seat markers, and wrapping party favours for the guests – not to mention having an awesome bachelorette event, which actually revolved around baking, and which I will be sure to tell you all about – I have no time to blog about it.


Croissants were made. They were not bad for a first try, but there is definitely room for improvement (for example, they didn’t rise nearly as much as I would have liked). But the next try will have to wait.

My thanks to Sarah for the challenge and the very detailed instructions. Please visit the Daring Kitchen for the challenge recipes, and check out the Daring Bakers’ blog roll to look at all the super-flaky croissants that came out of ovens all over the world this month.

See you all after the wedding!

Friday, September 16, 2011

Daring Cooks' September Challenge - Stock to Soup to Consommé

Peta, of the blog Peta Eats, was our lovely hostess for the Daring Cook‟s September 2011 challenge, “Stock to Soup to Consommé”. We were taught the meaning between the three dishes, how to make a crystal clear Consommé if we so chose to do so, and encouraged to share our own delicious soup recipes!


Sorry for posting late… I actually remembered the deadline on time, but I’d had a long day, and just wanted to rest. Then I got busy again. The wedding is in just over two weeks, and it’s starting to take its toll: we have wedding-related meetings and tasks nearly every day! Also, I’ve finally gotten serious about writing my thesis, so I’m filling up my typing quota as it is.

However, I was able to sneak in this month’s Daring Cooks’ challenge, and I’m glad I did, because it was an intriguing one. I liked that our hostess allowed us to keep things as simple or make them as finicky as we wanted. The core requisite was to make a beef, chicken, or vegetable stock. Then, we could turn it into a soup (simple), or a consommé (finicky). You know me: I shy away from layered desserts, extravagant cakes and pastry bags in general, but when it comes to savoury cooking, I’m always up for horribly complicated, time-consuming processes that lead to not necessarily impressive results (because, really, most people have no idea how much work and balancing of flavours goes into some of the simplest-looking, cleanest-tasting dishes). Plus, I make stock and soup all the time, so trying my hand at consommé was the logical choice.

I decided to make a beef and onion consommé, as I love French onion soup. I kind of knew it wouldn’t be perfect from the get-go, especially when the only bones I could find were marrow bones: the fatty marrow usually prevents one from obtaining a crystal clear stock, even when you try roasting them and extracting the marrow, as I did. On the other hand, as Peta, our hostess, pointed out, marrow also gives a lot of flavour.


Having made my stock the way I usually do (cold water, no stirring, minimal simmering for hours), I made French onion beef soup, with caramelized onions and red wine (I was out of port and cognac).


Finally came the unknown part: making consommé. I used the traditional “raft” method. It consists in using a protein mixture, in this case whipped egg white and cooked ground beef, and using it to attract all the impurities to the surface of the soup. Then, you poke a hole into the raft, and carefully ladle out the liquid.


I didn’t fare so well with this part. I can’t say whether it’s because my raft broke imperceptibly, or whether my stock was too cloudy to be saved, but my consommé was nowhere near crystal clear. But I was still very happy to sit down to a hot bowl of savoury liquid, regardless of its texture or appearance: it was late, I was hungry, and the liquid, whatever it was, tasted damn good.


I enjoyed learning about consommé, even if mine wasn’t a runaway success. My thanks to Peta for this challenge! Please check out the challenge recipes here, and go through the Daring Cooks’ blog roll to see the beautiful soups that were made this month.

Monday, September 5, 2011

When ingredients dictate the recipe - Jerk Chicken


Have you ever bought an ingredient on impulse, just because it caught your eye, without any specific idea of what you’re going to do with them? I did that a couple of weeks ago, with a basket of habanero chilis.

After staring at them for a while, then safely storing them in a cupboard, out of reach from my ever-curious cat, I launched an appeal on Facebook: what to do with way too many of the hottest chilis in the world? I was honestly expecting mostly suggestions for salsa, or maybe jellies, but instead got requests for beef jerky, preserves, and jerk chicken. Way to think out the box, people!

I opted to make jerk chicken, as suggested by Ken of A Food Year. I then planned to air dry the remaining chilis to preserve them, as suggested by Evelyne of Cheap Ethnic Eatz, then crush them and use them to make jerky, as suggested by a non-blogging friend of mine who loves food so much and has such a great imagination that he really should be blogging.

Unfortunately, the air drying process went terribly wrong. Now I know: next time I want to dry chilis, make sure they’re not touching each other. As for the jerk chicken… It was good, but definitely not the epic meal I was hoping for – although it turns out that was my fault.


I’d never made jerk chicken, and had eaten it maybe once in my life, too long ago for me to recall the flavour. I did some browsing, then opted for this recipe, because it seemed straightforward. I made a couple of alterations, such as using chicken pieces instead of halves, and honey instead of molasses. Also, following Ken’s warnings, I did NOT use a blender to make the entire marinade: it stands to reason that the habanero heat would be impossible to clean out, and would linger and taint any blended food for months.

I’ve had my share of chili burns, so I asked Laurent to bring me some latex gloves from his lab (sometimes, a fiancé who works in a lab is a cook’s dream come true). It’s funny how, despite having only ever been on the receiving end of surgery (and only wisdom teeth removal at that), wearing those gloves made me instinctively hold my paring knife the way a surgeon holds a scalpel. I guess all those medical TV dramas end up making an impression.

Everything went well, and the chicken tasted fine, but there’s no way I would rank it in my Top 5 Hottest Dishes ever. The latter, by the way, would probably include most of what I’ve eaten at Cuisine Szechuan (particularly the pork tongue with pickled chilis), chicken vindaloo from an otherwise unremarkable Indian restaurant, an eggplant dish at a Thai restaurant in Vienna, and the time I doused my enchilada with homemade salsa verde. This jerk chicken didn’t even come close to any of those. But then… I realized I had seeded the peppers, which explained everything. Next time, I’m leaving the seeds in.


It was also a tad too sweet for my taste, but it’s hard to say whether this was sweetness from the honey and dark rum, or if it was just an impression of sweetness, from the allspice and cinnamon (unlike most people, I’ve never been a huge fan of cinnamon). Hard to say, and since my remaining habanero chilis have sadly been destroyed, I can’t try the recipe again until I get my hands on some more, provided they’re still available somewhere. Just in case though, I’d reduce the cinnamon next time, from personal preference.

Nevertheless, it was still a very tasty meal, so here’s the recipe. I served it with plain white rice, cooked the Persian way. I’m guessing it’s not the way jerk chicken is served traditionally, but I wanted to try it. Gotta love that crust that forms on the bottom of the pan! But that recipe is for another post.


Jerk Chicken
Slightly adapted from Simply Recipes


For the marinade:
120 ml (1/2 cup) white vinegar
2 tbsp dark rum
2 habanero chilis, finely minced, with seeds (remove seeds for a milder version)
1 red onion, chopped
4 scallion tops, chopped
2 tbsp fresh thyme leaves, chopped
2 tbsp olive oil
2 tsp salt
2 tsp freshly ground black pepper
4 tsp ground allspice
2 tsp ground cinnamon
4 tsp ground nutmeg
4 tsp ground ginger
2 tsp honey

1 whole chicken, cut into 10 pieces, skin on
120 ml (1/2 cup) lemon juice
Salt and pepper, to taste


NOTE: It is important to wear gloves whenever handling habanero chilis, or anything containing chilis, such as the marinade. Avoid touching your eyes or any sensitive areas. Also, wash your hands after manipulating the chilis, and thoroughly wash your knife, cutting board, and utensils.


Put all the marinage ingredients, except the habanero chilis, in a blender and pulse until smooth. Transfer to a bowl and stir in the minced chilis.

Wearing latex gloves to protect your hands, rub the chicken pieces with the marinade Place in a non-reactive bowl or baking dish and cover (or put in a Ziploc bag and seal), and refrigerate overnight.

Preheat oven to 180ºC (350ºF). Place the chicken pieces skin side up on a baking sheet, and bake for 40 minutes, or until the chicken is cooked through (the breasts will typically cook faster than the thighs). For a crispy skin, broil for a few minutes, keeping a close eye on the chicken to prevent burning.

Serve with plain white rice.

Saturday, August 27, 2011

Daring Bakers' August Challenge - Candy


The August 2011 Daring Bakers’ Challenge was hosted by Lisa of Parsley, Sage, Desserts and Line Drive and Mandy of What the Fruitcake?!. These two sugar mavens challenged us to make sinfully delicious candies! This was a special challenge for the Daring Bakers because the good folks at http://www.chocoley.com offered an amazing prize for the winner of the most creative and delicious candy!

Oh, boy. This month’s Daring Bakers’ challenge was a doozie. Candies, including one mandatory chocolate candy. Everyone knows working with chocolate is a bitch on any given day, but working with chocolate on a humid summer day? Really? Not to mention boiling sugar and the like…


Ok, I’m done with the complaining… at least for now. The truth is, even though there were many reasons to skip this challenge, there were also plenty of reasons to go for it. One of them being the amount of work our hostesses put into it: the instructions were so detailed and they left us so many recipes and options, I would’ve felt bad wimping out just because “chocolate is hard.” And another reason was… well, precisely that chocolate is hard. It’s a challenge, one that I was supposed to tackle a long time ago.

A few years back, Laurent’s dad was preparing a conference on chocolate, and we all got dragged into the research and trivia. We were all kind of obsessed with it, really. That’s how I got to be fairly well informed about the tempering process. Tempering consists in melting chocolate, cooling it down to a certain temperature, then heating it back up slightly. The aim is to obtain a specific type of crystallisation, which leads to a finished chocolate that is smoother, snappier, and shinier. Yup, I knew all about tempering… but I’d never actually done it. This was because I also knew how difficult it is to control the temperature of chocolate.


So, with that in mind, I started off with a non-chocolate candy: pâte de fruits. I’ve always liked these chewy squares of fruit paste, and the recipe looked pretty simple. I made a citrus grapefruit version, although the pink coloring I used makes it look more like strawberry. Unfortunately, I was pretty disappointed by my result. Maybe I didn’t use enough pectin, but my pâte de pamplemousse never solidified as much as I would have liked. I had to store it in the fridge, and it didn’t have that satisfying chewiness I love. Also, the humidity made it absorb too much sugar, making it too sweet.


With that, I decided to man up and tackle the chocolate. Truffles would have been an easy way out, as Laurent and I often make truffles in the winter. But if I was doing this, I was doing it right. I decided to make bonbons with a caramel filling: they would highlight the tempered chocolate, and allow me to use those cute little moulds we’d bought during our chocolate obsession. With a good supply of Alto El Sol chocolate disks of the Barry brand and a marble slab which was graciously given to us a while back, I was ready.


As predicted, it was difficult and frustrating. I waited until all the chocolate had melted in the double boiler to test the temperature, only to find that it was already past the recommended limit. I then transferred most of the chocolate to the marble slab, and started spreading it and flipping it around. But the temperature simply refused to drop lower than 28.5ºC, even going back up at times, never anywhere near the required 27 ºC. Finally, I got bored and decided that this would have to do. I put the chocolate back over barely simmering water, and this time the temperature shot back up and was past its limit before I could do anything. That’s when I stopped using the thermometer, as it was seriously screwing with my mind.

Moulding the bonbons was an exercise in frustration as well. Despite being apparently too hot, the chocolate was thick, and didn’t spread very well. Next time, I’m definitely using a pastry brush to fill the moulds individually, rather than trying to ladle chocolate over all the cavities: it’ll be slower, but definitely less messy. I’m sure professionals can pull it off, but I’m just not there yet.

Prior to this, I had made a filling of salted caramel (the original recipe was passion fruit, but I didn’t have any on hand). I have a habit of burning caramel, so I was careful this time, and the result was light and liquid – maybe a little too liquid, thus making the moulding even more difficult.


As I waited for the bonbons to set in the fridge, I cleaned up the kitchen, wiping melted chocolate off the counter, floor, walls, stovetop, and fridge handle. I was rather despondent at that point, as I was certain the result was going to be a huge fail. So when I banged the mould on the counter and a perfect, shiny chocolate candy popped out, I cursed in delight – which very rarely happens.

Of course, they didn’t all come out perfect. I’d say about half were edible, the others were either crushed or permanently stuck in the mould. Not great for a pound of chocolate, and I felt saddened by all the wastage. But I vow to be more careful next time, now that I have a better idea of how this works.

My tempering was most definitely not perfect, but it still seemed to have an effect: the chocolate had a distinctive texture as it snapped between my teeth. It remains to be seen whether the nice sheen of the bonbons will last over the days. But still, it’s nice to know all that trouble wasn’t a complete waste of time.


Lisa and Mandy, thank you so much for this challenge. Despite all my complaining, I really am glad that you pushed me to do this. Even though it didn’t go perfectly, tempering chocolate no longer seems like an impossible task.

Please check out the challenge recipes here at the Daring Kitchen, and take a look at the blog roll to see all the cute candies made this month.

Monday, August 22, 2011

The Particular Sadness of Lemon Cake - Lemon Pound Cake


As mentioned before, I’ve been reading a lot of food books lately: chef memoirs, books about specific foodstuffs, but also fiction about food. I’ve decided to add a new partial focus to this blog: commenting on these books (I don’t want to say “reviewing,” because I don’t plan on being nearly that systematic or authoritative) and including a recipe taken from or inspired from the book in question. Basically what I did with Devil’s Food Cake Murder last month. This way, I get the best of both worlds I love: cooking and reading.

The Particular Sadness of Lemon Cake was one of those books that I came upon accidentally at the store. The greenish-blue cover, quirky title font, and, of course, the title and the striking slice of triple-layer cake caught my eye as I was skimming the shelves, looking for Kate Atkinson’s latest novel. I had never heard of Aimee Bender, but after reading her book’s synopsis, I was too intrigued to leave it behind.


The narrator, Rose, is a happy, carefree nine-year-old girl at the beginning of the novel. The first scene is the kind of childhood memory everyone either cherishes or would like to have: she comes home from school to her smiling mother, who is just about to start baking her a birthday cake. But after one bite, Rose realizes something is very wrong: although the cake is objectively delicious and made from quality ingredients, she can taste something else in it, too. Hollowness, emptiness. Her mother’s mal-de-vivre.

Rose soon discovers, much to her despair, that, no matter what she eats, she can now taste the emotions of the person who prepared the food – even in something as basic as a sandwich. Imagine eating a bakery cookie and tasting the boredom and frustration of the person who made it. Or, even worse, finding out your mother’s deep, dark secrets by way of her roast beef.

The novel follows Rose through the years, as she deals with this gift/curse. The focus is also on her family, which appears fairly average, in that dysfunctional way that is so frequent in contemporary novels: her father, a pragmatic lawyer who seems to have achieved most of his personal ambitions, and who remains a distant figure most of the time; her mother, who struggles to discover what she wants in life and hides her inner void as best as she can; and her older brother, Joseph, a reclusive teen genius who grows up to be an even more reclusive young adult, with, as it turns out, a gift of his own.

The Particular Sadness of Lemon Cake, despite its title and premise, is much less about food than it is about human relations. Descriptions of food revolve more around feelings than flavours, which may disappoint foodies looking for mouth-watering depictions, but which also makes the mind wander to interesting places: what would depression, joy, infatuation, or excitement taste like?


Ultimately, the novel is about how people navigate around and with each other – a fairly common theme, but a seemingly infinite one. Rose’s problem is that, no matter how much she would like to shut the world out, she can’t: she has to eat, and although she relies as much as possible on vending machine snacks and factory-made food, she can’t forever avoid tasting other people’s feelings and having to deal with them. Her circumstances are unique, but she remains a relatable protagonist in that way. It also helps that, although her chipper personality takes a sarcastic turn after she discovers her gift, she never resorts to whining about her condition, and remains stoic, almost wise at times. I also very much liked her father, despite his complacency: he too, in his own way, is at heart someone trying to find his place. The character of Joseph was harder for me to enjoy (although you’d think I’d relate to an anti-social nerd who insists on reading at the dinner table), in part because of what his gift turns out to be: I won’t spoil it, but I thought it was a bit far-fetched, and not very useful to the story (or in the real world, for that matter).

Despite the book’s qualities, I closed it with a feeling of emptiness – maybe like the one Rose tasted in that fateful birthday cake. It had started out strong, a real page-turner, but I felt the book fizzled out in the end, with much potential left untapped. This is probably because the story ends just as Rose is starting to discover something her gift might be good for. I would have liked to see that part be more explored. In fact, I would have liked more development in general: the ingredients were there for a great story, and there are little gems scattered throughout, but somehow the richness was lacking to bring them all together.

Although the title lemon cake is explicitly a round cake, iced with chocolate, I took this as an opportunity to revisit an old favourite: lemon pound cake. My father-in-law gave me this recipe, and, although it is a classic, it’s still delectable. The syrup at the end is all-important, as it gives the cake its lovely moisture and terrific lemon flavour. I’m told it works best with margarine, but I refused to try this, as margarine make me shudder.


Lemon Pound Cake
From my father-in-law’s kitchen (possibly taken from somewhere else)

Yields one 22 by 11 cm (8.5 by 4.5 inch) cake

250g (2 1/2 sticks, 9 oz) unsalted butter, softened
250g (1 1/3 cup, 9 oz) granulated sugar
5 whole eggs, beaten
The zest of two lemons, grated
250g (1 3/4 cuo, 9 oz) flour
2 tsp baking soda
Pinch of salt

For the syrup:
The juice of 4 lemons
100g (3/4 cup, 3.5 oz) confectioner’s sugar


Preheat oven to 180ºC (350ºF).
In a large mixing bowl, cream the soft butter with the sugar, until pale yellow in colour. Gradually beat in the eggs and lemon zest. Combine the flour, baking powder, and salt in a medium bowl, and gradually stir the dry ingredients into the butter and egg mixture.

Butter a 22 by 11 cm (8.5 by 4.5 inch) cake mould. Pour the batter into the mould, place it on a baking sheet, and bake for 60 to 65 minutes. The cake is ready when a knife inserted into the center comes out clean.

Meanwhile, make the syrup: gradually stir the confectioner’s sugar into the lemon juice, until all the sugar is dissolved.

When the cake is baked, unmould it and prick its top and sides with a fork while it is still very warm, and brush with syrup, until most or all of the syrup is absorbed. Let cool on a rack. Store at room temperature, wrapped in plastic wrap.

Thursday, August 18, 2011

Food, Culture, and Friends - Matsuri Japon


Okay, Evelyne has put me to shame by posting about this days ago, so… I really need to write this now.

Last weekend, I hung out with two lovely gals and fellow food bloggers: Evelyne of Cheap Ethnic Eatz, whom I’ve seen on several occasions, and Mary of Mary Mary Culinary, who was in town for a few days, and whom I was meeting for the first time. Incidentally, Mary was hosting the August Daring Cooks’ Challenge, the deadline of which was only a day away. Fortunately, I’d completed the challenge the day before, so I could confront her guilt-free. :-)

It turns out there were quite a few things to do in Montreal that day, including Gay Pride-related activities, and Otakuthon, which I actually didn’t remember about until Monday. Not that I would’ve forced my two friends to attend an anime convention… But in the end, we settled for another Japan-themed event: the annual Montreal Matsuri Japon festival.

Every year for the past ten years, Matsuri Japon (a masturi is a traditional Japanese festival) has been celebrating Japanese culture. Despite my interest in the latter, I had never attended the event, and was looking forward to finally seeing it for myself.

Finding the location was easy enough: we just followed the throng of yukata-clad girls. You could actually borrow a yukata on site, and wear it around the festival (sadly, I didn’t have a good pic of people wearing the traditional garment, but you can see some in Evelyne’s post). Japanese dyed fabric, jewellery, stationery, toys, and other trinkets were on sale at various stalls.


Of course, being food bloggers, we were (not solely, but mostly) in it for the food. There was quite a bit to choose from, including prepared bento, curry, and noodles. Mary and Evelyne went for the okonomiyaki.

I never understand why the okonomiyaki is so often described as a “Japanese pizza.” “Japanese pancake” is a comparatively better fit, but anyone looking for the fluffy texture of a pancake will be sorely disappointed. The only way I can really accurately describe okonomiyaki is: pan-fried batter with stuff in it, topped with katsuoboshi (dried bonito shavings), aonori (nori sprinkles), special brown sauce, and mayo (and, ideally, pickled red ginger, or beni shoga). The “stuff” you put in it can vary, but usually includes cabbage and shrimp.

The girls had some trouble eating their okonomiyaki with chopsticks (normally, it should be pre-cut into wedges). Meanwhile, I was happily slurping refreshing hiyashi udon, chilled noodles served in a cold light sauce.


I also splurged on a couple of takoyaki, or octopus balls.


It seems to take quite a bit of time to make takoyaki, and they need to be frequently turned over. I really want that apparatus, though.


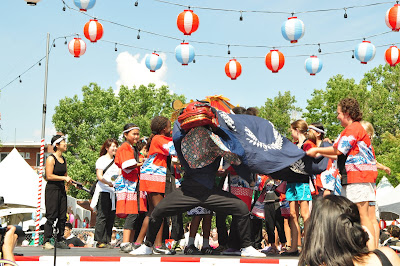
All of this was happening against a background of entertainment, including traditional dancing and taiko drums. The latter were really impressive, and the players looked like they were having a real blast.


How cool would it be to have one of these in your living room? I can think of a lot of uses for those mallets, too.


There was also the traditional carrying of the shrine. I kind of like that they didn’t even try to make it look like a real, ancient shrine, and just went for a simple design.


The kids had their own shrine (as happens in real matsuri), and they also performed on the drums (I have pics, but they’re sub-par).


I don’t think all matsuri have a dragon, but it never hurts to have one.


It was a very fun event, and it was even better sharing it with my foodie friends. Thanks for a great afternoon, girls!

Sunday, August 14, 2011

Daring Cooks' August Challenge - Appams and Curry


Mary, who writes the delicious blog, Mary Mary Culinary was our August Daring Cooks’ host. Mary chose to show us how delicious South Indian cuisine is! She challenged us to make Appam and another South Indian/Sri Lankan dish to go with the warm flat bread.

This month’s hostess’ blog is one of my regular and favourite hang-outs, so I couldn’t wait to find out what she had planned for us. Mary didn’t disappoint.


I’ve made naan bread many times, and I’ve also had the unleavened bread chapatti in Indian restaurants, but appams were entirely new to me. They are basically yeasted pancakes, except that they are egg-free. And made from ground rice instead of wheat flour. And shaped more like a crêpe.

There was a lot of resting time, but overall the preparation was mostly similar to pancakes or crêpes. And, since I can almost never manage to make perfectly round crêpes, there’s no reason why I should have expected to be able to make perfectly round appams.


The appams tasted very mild, and I loved their light, slightly spongy texture.

As a main dish, I chose the chemeen pappas, or shrimp in coconut milk. I thought I had all the necessary ingredients on hand, but then realized I had no curry leaves. I searched and searched my (admittedly very cluttered) pantry, but couldn’t find any. I ended up using dried basil instead – not a substitute by any means, but the result was surprisingly palatable.


The shrimp were great, spicy with just the right amount of heat, and a great sauce that was just begging to be mopped up with the appams – and naturally, we obliged.

Thank you, Mary, for this instructive challenge! The rest of you, please check out the challenge recipes at the Daring Kitchen, and click through the Daring Cooks’ blog roll to see the tasty dishes served this month!