Friday, May 29, 2009

A Quickie Gift - Chocolate Thumbprints

A while back, I needed to bake something to give someone the next day. It had to be easy to carry, it had to be quick, and it had to be chocolate.

I'm told it's always funny to watch me browse for a recipe. It's true that I get pretty frantic, pulling cookbooks off the shelf, madly flipping through them, putting them back in their rightful place (they have to be organized by size), then pulling them out again and spreading them across the table to compare with other recipes. I get a little crazy during those moments...


So, after going through the above process, I finally settled on these Chocolate Thumbprints from Martha Stewart's Cookies. I got this book for Christmas and have only tried a few recipes so far. Some of them didn't come out quite right, but this one was definitely a winner!

These little cookies were very easy to make, and they came out looking adorable! Furthermore, I really loved the buttery, crumbly cookie base, and the chocolate topping hardened nicely, while retaining a smooth texture. Plus, the cookies' rustic aspect makes it really difficult to screw up their appearance: it's the perfect gift recipe when you're in a hurry!

It turns out the recipe on the website is actually a more-or-less halved version of the one in the book - which I halved anyway, because 4 dozen cookies seemed like an awful lot. At any rate, everything went smoothly. I really recommend these!

Chocolate Thumbprints
From Martha Stewart's Cookies (recipe also available here)

Yields 20-24 cookies

130 (1/2 cup plus 3 tbsp) unsalted butter
70g (1/2 cup) confectioners' sugar
1/4 tsp salt
1 tsp pure vanilla extract
175g (1 1/4 cup) all-purpose flour
90g (3 ounces) dark chocolate, chopped (or discs)
1 tsp light corn syrup

Preheat oven to 180°C (350°F). Line a baking sheet with parchment paper.

In a mixer bowl, with a wooden spoon, beat together 200g (1/2 cup) butter with the confectioners' sugar, salt, and vanilla. Beat in flour until combined.

Form balls with 2 tsp of dough for each, rolling them with your palms, and place them 2,5cm (1 inch) apart on the baking sheet. Bake for 10 minutes, then remove from oven. With your thumb, or with a similarly shaped object (I used the handle of a pestle), make deep, wide indentations. Don't panic if the edges crack (even the cookies on the photograph in the book were cracked), just make sure not to split the cookies completely in half.

Rotate sheet and return to oven. Bake until light brown on the edges, 7 to 9 minutes. Keep an eye on the cookies, as the indentations may lose definition. If this happens, take the cookies out and press again (if using your thumb, keep a bowl of iced water nearby and dip your thumb in it if the heat gets to be too much - just make sure to dry your finger before touching the cookies). Transfer to a wire rack and let cool completely.

Melt the chocolate with the remaining 30g (3 tbsp) butter and the corn syrup in a double boiler. When smooth, let cool for a bit until slightly the mixture is slightly thickened. Fill the cooled cookies with a teaspoonful or two of the chocolat mixture. Let the mixture firm up before storing in airtight containers at room temperature, in single layers.

Wednesday, May 27, 2009

Daring Bakers' May Challenge - Apple Strudel

I absolutely adored this month's Daring Bakers' challenge: apple strudel! As my parents live close to Vienna these days, I have had the chance to sample this typical dessert quite a few times (although, being a chocophile, I've often chosen sachertorte over it). But because I associate it so closely with Viennese cafés, it had never occurred to me to make it myself. Well, this month's hostesses, Linda and Courtney, changed that, and I am certainly grateful to them!

The May Daring Bakers’ challenge was hosted by Linda of make life sweeter! and Courtney of Coco Cooks. They chose Apple Strudel from the recipe book Kaffeehaus: Exquisite Desserts from the Classic Cafés of Vienna, Budapest and Prague by Rick Rodgers.

Two smaller strudels from one batch of dough

Although we were given a recipe for classic apple strudel (which you can find at The Daring Kitchen), we were encouraged to play around with the filling. The only requirement was to make the strudel dough ourselves. The ingredients themselves are very simple: flour, water, oil, and vinegar. The main difficulty lied in stretching the dough until it was tissue-thing. The technique consisted in rolling out the dough as much as possible on a tablecloth rubbed with flour (or, as I did, floured waxed paper taped to the table), then picking it up and stretching it with the help of gravity.

Most people seem to have found the dough a dream to work with, reporting that it stretched almost by itself. My experience was a little rockier... My first attempt at making the dough led to a sticky mess that was too wet and completely impossible to knead; I threw it out immediately. For my second attempt, I was too cautious about adding liquid, and so I ended up with a dough that was too dry and rather difficult to stretch: gravity wasn't enough, so I had to lay the dough flat on the table and pull it. Even with this method, I had some trouble, as the dough tended to shrink back, like pizza dough. I managed it in the end, but my back was killing me by the time I was through.

A couple of days ago, I made a third, final attempt. I had a better idea of what the dough was supposed to be like, and was less shy about adding water and kneading. The result was much better, and I finally understood what other people meant about the dough being easy to work with - as long as it's made right. Unfortunately, I made the mistake of not flouring my work surface, thinking the dough wouldn't stick - which, of course, it did, leaving me to desperately try to pry it from the waxed paper without tearing it, while shrieking for Laurent to get me some flour, STAT! Despite that little mishap, the rest of the process went very well, although I still used the same unorthodox stretching technique. It worked, though: my dough was much thinner than the first time, while remaining solid enough to hold all the filling in.

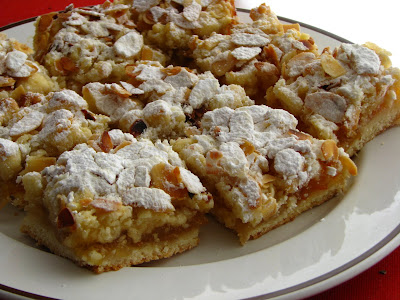
Speaking of the filling... My first strudel was a savoury one, with Italian-inspired ingredients: mild Italian sausage, portobello mushrooms, red bell peppers, and grated mozzarella. It made a really good dinner! For my second batch, I cut the stretched dough in half lengthwise and made two sweet versions: one following the classic apple recipe we were given, and one with an improvised combination of pear, chocolate, and almond slivers. The apple strudel was delicious, and honestly rivaled the ones I've had in Vienna. However, I used very fresh Royal Gala apples, which didn't look like they would soften enough during the baking process, so I cooked them in butter aforehand - which turned out to be a wise decision. The pear strudel was kind of unbalanced (you can see all the chocolate ended up on one side of the pastry), but pear and chocolate are always a great combination, and I will get it right next time.

Because there will definitely be a next time. Even though this recipe looks complicated at first glance, it's really quite simple once you get the hang of it. And, as you can see, it's also very versatile, good for dinner or dessert. As for the pastry, it's uniquely light and flaky once it's baked. The only downside is that it tends to get soggy rather quickly, so it's best to eat the whole thing within a day or two.

I'm curious as to what else I could do with strudel dough... Maybe use several sheets to make a pie? Or how about mini-strudels, as an appetizer? Oh, the possibilities!

As I said, the original recipe and instructions can be found at The Daring Kitchen. Below is what I ended up doing, for better or for worse.

Strudel Dough
Makes one large strudel or two smaller ones, serves about 6 people

200g (1 1/3 cups) unbleached flour
1/8 tsp salt
105ml (7 tbsp) water, plus more if needed
30ml (2 tbsp) vegetable oil, plus additional for coating the dough
1/2 tsp cider vinegar
115g (1/2 cup, or 9 tbsp) butter, melted
1240ml (1 cup) fresh breadcrumbs

Combine flour and salt in a mixing bowl. Combine the water, flour, and vinegar in a measuring cup and gradually add it to the flour, stirring with a wooden spoon until you get a soft dough that's not sticky, but not too dry either: it needs to remain very supple.

Take the dough out of the bowl and knead it on an unfloured work surface for about 7 minutes. Pick it up and throw it down hard onto your working surface every now and then.

Put the dough on a plate, oil the top lightly, and cover tightly with plastic wrap. Let rest for 30-90 minutes (the longer the better).

Meanwhile, heat 3 tbsp of the melted butter in a skillet, add the breadcrumbs and cook until they are brown and toasted. Let cool completely. Prepare your filling (see below).

When your dough has rested long enough, put your oven rack in the upper third of the oven and preheat to 200°C (400°F). Line a baking sheet with parchment paper.

Cover a large work surface with waxed paper and tape it securely. Flour lightly. Turn out the dough on the surface and roll it in a rectangle, as flat as you can. Then, stretch the dough any way you can. Ideally, pick it up by one end and let gravity do the work, supporting the dough with the backs of your hands and your forearms as needed. Or, do what I did and pull around randomly, keeping the dough on the surface. The dough is ideally supposed to stretch until 90cm x 60cm (3 x 2 feet), but I never got it to that length. What's important is for the dough to be very thin, see-through in fact. Don't panic if you get a few holes. When you are done, the edges will likely be thicker; cut them out with scissors. If you want to make two smaller strudels, cut the dough lengthwise in half.

Using a silicone pastry brush (or your fingers), spread another 3 tbsp of melted butter over the entire surface of the dough, then cover with the breadcrumbs (this helps keep the layers separate after the strudel is rolled, and keeps the pastry flaky). Spread your filling about 10cm (4 inches) away from the short edge of the dough, in a strip about 15 cm wide (6 inches). Fold the short end of the dough over the filling, then roll the strudel, either with your bare hands, or by lifting the waxed paper and letting the strudel roll onto itself. Tuck the side edges under the roll. Brush the top of the strudel with the remaining butter.

Spreading the filling on the prepared dough

Curve the strudel into a horseshoe form if necessary (mine was small enough to be left straight), then pick it up and place it on the prepared baking sheet. Bake in the preheated oven for 30 minutes, or until the pastry is deep golden brown (the smaller strudels bake more quickly). If making a dessert strudel, let cool at least 30 minutes before serving (savoury strudels can be eaten hot). Cut into slices with a serrated knife.

Italian Sausage and Vegetable Filling
Fills a large strudel

300g (10 oz) mild Italian sausages (about 3 sausages)
2 portobello mushrooms
1 tbsp olive oil
1 red bell pepper
1 yellow onion
1/4 tsp dried oregano
160ml (2/3 cup) grated mozzarella

Savoury sausage strudel

Remove the ground meat from the sausage bowels. Cook in a skillet over medium heat, until browned and completely cooked. Remove from heat and reserve.

Remove the stems from the mushrooms. Cut the mushrooms into slices and cook them in a skillet over high heat, without adding any oil or butter. Salt, turn once, and continue cooking until the mushrooms are beginning to shrivel and brown (dry-cooking them like this allows them to release some of their moisture, and brings out their flavour). Transfer to a bowl and reserve.

Core the bell pepper and cut it into strips, julienne-style. Mince the onion. Heat the olive oil in a pan over medium-high heat, cook the onion and pepper strips until tender. Season with oregano (do not salt, as the sausage meat is very salty). Remove from heat and reserve.

When ready, spread the ingredients in layers over the prepared strudel dough as indicated above (don't forget to top with the mozzarella). Roll, butter, and bake as indicated. Serve hot.

Classic Apple Filling
Fills a half-strudel

1 tbsp rum
2 tbsp raisins
1/4 teaspoon ground cinnamon
35g (1/6 cup) sugar
2 tbsp butter
120ml (1/2 cup) coarsely chopped walnuts
2 medium tart apples
Confectioners' sugar for dusting

Apple strudel

Mix the rum and raisins in a large bowl. Mix the cinnamon and sugar in a smaller bowl.

Core and peel the apples, cut them into 5 mm (1/4 inch) slices. Melt the butter in a skillet over medium heat and cook the apples until they are slightly tender. Mix them with the raisins and rum, then add the cinnamon sugar and mix until the apples are coated.

Spread the walnuts and apple mixture over the prepared strudel dough as indicated. Roll, butter, and bake as indicated. Sprinkle with confectioners' sugar when baked. Let cool and serve warm or at room temperature.

Pear and Chocolate Filling
Fills a half-strudel

2 medium ripe pears
60 ml (1/4 cup) dark chocolate discs or chips
the juice of a lemon
3 tbsp light brown sugar
60 ml (1/4 cup) slivered almonds
Confectioners' sugar for dusting

Core and peel the pears and cut them into 5 mm (1/4 inch) slices. Douse them with the lemon juice.

Spread the filling in layers over the strudel as indicated above: first the almonds, then the chocolate, and finally the pears. Sprinkle the sugar over the pears. Roll, butter, and bake as indicated. Sprinkle with confectioners' sugar when baked. Let cool and serve warm or at room temperature. (Note: Don't refrigerate this strudel later, as the chocolate will harden again - it might have been a better idea to use a ganache... I'll try it sometime and report back.)


Pear and chocolate strudel

Sunday, May 24, 2009

Getting Out of a Jam - Ginger and Orange Squares

For some reason, there was a time when my friends and relatives kept giving me jams, jellies, and spreads. While I like jam, I'm not particularly infatuated with it, so I'm not sure why people seemed to associate me with it.

But, never being one to complain about free food (except when it's something perishable that I really don't need at the moment), I diligently made myself toast with cream cheese and jam for breakfast, or peanut butter and jelly sandwiches for lunch, until most of the spreads were gone.

However, there was one particular jam that I had no idea what to do with: a ginger root jam. The taste was very strong, much too strong for breakfast or a sandwich. The label suggested using it to season a roast, but it didn't seem like something I wanted to do: I love to spice up savoury dishes with ginger, but the sweetness of the jam seemed ill-suited for this.

So, I decided to combine the ginger jam with orange marmalade, and use it as a filling for bar cookies. And thus, Ginger and Orange Squares were born.

I once again turned to Marcy Goldman's A Passion for Baking. There are several lovely bar recipes in there, including the one I used as a basis for this project: Bookstore Café Apricot Squares. The original recipe, which includes a homemade apricot filling, looks delicious, and if I hadn't been looking to get rid of the ginger jam, I would have followed it faithfully. As it was, I adapted the filling, obviously, and also tweaked the dough a little bit, substituting almond powder for ground walnuts and some of the flour, amongst other things.

Despite the blending presence of the marmalade, the ginger's sharpness was still very strong. It was good, but not amazing. I'm not sure I'd go out of my way to make this recipe exactly the same - I certainly wouldn't go looking for more ginger jam.

But the crust... The crust was divine. Unexpectedly, it made think of a delicious almond-apple tartlet I used to eat often when I lived in Brussels. The fact that I topped the squares with slivered amonds probably had something to do with it. I really think I will try making this recipe again as a fruit pie, rather than jam squares: a fresher, less sweet filling would go wonderfully with the pastry.

So if you ever feel like trying these squares with a different type of jam or filling, I highly recommend it. The recipe is very simple to make, and it's easy to make it look pretty! And that crust...


Ginger and Orange Jam Squares
Adapted from Marcy Goldmann's A Passion for Baking

Makes 16 largeish squares

For the tart pastry crust:
280g (2 cups) all-purpose flour
95g (1/2 cup) sugar
1 tsp baking powder
1/4 tsp salt
70g (1/2 cup) almond powder
130g (2/3 cup) butter, softened
2 large eggs
1 tsp vanilla extract
6 tbsp whipping cream

For the filling:
240ml (1 cup) ginger root jam, room temperature
240ml (1 cup) orange marmalade, room temperature

To decorate:
Confectioners' sugar
Almond slivers

Combine flour, sugar, baking powder, salt, and ground almonds in a mixing bowl. Add butter and mix until you obtain a uniform, floury mixture. (Note: Marcy Goldmann uses a food processor, which I rarely do. I started mixing with a wooden spoon, then just used my hands and squeezed the remaining bits of butter until they blended.) Gradually incorporate eggs, vanilla extract, and cream.

Turn out the dough on a lightly floured surface and knead gently to obtain a firm but soft dough. Divide in two equal parts and wrap separately. Put one half in the refrigerator for one hour, and put the other half in the freezer.

Preheat oven to 180ºC (350ºF). Grease a 23cm (9 in) square pan or a 28cm x 18cm (11in x 7in) pan and place on top of a baking sheet lined with parchment paper. (Note: you can also grease a standard baking sheet and place it on top of the parchment paper-lined one)

Take the refrigerated dough out and press it onto the bottom of your prepared pan. Bake about 10-12 minutes. Cool well.


Take the remaining half of the dough out of the freezer and grate it coarsely. Spread the marmalade on the cooled, baked pastry bottom, then spread the ginger jam over it. Sprinkle the grated pastry over the filling, so as to cover it. Bake about 25 minutes, until the top pastry is beginning to brown. Let cool in pan.


Toast the almond slivers in a non-stick pan over medium-high heat, stirring often, until they begin to brown and become fragrant. Let cool, then sprinkle over pastry. Dust with confectioners' sugar and cut into squares.

Saturday, May 16, 2009

My Idea of Resting: Focaccia and Bocconcini Tomatoes

I have lost my bread-baking virginity!

In my last post, I mentioned a focaccia that was in the process of rising. It was my way of celebrating the fact that I finally get to take a break from work, at least for a few days. It's been a busy school year, and I could feel myself starting to burn out during the last couple of months. But I made it, and one of my rewards (apart from sleeping and idly watching TV) was to spend as much time in the kitchen as I wanted.

So on Wednesday, the day after I got home from my last set of conferences, I pondered on what to make. Ideally, it would be a project which would require lots of time, as opposed to the quickie projects I've been doing recently. And it would have to be either a side dish or a dessert, because Laurent had already planned to make me something for dinner that night.

And so, I decided to tackle a project that had been lingering in my mind for a while: baking bread, all by myself.

Bread baking has always seemed incredibly intimidating to me, because it is a process I don't fully understand. Actually, to be honest, I am still awed, even today, by the baking process in general. I can understand cooking; but it still amazes me how flour, eggs, and butter can turn into cake, or cookies. And when it comes to bread, where rising is involved... well, I'm just floored by that. Even though I've read up on gluten, and how yeast works, and so forth, I still find it magical.

To be honest, I had made one type of bread before: pizza dough. Pizzas are normally Laurent's territory, and he really makes the best ones I've ever had. But one day, I was ticked off because he'd made fajitas in my absence, which are normally one of my specialties... so I decided to steal one of his recipes, and made pizza on my own. (As you can see, we're both a little territorial in the kitchen - but it works, in a weird, paradoxically dysfunctional kind of way.) And I did a pretty good job, if I do say so myself.

Nonetheless, I perceived a difference in making pizza, which rises at first but remains almost completely flat in the oven, and making a bread which rises and yields actual crumbs. I was worried about how the inner texture would come out. A foccacia seemed like a good compromise: it's technically a flatbread, but it is still much puffier than pizza bread.

So, with that in mind, I found an alluring focaccia recipe in Marcy Goldman's A Passion for Baking. I love this book. It's very versatile, with many different types of recipes in it (breads, cakes, muffins, cheesecakes, scones, doughnuts, tarts, cookies), and the instructions are limpid - perfect for a rookie like me.

Unfortunately, I won't give a recipe today, because, although the focaccia came out very nice, it's not quite perfect yet. Since I was making it to go with dinner, I decided to forgo the rather strong toppings which Marcy Goldman used (which included onions, black olives, and tomatoes), and went with more neutral flavours: olive oil, salt and pepper, dried oregano, and a dash of dried chili pepper. However, I should have put more salt in the dough to counter the absence of strong flavours, as it was a tad bland coming out of the oven (like the salt-free bread my grandmother eats for her blood pressure). And it's possible that I overkneaded the dough and put too much flour. So I'd like to try it again and tweak it a little, before posting a recipe.

The recipe yielded two 20 cm (8 in) breads, and I had enough leftover for two individual breads, which I experimented a little on: I topped one with truffle oil and oregano, and the other with sliced green olives and thyme. The truffle aroma evaporated in the oven, but the olive one tasted great, which proves that the original recipe really called for stronger toppings.

But... My focaccia rose! And it had crumbs and a fluffy interior! And my kitchen smelled like a bakery for a few hours! That alone made this first-time experience a success in my eyes!

Also, it went well with what Laurent had prepared for dinner: a classic tomato and bocconcini dish. I really feel like I don't need to give a recipe for this either, because it is so simple to make: get the best fresh bocconcini available (we use Saputo-brand Mozzarina), along with ripe, sweet tomatoes, slice them up, arrange them prettily with fresh basil, drizzle with olive oil and balsamic vinegar (or, in this case, balsamic glaze) to taste, sprinkle with fresh ground pepper and fleur de sel, and presto! You can add some slices of prosciutto and parmesan shavings for a heartier meal.


To me, this dish signifies the return of summer - which is probably why we tend to eat it very often between May and September, in an effort to keep that summer vibe going for as long as possible.

And, because Laurent knows me so well, he had bought a bottle of Muscat Beaumes de Venise, my favourite sweet wine, which I also associate with leisurely sunny days.

So, between a new challenge and an old tradition, I'd say my first day of rest was absolutely perfect!

Thursday, May 14, 2009

Daring Cooks Challenge: Ricotta Gnocchi

It's been a while! I've been busy, and under quite a bit of stress for various reasons. But my schedule has finally cleared up as of today, and the pressure should hopefully be gone soon, which means I will have more time to get busy in the kitchen, and write about it here. In fact, I just worked some of that stress out by kneading focaccia for the first time ever. It's rising as I type this; I hope it turns out well.

BUT... That's not what I'm here to write about today. The real point of this post is really much more exciting (although I'm pretty excited about that focaccia, to tell the truth).

Today, we reveal the results of the first ever Daring Cooks challenge! I'm very pleased and grateful to have been able to take part in this new project!


Ivonne, of Cream Puffs in Venice, and Lisa, of La Mia Cucina, who also happen to be the amazing founders of the Daring Bakers, challenged us to make ricotta gnocchi, following Judy Rodgers' recipe in The Zuni Café Cookbook.

I had only ever had gnocchi once in my life: they were potato, and storebought. So I really had no idea what to expect from this recipe. Laurent, however, made a face when I revealed the challenge to him: despite his Italian roots, he hates ricotta in most of its forms. He likes it in cannoli, but only if it's chocolate-flavoured. Nevertheless, he was open to being my taste-tester.

You can find the original recipe and tips at the Daring Kitchen. The main purpose was for us to make and shape the gnocchi - the seasonings and sauce were left up to us.

It was recommended to use fresh ricotta, or make our own (which a lot of impressive Daring Cooks did). I, however, was unable to find fresh ricotta, and was already intimidated enough by this challenge without adding an extra difficulty. So I used *gasp!* the generic variety.

For the sauce, I decided on something I knew Laurent would like, to make up for the fact that I was forcing him to eat ricotta: I made a broccoli cream sauce, with loads of parmesan.

The verdict: I had fun making the gnocchi, but I am still not sure whether they came out the way they were supposed to - there's a chance my cheese was still too wet. The gnocchi didn't disintegrate in the boiling water, which was apparently the biggest risk with this challenge. But, while they were pleasantly light and airy, they remained very mushy, too soft for me to stick a fork in them and lift them. And you know what? I think I agree with Laurent on ricotta: it's not my favourite cheese either. Then again, maybe it's my fault for using generic ricotta...

Also, looking at others' pictures, I realize I could have made more of an effort to form beautiful, smooth gnocchi. I was afraid of overhandling them, so I kept them rather rustic, but perhaps I was being overly cautious.

I froze half of the gnocchi, for future use. Some people pan-fried theirs, and I think I might try the same with my leftovers: I have a feeling the added crunch would be a definite plus.

At any rate, my thanks to Ivonne and Lisa for inspiring us to try new things!

Adapted Challenge Recipe:
Ricotta Gnocchi in a Broccoli Cream Sauce

Yields 48 small gnocchi

For the gnocchi:
454g (1 pound/16 oz/ 2 cups) fresh ricotta
2 large cold eggs, lightly beaten
1 tbsp (1/2 oz) unsalted butter, melted
15g (½ oz) Parmigiano-Reggiano, grated (about ¼ cup very lightly packed)
¼ tsp salt
all-purpose flour for forming the gnocchi

For the sauce:
One head of broccoli
160ml (2/3 cups) heavy cream
120ml (1/2 cup) grated parmesan
Fresh-ground pepper

To drain the ricotta:
Line a sieve with paper towels, place over a bowl and drain in the fridge for 24 hours. It is important for the ricotta to be dry, or the gnocchi will fall apart. (Note: I pressed the cheese every now and then and changed the towels, to get as much moisture as possible out.)

To make the gnocchi batter:
Put the ricotta in a large bowl and mash it with a rubber spatula (you need a flexible tool here). Incorporate the eggs and the melted butter. Finally, add the grated parmesan and the salt. Scrape the bowl with the spatula and gather the batter in the center of the bowl.


To shape the gnocchi:
Before you start making the gnocchi, get a small pot of water boiling, salt it, and keep it at a simmer. You will use this to test your first gnocchi.

Line two baking sheets with parchment or waxed paper and dust with flour. Cover the bottom of a large, shallow baking pan with 1 cm (1/2 inch) of flour.

Collect a tablespoon of ricotta mixture and gently drop it into the flour. Roll it in the flour so that it is coated in it (either by pushing it around with your fingers or by gently shaking the pan). Pick up the ball of batter and shape it into an oval by pressing it delicately in your palm.

Once your first gnocchi is ready, drop it into the simmering water. It will sink, then bob to the surface. Once it is floating, let it cook for 3-5 minutes, until it is firm. If it holds together, your batter is fine. If not, it is recommended to add egg white, or beaten egg. Otherwise, some people added flour to the batter. Run a second test, just to make sure.

Looks lonely, doesn't it?

Shape the rest of your gnocchi in the same way. You can put several balls in the flour-pan at the same time, just make sure they don't touch each other. Place them on the prepared baking sheets when they are formed and coated.


To cook the gnocchi:
Once your gnocchi are all shaped, you can either cook them right away, or put them in the fridge for an hour to firm them up (Note: they may be stickier coming out of the fridge. If so, sprinkle some more flour on them). If you want to freeze them for later, put the baking sheets in the freezer for several hours, then put the gnocchi in airtight bags.

Before you start cooking the gnocchi, make the sauce (see below).

Get a large pot of water simmering and salt it (the pot must be large to prevent the gnocchi from bumping into each other). Drop the gnocchi in and cook them the same way you did with the tester. Remove with a slotted spoon, coat in the sauce, pepper to taste, and serve immediately.

To make the sauce:
Chop the broccoli tips and boil them in salted water until they are very soft (overcooked, in fact). Drain, run under cold water, and reserve.

Bring the heavy cream to a simmer in a small pan, stirring constantly. Incorporate the broccoli, and mash thoroughly with a spoon. Remove from heat and puree with a hand mixer. Return to low heat, add the parmesan, and stir until melted. If the sauce is too liquid, dissolve a teaspoon of cornstarch in a tablespoon of cream, add it to the sauce and bring back to a boil (or just add a tablespoon of Maizena).

Monday, May 4, 2009

Almond Cookie and Peppered Lemon Tartlets

"They're perfect!" my father-in-law exclaimed with his mouth full. "Especially the crust! When you make them again, don't change a thing!"

This comment had me both pleased and distraught. I was pleased, because he was talking about the lemon tartlets I had made. But I was distraught that I was being asked not to change a thing... You see, these tartlets were the result of a series of recycled leftover ingredients that would take some time to reproduce.


It all started when I made chocolate pots-de-crème several weeks ago. They require egg yolks, and so I was left with a rather large quantity of egg whites on my hands. I had already made dry meringues not too long before, and I didn't have enough time to make something elaborate like macarons, so I decided to try my hand at making amaretti cookies.

I flipped through my cookbooks and found at least four recipes for amaretti. I was surprised to find that they were quite different from one another: the quantities varied quite a bit, and some recipes required the egg whites to be beaten, while others didn't. Since I had a lot of whites, I decided on the recipe which required the largest amount.

Unfortunately, it turned out to be a recipe for coarse macarons, rather than amaretti (despite the title's claim). The cookies came out far too chewy; not only that, but I overbaked them and burnt the bottoms. In short, it wasn't a huge success. I kept them around for a few days, nibbling a couple here and there. But there were so many that it didn't look like Laurent and I could ever finish them by ourselves, and they weren't good enough to share with other people. So, I decided to recycle them into something else.

Inspired by the last Daring Bakers' challenge, I decided to reduce the cookies to crumbs and make tartlet shells out of them. I mused for a bit about what filling to make, and decided on a no-bake lemon cream: the acidity would balance the cookies' sweetness, and at least I wouldn't run the risk of overbaking the shells. I also added some freshly ground pepper, to add a little kick.

The tartlets came out better than I could have hoped for. And, as I mentioned, they were a huge hit with my father-in-law. The problem is, reproducing them exactly seems like a huge hassle: I'd have to make something involving egg yolks, then use the leftover whites to make failed macaron-amaretti hybrids (making sure to burn them), and only then would I get to make the tarts again... Or, I could use a recipe for lemon filling that requires yolks, rather than whole eggs, and that would solve the problem...


Well, I can't guarantee that the next batch will turn out exactly the same, but I will definitely be making this kind of recipe again! I think my father-in-law will be pleased!


Almond Cookie and Peppered Lemon Tartlets

Makes about 16 mini tartlets (5 cm/2 inches diameter), or 7 medium tartlets (9 cm/3.5 inches diameter)

For the shells:
About 30 almond-based cookies (coarse macarons, or amaretti)
100g (1/2 cup) unsalted butter, melted

For the lemon filling:
(Adapted from Le Cordon Bleu Quick Classics)
3 eggs
100ml (1/3 and a half cup) lemon juice (2-3 large lemons)
100g (2/3 cup) icing sugar
60g (1/3 cup) unsalted butter, diced

Preheat the oven to 190ºC (375ºF).

To make the shells: Run the cookies through a food processor until they are reduced to crumbs. Gradually pour the cooled melted butter over them, and mix until the mixture is moist enough to form bunches when you squeeze handfuls of it (you may need less butter than indicated, depending on how dry your cookies were).

Press the mixture into the tartlet molds of your choice (I tried molds with both removable bottoms and fixed bottoms, and they both worked), making sure to coat the bottom and edges uniformly. Line a baking sheet with parchment paper and place the molds on it. Bake for 15-20 minutes, until the shells are brown and very crisp. Let cool before unmolding.

To make the filling: whisk the eggs, lemon juice, and sugar together in a saucepan. Place over low to moderate heat and whisk constantly until the mixture is thick enough that you can make lasting traces in it with your whisk. Remove from heat, add the diced butter and continue whisking until butter is melted.

As soon as the tartlet shells are cool enough to handle, fill them with the lemon mixture. Sprinkle with fresh, coarsely ground pepper. Let cool in the fridge for at least an hour, until the filling has set.