Sunday, February 27, 2011

Daring Bakers' February Challenge - Panna Cotta and Florentine Cookies


The February 2011 Daring Bakers’ challenge was hosted by Mallory from A Sofa in the Kitchen. She chose to challenge everyone to make Panna Cotta from a Giada De Laurentiis recipe and Nestle Florentine Cookies.

We had dinner with a Tuscan friend two evenings ago. He served us an exquisite traditional Italian meal of homemade fettucine with onions and pancetta, followed by braised chicken with rosemary and garlic (both dishes have names, but I can’t remember them for the life of me, so I’ll just keep quiet). Simple dishes, but made with enough care and attention to flavour to make them truly delectable.

During the conversation, I mentioned half of this month’s DB challenge: Florentine cookies. To my surprise, our friend had no idea what I was talking about. He took out his Tuscan cookbook and found a pastry with the same name, but which had nothing else in common with what I had in mind: it looked like cocoa-flavoured quenelles of almond paste, not flat, thin cookies. Then Laurent’s father intervened and suggested that Florentine cookies are actually French, not Italian. Meanwhile, Anita Chu’s Field Guide to Cookies states that Florentines may in fact have been invented in Austria.

So, the jury’s still out on where Florentine cookies actually hail from. But that shouldn’t stop us from enjoying them, and it didn’t stop me from completing the challenge.


But first, the other half of the challenge, the one I was most looking forward to: panna cotta. I’ve had this creamy dessert a few times, and was glad to have the opportunity to make it myself. In order to make it a little more interesting, I garnished it with two kinds of gelée: pomegranate and mango. Although I have to admit I cheated a little: instead of using fresh fruit, which isn’t all that easy at this time of year, I used bottled juice.


Making the gelée and panna cotta was very easy, and the most trying part was actually assembling the desserts: making layers, then waiting for them to solidify in the fridge before adding another layer on top. It wasn’t difficult, just time consuming. I made a few variations, including two unmouldable versions: one plain (which was easy enough to unmould), and one with a layer of gelée (which stuck a bit more). I drizzled both with caramel (bottled, not homemade – more of a last minute impulse).

We enjoyed the dessert, although I felt it was just a tad too gelatinous. I know that Josée di Stasio and Patrice Demers both use yogurt in their panna cotta, which gives and allows them to use less gelatine and create a creamier result. I would definitely like to try that option in the near future.


As for the Florentines, everything started out great – well, more or less. I had to push everything back a day when I realized I had absent-mindedly bought oat flour, instead of rolled oats. And when I finally did make the challenge, I initially put too many cookies per baking sheet, and they merged together as they spread. But no biggie, I just cut them up into relatively circular shapes after they had cooled, and then I adjusted the cookie/sheet ratio for the next batches. The cooled Florentines were shiny and crispy, and reminded me of dentelles de Bruges, another lacy cookie I’ve made before.


But this went wrong when I least expected them: during the filling process. I wanted to sandwich my Florentines, as is usually done. But instead of pure chocolate, I used some ganache I had left over from another recent baking project. This turned out to be a mistake, as the cookies absorbed the moisture and became soft and mushy.


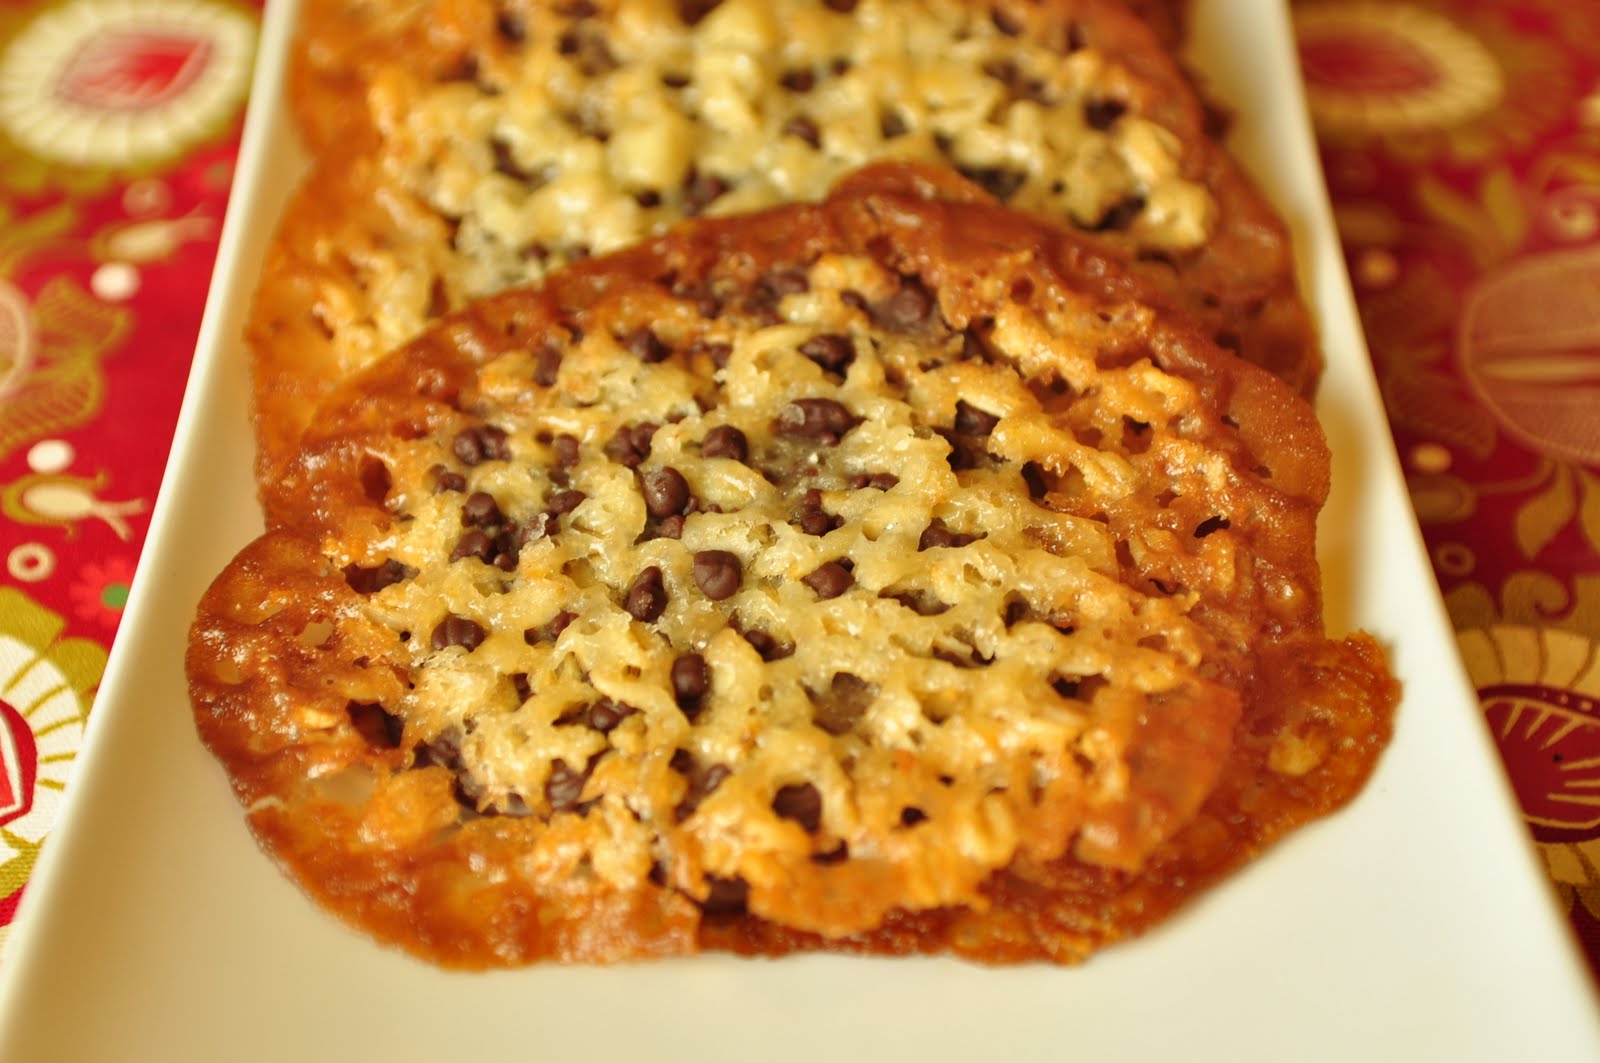
They look pretty, don’t they? Alas, ‘tis all an illusion. However, the “naked” cookies I nibbled at before garnishing – and ruining – the rest were really good, so I wouldn’t call my attempt a complete failure. Just an ultimate one.

Mallory, thank you for hosting this challenge, I learned a lot (such as: you can’t always substitute ganache for chocolate). I’m including the basic recipe for fruit gelée, and you can find the challenge recipes at the Daring Kitchen. Don’t forget to look at the DB blogroll to see what all the other bakers have accomplished this month!

Fruit Gelée
Yields 240 ml, or 1 cup

240 ml (1 cup) fruit juice of your choice
1 1/2 tsp unflavoured powdered gelatine
1 tbsp granulated sugar

Pour the juice in a saucepan, sprinkle the gelatine over it in a fine layer, and let rest for 5 minutes. Stir in the sugar, and heat over medium-low until hot but not boiling, and all the sugar and gelatine have dissolved. Remove from heat and let cool before use. The gelée will reach the right texture after about 30 minutes in the fridge (depending on how you choose to use it).

Thursday, February 24, 2011

Tartine Bread, Take Two


So, because I’m stubborn, I tried making Chad Robertson’s Tartine country bread again. But I only re-attempted it after I’d eaten all of Attempt No. 1, which I had sliced up and frozen – even though it really wasn’t a very good bread at all. But I felt bad wasting all that flour, so I used it for sandwiches.

Attempt No. 2 was much, much more successful. Being able to compare it to the first time, I could tell right from the beginning that everything just seemed to be more “right:” my starter was lighter, my dough was more supple, the gluten was more developed.

I think I figured out a few things that went wrong before:

1) My starter wasn’t mature enough;
2) I hadn’t incorporated the salt well enough, which means my dough never had a chance to develop properly, as it wasn’t properly holding together in the first place;
3) My kitchen was a tad too cold; this time, I turned my oven into a proofbox, by turning it on for 1 minute and turning it off again before putting my dough in it.


My clumsy slashing skills aside, the crust was nearly perfect: thick, crisp, and golden. It didn’t quite make that lovely crinckling sound as it cooled, but it was still a beauty. As for the crumb, although it still wasn’t as light and aired as what I was going for, it was still miles above my previous result.


So, how does this bread, which requires an entire day of preparation and care (you have to stretch and fold it every half hour during the bulk rise, so you can’t really leave it alone for too long), measure up to Jim Lahey’s easy-peasy no-knead bread? Honestly, it’s a very close call so far. The no-knead recipe is foolproof and yields amazing loaves. Chad Robertson’s bread, on the other hand, requires serious skill and experience to obtain similar results. But there is one thing that gives this bread the potential to outshine its laid-back competition: flavour. The no-knead bread has an impressive flavour, born from its overnight rise; but the Tartine bread has even more aromas and a hint of acidity, thanks to the starter. This was evident even in my less-than-perfect second loaf. Just for that, I’m going to keep trying to master this bread.

And, well, there are bragging rights, of course: “I made this bread with yeast I cultivated myself!” It just proves how big of a food geek I’ve become that I find this incredibly cool. So, in the spirit of pride and experimentation, bring on the Tartine bread!

Saturday, February 19, 2011

I stand corrected - Jim Lahey's No-Knead Bread


I admit I’ve always been a little sceptical about no-knead bread. I figured there had to be a reason why bakers continue to put elbow grease into the process. And I’ve always rather liked the experience of kneading: it’s an effective way to work out stress and frustration.

But when I read this article praising the virtues of no-knead bread, and saw that it was written by a fellow sceptic, I decided I needed to try it for myself. After all, it really did look ridiculously easy, judging from Jim Lahey's included recipe: just mix the ingredients, let rise overnight, shape, and bake.

It was my first time using my Dutch oven for baking, and it only makes me love my big cast iron monster even more. So many delicious things come out of that thing: stews, braises, and now this incredible bread.


There, I’ve said it: this bread is incredible. It is by far the best bread I’ve ever baked. The crust is unbelievably crisp, thanks to the baking process: sealing the bread inside the Dutch oven produces enough steam to obtain a beautiful, blistery crust that crinkles as it cools down. As for the crumb, it’s airy and cool, just the way I like it. The bread also packed a lot of flavour, thanks to the slow fermentation process.

I’ve tried making this with half whole wheat flour, and the results were still good, although the crumb was inevitably heavier. I’ll need to experiment some more to find a balance. But overall, this recipe is as close to foolproof as I’ve ever come across.


I cannot, however, say the same for Chad Robertson’s country bread. I purchased his book Tartine Bread a while ago, and have been trying to work with it. I’d never created a starter before, and spent a couple of weeks feeding and nurturing my new yeast colony, fascinated by the idea that I was raising organisms in a jar (Laurent, as a biochemist, is more used to the situation). The starter seemed to be doing well: it was bubbly, it rose and fell in a pattern, and it smelled nice.


But when I finally tried to make the bread, which, like the no-knead bread, relies very much on slow fermentation (although some light kneading is required), I was very disappointed: my loaf was way too heavy, its crumb dense and flavourless. There were a few large holes here and there, but nothing remotely approaching the gorgeous, light crumb that was featured in the book (which, incidentally, is beautifully made and full of step-by-step pictures). And the crust was just dull.

I’m thinking my starter wasn’t mature enough. But I know I’m not the only one to have had initial trouble making this bread (I’ve actually seen a picture of a failed loaf just like the one I ended up with), so I’m going to keep trying. In the meantime, there’s still fabulous no-knead bread!

Monday, February 14, 2011

Daring Cooks February Challenge - Hiyashi Soba and Tempura


The February 2011 Daring Cooks’ challenge was hosted by Lisa of Blueberry Girl. She challenged Daring Cooks to make Hiyashi Soba and Tempura. She has various sources for her challenge including japanesefood.about.com, pinkbites.com, and itsybitsyfoodies.com

Lord knows I’m always up for making Japanese food. We had a big sushi party here, a couple of weeks ago. The guests pitched in and took a shot at rolling their own maki, while I looked over their shoulder and pretended to be an expert. It was fun!


So I was pleased to discover this month’s DC challenge: cold soba and tempura. Laurent and I have made tempura before, but it had been a while. And it had been even longer since we’d had soba at home. We usually prefer udon or ramen, which are less healthy, but milder tasting. And we usually serve them in hot soups, rather than cold. But I had hiyashi soba several times last summer in Japan, and they were a refreshing delight on a hot, muggy day.

I don’t have much to report this month. I mistakenly thought I had a pack of soba left in the pantry, and had to run out and substitute what I could find. Technically, I used buckwheat lomein, but I’m fairly sure they only differ from soba by their shape. I probably should have rinsed the cooked noodles a little more, as they stuck together a bit. But a little bit of spicy dipping sauce (very zippy, by the way!) did the trick and made them slurp-a-licious!


For the tempura, I was pleased to learn a couple of tricks to improve results, such as keeping everything cold prior to frying, and putting the fried pieces of food on a rack to drip their excess oil, instead of blotting them on paper towels. This was definitely the crispiest, lightest tempura we ever made! It was also our first time using shiitake and eggplants for this dish (we usually stick to shrimp), and we enjoyed both, especially the mushrooms.


Thanks, Lisa, for this challenge and for all the info!

Please check out the Daring Cooks’ blogroll to see what everyone else cooked up this week. And visit The Daring Kitchen to look at this month’s challenge recipes.

Monday, February 7, 2011

My Interpretation - Smoky Beef Chili Stew


So, I’m told there was this Super Bowl thing yesterday? I’m not much of a sports fan (except for snooker, which is barely a sport), so I would have been pretty much oblivious to the whole event, if it hadn’t been for a handful of bloggers and journalists who wrote about their ideal Super Bowl snacks.

Seeing all those chicken wings, guacamole, and nachos made me crave Southern flavours. Specifically, it made me crave chili – even though I’d never made chili in my life, and wasn’t even sure if I’d actually ever had real chili. It’s always seemed to me that the term “chili” is way too broad, applying to stews, dips, sauces, powders… Really, what is the essence of chili?


My craving – and my confusion – may also have been linked to an article in this weekend’s Gazette, where chefs Chuck Hughes and Nick Hodge had a chili face-off. It seems that Canadians chili and Texan chili are not the same thing at all, with Texan chili being apparently bean-free… even though I have a printed recipe for “Texas-style beef chili” which calls for beans. I give up.

Anyway, to be more specific: I was craving stewed meat, beans, and spices. I really wanted to make Chuck Hughes’ chili (with bison and ground duck, no wonder he won the face-off), but I was short a few spices. So instead, I improvised something. I would have used reconstituted dried beans if I’d had time, but I did my shopping too late.


I have to give a shout-out to another Valerie from Canada, the terrific author of A Canadian Foodie: a few days ago, she posted about a delicious-looking Smoky Chili Soup (because it’s apparently a soup, too, on top of everything else), which immediately caught my eye. I made a lot of alterations to suit my pantry and my inclinations of the moment, but this soup was definitely an inspiration for my stew, right down to the lime garnish (I omitted the yogurt, as there was already a clear tanginess from the chipotle chiles and the tomatillos).

I was overall really pleased with my first venture into Chili Land. The many spices gave a sweet-smoky depth to the flavour, and the heat was slow-burning and tingly, never overwhelming or aggressive. Definitely what I was craving.


Smoky Beef Chili Stew
Serves 10-12

2 tbsp olive oil
450g (1 pound) extra-lean ground beef
700g (1 1/2 pound) chuck, cut into bite-sized cubes
2 onions, thinly sliced
8 cloves garlic, thinly sliced
One 330ml (approx. 1 1/2 cup) bottle dark beer, such as brown Leffe
2 tbsp ground cumin
2 tbsp ancho chile powder
2 tbsp smoky paprika
1 tbsp hot Hungarian paprika
1 tbsp chili powder
1 tbsp tomato paste
3 chipotle chiles en adobo, chopped
Two 540ml (19 fl. oz, approx. 2 1/8 cups) can diced tomatoes (with juices)
One 700ml (24 fl oz, approx. 3 cups) can whole tomatillos, drained
One 540ml (19 fl. oz, approx. 2 1/8 cups) can black turtle beans, drained and rinsed
One 540ml (19 fl. oz, approx. 2 1/8 cups) can red kidney beans, drained and rinsed
One 540ml (19 fl. oz, approx. 2 1/8 cups) can romano beans, drained and rinsed
240ml (1 cup) beef broth
2 bay leaves
1 dried guajillo chile pepper, stem removed
Salt, to taste
Lime wedges, for garnish
Fresh cilantro, chopped, for garnish
Scallions, chopped, for garnish

Preheat oven to 160ºC (325ºF).

Lightly season the meat with salt. In a Dutch oven, heat 1 tbsp olive oil over medium high heat. Brown the ground beef, breaking up any clumps. Remove from pot. Brown the cubed chuck on all sides, working in batches. Remove from pot and reserve.

Reduce heat to medium. Add the remaining tbsp of oil and cook the onions and garlic, stirring often, until softened. Pour in the beer to deglaze, using a wooden spoon or spatula to scrape any browned bits off the bottom of the pot. Return all the meat to the pot. Raise heat and boil until the liquid is reduced by half.

Add the cumin, ancho chile powder, both paprikas, chili powder, tomato paste, and chipotle chiles, and stir to combine until all the meat is well coated. Stir in the tomatoes, tomatillos, and beans. Finally, stir in the broth, and add the bay leaves and guajillo chile pepper.

Bring to a boil, then cover and bake in the oven for about 2 hours, until meat is tender. Taste for seasoning, and salt if necessary. Spoon into bowls or deep plates, and garnish with lime wedges, cilantro, and scallions. Serve with crusty bread, cornbread, or biscuits.