Wednesday, January 27, 2010

Daring Bakers' January Challenge - Graham Wafers and Nanaimo Bars

The January 2010 Daring Bakers’ challenge was hosted by Lauren of Celiac Teen. Lauren chose Gluten-Free Graham Wafers and Nanaimo Bars as the challenge for the month. The sources she based her recipe on are 101 Cookbooks and www.nanaimo.ca.

Despite having lived in Canada for eleven years, I had never eaten a Nanaimo bar. In fact, I had barely heard of them. But according to this month’s DB hostess, the amazing Lauren from Celiac Teen (one of my favourite bloggers), Nanaimo bars are a quintessentially Canadian treat from British Columbia.

Having made these, I feel a little bit more Canadian. :-)


There were two parts to this challenge: the first was to bake the graham wafers necessary for the base layer of the bars, and the second was to assemble the bars themselves. Lauren’s baking is strictly gluten free, and she gave us instructions for baking gluten free graham wafers. However, she kindly gave us a wheat-based version as well. This was much appreciated, as I was unable to find sorghum flour in time, and ended up using wheat flour. But I was a bit disappointed at not being able to try my hand at gluten free baking: despite having no issues with gluten myself, it seemed like a really interesting experience, and definitely a challenge.

I had never made graham crackers or wafers, but the recipe was fairly straightforward. The dough was very forgiving and rolled like a dream. Also, it smelled amazing, thanks to the brown sugar and the honey: I was in olfactory heaven the whole time I was rolling it.

The only issue with the dough was that it was quite sticky. Therefore, I didn’t roll it too much, and my wafers were rather thicker than they should have been: more like cookies, really. The odd thing is, they still browned much faster than predicted, and I had to take them out of the oven way before the allotted time was over. They were still very soft, but firmed up as they cooled on a rack. And the taste was quite nice: not too sweet, with a hint of honey, and a snappy texture.


With the graham wafers done, the baking part of the challenge was technically over, but there were still bars to be made. Nanaimo bars consist in three layers. The bottom one is a mixture of graham wafer crumbs, cocoa, melted butter, chopped almonds, and shredded coconut. The middle is a kind of vanilla-flavoured custard and butter concoction. And the top is a simple chocolate glaze.

Now, the problem is, I’m not too big on vanilla custard – or vanilla anything, really, except in very specific conditions. So I decided to experiment a little, for once. As I was brainstorming for flavour ideas, I voiced my ideas out loud to my boyfriend Laurent (not to be confused with Lauren, our hostess ;-) ):

“What are your feelings on the peanut butter and chocolate combination?”

“Hmmm…” he replied. “It sounds good.”

“You make it sound like you’ve never had peanut butter with chocolate.”

“I haven’t.”

“You – You’ve never tried it? Not even in a Reese cup?”

“What’s that?”

Now, Laurent has lived in Canada nearly all his life, so this state of affairs may seem surprising. But there are two factors that can explain how he has managed to go through life without ever having eaten a Reese cup. For one thing, his father bakes, which means Laurent grew up with homemade desserts, not candy bars. Also, he didn’t have a sweet tooth as a child: I’m told he used to prefer olives to chocolate back then; it’s only recently that he’s developed a taste for desserts. So it makes sense that he has had very little contact with brand-name treats.

Still, I couldn’t allow him to be ignorant of the wonders of peanut butter and chocolate any longer. So I tweaked the original Nanaimo filling recipe, and made a peanut butter version (recipe below).


Also, I didn’t have a square 8x8 inch pan, only round cake pans. So my “Nanaimo bars” ended up being more like “Nanaimo torte wedges” – complete with crust!

And how did they taste? Honestly, better than I could have hoped for. It was, in two words, deliciously decadent. The almonds in the base could be substituted with other nuts, but the coconut is essential, both for taste and texture (gotta have that chewiness). The taste of peanut butter wasn’t quite as strong as I would have liked, but that was my fault; I’ve corrected the quantities in the recipe below, for a stronger taste. Other than that, I really enjoyed this bar (or wedge, or whatever), with all the different textures of the base, the creamy filling, and the intensely chocolatey taste. Next time, I might crush my graham wafers to bits, rather than grind them to crumbs, to add a crunchy texture to the rest.


Nanaimo bars are rich to begin with, and I suspect the addition of peanut butter didn’t help: one little slice at a time is enough. So these bars might last us a while, or we might end up distributing them among our friends. But I’m sure they will be very much appreciated, either way.

Thank you so much Lauren, for this really fun and tasty challenge! And for introducing me to an essential part of Canadian culture!

For the original challenge recipe, click here. And check out the other Daring Bakers’ Nanaimo bars over here!


Peanut butter filling

50g (1.75 oz, 1/4 cup) butter, cubed and softened
80ml (1/3 cup) smooth peanut butter
3 tbsp heavy cream
1 tsp vanilla extract
200g (1 1/2 cup) icing sugar

Cream the butter and peanut butter together until smooth and combined. Whisk in the cream and vanilla extract. Gradually whisk in the icing sugar until the mixture is homogenous.

Wednesday, January 20, 2010

Discovering North America - Cornbread


Cornbread is not very common in Europe, so I haven’t come across it much in my life. Indeed, even though I’ve been living in Canada for over a decade, I had never eaten it until recently. There are some foods that simply don’t register on my radar: I’m vaguely aware of their existence, but I never seem to get around to trying them.

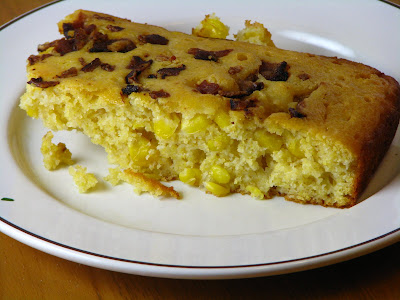
Still, when I saw a recipe for cornbread in The Bread Baker’s Apprentice, and read that, even though Peter Reinhart had originally meant to only write about leavened breads, he couldn’t resist including this one, I knew I had to try it. Buttermilk, corn, and bacon: how could this not taste good?


Since this was my very first time eating cornbread (not to mention making it), I can’t compare this one to anything else. All I’ll say is that it was indeed very satisfying, a lovely companion to carrot or butternut squash soup. The kernels of corn popped satisfyingly under the tooth, and the crunchy bacon added an essential saltiness. Despite the bacon, I was surprised at how sweet the bread. I don’t know if all cornbreads are this heavy on the honey (there was quite a bit of it here), but I wonder if I wouldn’t prefer something closer to a savoury bread. It’s worth a try, at any rate.

Nonetheless, I do declare, cornbread is a very good North American invention!

Sunday, January 17, 2010

E-book for Haiti


Like everyone else on the planet, my thoughts have been with Haiti. It's impossible not to feel compassion, sadness, and horror in the face of the ravages caused by the earthquake. And it is equally impossible to imagine the sorrow, pain, and fear which the victims are going through.

Cash donations are said to be the most efficient way to help: organisms like the Red Cross and UNICEF are well-organized and know what is most urgently needed in Haiti right now.

But once the donations have been made, there are other ways to help. A fellow blogger, the wonderful Lauren from Celiac Teen, has come up with a worthwhile idea: she is putting together an e-book, with blogger recipes of their favourite dish, the one that evokes "home" more than any other.

I will be taking part in this endeavour. If anyone reading this wants to contribute, I urge you to read Lauren's post here. But here is the basic information you need to know:


Lauren from Celiac Teen writes:

"[I]f you're a blogger, send me your favourite, most loved recipe that makes you feel at home with an email subject line of "Haiti Ebook" to mail (at) celiacteen (dot) com {replacing the (at) and (dot) with applicable characters!}. Please also include a picture! The recipe does not have to be gluten free. It can be a baked good, a meal, a breakfast, a treat, anything. Whatever it is though, make sure it makes you think of home. They lost theirs, so a comforting dish is the best way in my eyes!

I would like to have the submissions by January 24th, in order to get it out relatively quickly!

I'm looking into the best charities to use, but am thinking it will have something to do with food? The Canadian Red Cross and Doctors without Boarders are also likely candidates =D. Thoughts on that would be wonderful as well!"


Don't hesitate to circulate this and get the word out.

Thursday, January 14, 2010

Daring Cooks' January Challenge - Satay


The January 2010 DC challenge was hosted by Cuppy of Cuppylicious and she chose a delicious Thai-inspired recipe for Pork Satay from the book 1000 Recipes by Martha Day.

Aaaah, the first DC challenge of the year! I was very grateful to our hostess for choosing a relatively stress-free challenge: no running around looking for out-of-season ingredients, no spending hours perfecting a technique. Just a simple dish, packed with flavour. Around this time of year, when I find myself scrambling to make up for having slacked off during the holidays, a lighter challenge was very much appreciated.

On top of that, the challenge dish, satay, had long been on my list of “Things I Love to Order in Restaurants and Should Try Making Myself.” I’m usually told that these savoury skewers originated in Indonesia, but they’re pretty much ubiquitous these days, and we were given a Thai-inspired recipe from a British cookbook. Talk about the effects of globalization! But I’m all for fusing and taking inspiration and ingredients from other cultures and regions – as long as it yields good food!


Speaking of borrowing ingredients from other regions, I learnt something that surprised me the other day: capers apparently originated in Central Asia. Which is weird, because they aren’t really used in Central Asian cuisine at all, to my knowledge. Also, it begs the question: is there anything in Italian cuisine that didn’t come from the Orient? :-P

And no, this has absolutely nothing to do with this month’s challenge, which didn’t include capers (good thing too, it sounds like a terrible combination). I’m just making chit-chat, filling up space – because the fact is, I really don’t have a whole lot to say about this challenge. I was woefully unimaginative, just followed the recipe, and I don’t even have a disaster or catastrophe to entertain you with. All I can tell you is that I ended up having a delicious meal.

Our hostess left us a lot of freedom when it came to preparation and ingredients. I made the satay shortly after coming home from vacation, perhaps the only time in my life when I found myself craving… chicken, of all things. Usually, I associate chicken with ordinary days: we often have it at least once a week, in some form or another. Chicken is what we make on days when we feel like cooking up something safe and familiar, or when we need a neutral base for stronger condiments or side-dishes – the chicken itself is rarely the focal point of the meal (except when it’s roasted whole). But on the day I did the challenge, I was returning from a flurry of restaurants and parties, having gorged on things like Wiener schnitzel, fish soup, foie gras, stuffed cabbage, sushi, Argentinean steak, oysters, gourmet cheese, beef tongue, garlic shrimp, sautéed duck, gougères,, and truffled scallops (not all at once, obviously). Pretty much everything except chicken. By then, I was actually missing this humble bird.


So, chicken breast satay it was. I marinated the poultry slices for a couple of hours according to the recipe, adding a touch more fresh ginger and spices. Then I skewered them and broiled them in the oven. I slightly overcooked them, but they were still moist enough. And the marinade flavours were vibrant in every mouthful!

Of course, no satay is complete without a spicy peanut sauce. I’ve actually made this type of sauce very often, even though I had never made satay before: it goes well with spring rolls, and makes for a great stir-fry. This recipe was a little different from the one I normally turn to, with more kinds of spices. It was very tasty, a worthy alternative to my regular sauce – although it could have used a little more heat. I also had some homemade ponzu sauce leftover from a previous dinner. Ponzu is basically soy sauce with sake and yuzu (or lemon) juice. Even though it’s a typically Japanese sauce, I had a feeling it might go well with the Thai satay. And indeed, the slight acidity of the sauce complemented the sharpness of the ginger, and echoed with the lemon that was already present in the marinade.

And… that’s really all there is to report. It might have been more interesting to do as our hostess suggested: use a tougher cut of meat, marinate it for longer, and see how tender it comes out. But like I said: I really, really wanted chicken. I did consider using thighs instead of breasts, but the thighs seemed more difficult to slice into a proper satay-type shape. I just wasn’t feeling up to struggling with raw chicken any more than I had to.


So in the end, I got a very good meal out of it, and finally crossed satay off my “to-do” list. A great thank you to Cuppy for this tasty challenge! Please see the challenge recipe for yourself at the Daring Kitchen, and check the DC Blogroll to see the other participants’ mouth-watering dishes!

Thursday, January 7, 2010

Celebrating the Epiphany - Cocoa-Pear Royal Galette

Yesterday marked the official ending of the holiday season. Not just because everyone is back to work by now (even students), but because it was the Epiphany. Historically, January 6th is the celebration of the Three Magi’s visit to Bethlehem. But nowadays, for most people, it’s an excuse to eat a very special cake.


La Galette des Rois, or King Cake (though I personally prefer to call it Royal Galette), apparently exists in several versions. The one usually encountered in Belgium and France consists of puff pastry filled with frangipane. But its most distinctive trait is that it contains a fève. “Fève” translates as “broad bean,” but it’s not really a literal designation anymore: nowadays, the fève is usually a small porcelain or ceramic figurine, which is hidden inside the galette. When the cake is divided among the guests, the person who gets the fève becomes King (or Queen), and is allowed to choose a consort.

As far as I remember, being King never really got anyone special privileges, other than that of wearing a nice paper crown, and maybe not having to clear the table. But it’s a fun tradition. Normally, to ensure randomness, the youngest person of the group has to hide under the table and call out people’s names as the pieces of cake are distributed. But when I was little, my mother always cheated and made sure I got the fève. She never made the galette herself, but she would poke around to find the fève and give me the winning piece.

For some reason, it had never occurred to me to make the Royal Galette myself. But just a few days ago, we saw a short news report on galettes, and I was shocked at how… simple it was: a disc of puff pastry, covered with frangipane, and topped with another disc of pastry. “That’s it?!” I exclaimed. “I can totally do that myself!”

And that’s how I wound up baking la Galette des Rois this year.


We needed a fève. Fortunately, we had been served an early galette a few days ago, and Laurent had been crowned King. No shame in recycling the fève, after all. Besides, I have no idea where I could buy one… And I’d be afraid to use just any old figurine, for fear that it wouldn’t be ovenproof!

Even though making puff pastry no longer scares me, ever since that Daring Bakers’ vols-au-vent challenge, I used storebought pastry, out of sheer convenience. For the frangipane, I based myself on the recipe we were given for the Bakewell Tart challenge (gosh, I’ve learnt so much by being with the DBs!). But I wanted to make it a little different, so I added some cocoa and diced canned pear.


Everything went fine, and I was happy with the results: good blend of textures (flaky pastry against moist filling), nice combination of flavours. And yes, it’s a decadent treat, but it’s only supposed to be eaten once a year (or twice, in our case).

So, who took the fève? So far, no one: it was just me and Laurent, and neither of our pieces had the hidden prize. We couldn’t eat the whole thing, so we saved the rest and will try again tonight. Not particularly exciting, since the winner will inevitably choose the other as consort…

But like I said: the Epiphany is an excuse to eat galette!


Cocoa-Pear Royal Galette

Serves 8

500g (17 oz) puff pastry, thawed in the fridge

For the frangipane:
50g (1.75 oz, 1/4 cup) butter, softened
50g (1.75 oz, 1/3 cup) icing sugar
50g (1.75 oz, 1/3 cup) almond powder
1 egg
1 tbsp flour
1 tsp almond extract
1 tbsp rum (optional)
2 tbsp powdered cocoa
2 small canned pear halves, drained and diced

For assembly and finishing touches:
1 fève, or small ovenproof figurine
1 egg, separated


Preheat oven to 200ºC (400°F).

Prepare the frangipane:
Cream the softened butter with the sugar, until very fluffy and light yellow. Stir in the egg, until well combined. Add the almond extract and the rum, if using.

Gradually stir in the almond powder, then the flour, and finally the cocoa. Set aside.

Assemble the galette:
Divide the pastry in two equal parts. Roll each half into a 25cm (10 inch) disc, about 5mm (1/4 inch) thick.

Put a baking sheet on top of another baking sheet, and line it with parchment paper. Place one disc of pastry in the center of the prepared sheet. Spread the frangipane mixture over it making sure to leave a 1cm (1/2 inch) margin at the edge.

Take the diced pear and pat the pieces dry. Scatter the pear evenly over the frangipane, pressing the pieces slightly into the almond mixture.

Take the fève and press it into the frangipane in a random spot, at an approximately equal distance from the center and the edge of the disc. DO NOT place it at the center.

Take the separated egg and lightly beat the white. With a pastry brush, lightly brush the edge of the pastry with egg white. Place the second disc of pastry on top of the first, and press all around the edge to seal the frangipane in.

Whisk a tablespoon of water into the egg yolk. Lightly brush the top of the galette with this egg wash, being careful not to let it drip down the sides, which would inhibit the pastry from rising.

With the edge of a sharp knife, make decorative patterns on top of the galette.

Bake for 25 minutes. Then lower the oven to 160ºC (350ºF) and bake for another 10 minutes, keeping an eye on the galette to make sure it doesn’t colour too quickly. The pastry should be risen, crispy and golden.

Serve warm, or at room temperature.

Tuesday, January 5, 2010

Belated New Year Wishes - Two Chocolate Cookies


It seems everyone has been writing “Best of the Year” posts, or sharing their resolutions, or at the very least sending out New Year’s wishes. I’ve been very quiet, and I feel rather bad about it. But truth be told, I’ve never been big on New Year. I love Christmas, but New Year never brings out quite the same excitement in me. It never feels like as big a milestone as it’s supposed to be – even this year, which marks the end of a whole decade. To put it in Internet-speak, I feel sort of “meh” about the whole thing.

But that’s still no excuse to completely ignore it, or to be the New Year equivalent of The Grinch (although he probably hated New Year just as much as Christmas– and Easter too, I’m betting). So, allow me to wish you all a wonderful 2010! May this year be filled with success, joy, and laughter. And of course, delicious meals!

And to start the year off, how about some cookies? I know cookies tend to be associated with Christmas, but I say, bollocks to that: cookies should be made and eaten all year round. And it had been a while since I had made any (apart from macarons).


My lack of practice showed. I was in a rush, so I flipped through Martha Stewart’s Cookies, in search of a couple of no-rest recipes I could whip up. The first was a recipe I had tried before, for Cocoa Shortbread Diamonds. The reason you don’t see any diamonds on the picture is that I didn’t have a diamond-shaped cutter, and apparently couldn’t be bothered to find a ruler. So, Cocoa Shortbread Disks it was (they’re the two bottom cookies).

The first time I tried this recipe, it failed to pull together, and I had to salvage it by adding cream. The exact same thing happened this time around. I don’t know if I’m doing something consistently wrong, or if it’s the recipe itself, but my dough comes out too dry every time. Maybe it’s because I insist on mixing the dough by hand, instead of in a food processor? If anyone knows, do share!

The white chocolate topping adds a lot to these cookies, which would otherwise be a little dry. Ideally, you’re supposed to drizzle it in a fine thread, to form a delicate pattern (see Martha’s website). I tried to use a small icing syringe, but the melted chocolate wouldn’t pass through the tiny tip (I later discovered it was clogged with old royal icing), so I had to use a larger one. Delicate patterns were never my thing.

While I probably won’t go out of my way to make this shortbread again, the other cookies I made (represented by the big broken cookie in the picture) were a hit. These Giant Chocolate Sugar Cookies are absolutely satisfying. Their size allows for a variety of textures within a single cookie: chewy on the edges, soft and cakey in the center. I made them with coarse cane sugar, which gave them an added crunch and a different kind of sweetness.


On another note, you may find my pictures to be a little different in this post, a little fuzzier in places. I’ve been playing around with Laurent’s old Nikon D70, trying to learn to use a SLR properly. I’ve been using a Canon Powershot S5IS so far – a really good compact, but I think I’m ready to explore more options. I’m still struggling a little to get a feel for the SLR, it works in so many different ways than what I’m used to. Not being able to see what the picture will looks like before I snap the shot is especially unsettling for me. As is having such precise distinctions between foreground and background focus: with the compact, I had to push my camera to its limits just to get a slightly blurred background, whereas now I have room to play around in – for better or for worse. In fact, I think Laurent took these particular pictures: mine had… issues.

But I'll get better! I may not be big on New Year's resolutions, but I can at least set this as a goal!