Showing posts with label pasta and rice. Show all posts

Saturday, May 4, 2013

Cooking for Gracie - Spaghetti with Anchovies, Walnuts, Mint and Breadcrumbs


Today’s book: Keith Dixon’s Cooking for Gracie. A surprising choice for me. Why? Allow me to tell you before getting to the book itself.


Since even before Raphaël’s birth, people have been giving us a lot of stuff. A lot. Most of the gifts were predictable, but very welcome: clothes, toys, gift certificates, more clothes. Others were pleasant surprises: a baby food maker, a soothing noise-maker (which doesn’t really put the baby to sleep, but is still really cool). I’m grateful for it all. But there is one type of gift which I specifically asked people not to give me (and fortunately, most of them complied): parenting books.

My dislike of parenting books (and most self-help books, really, but let’s stick to this particular genre today) stems from way before I ever became a parent myself: it started during my teen years. I was a fairly typical teenager, undergoing all the angst, drama, and emotional rollercoaster those years often entail. But around that time, my mother started developing the annoying habit of attributing anything I did that rubbed her the wrong way to my age. “I know teenagers are unkempt / rude to their parents / selfish, but I will not have you wear your hair like that / speak to me that way / behave in this manner.” It was as if I had been labelled practically overnight, and anything I did would inevitably be traced back to that label. Granted, not all her criticisms were undeserved: my hair was indeed a mess most of the time, and I wasn’t always the most thoughtful daughter. But I could have been the best-groomed, most polite, most altruistic teen, and my mother probably would have found something else to blame on teenagehood. Because I was no longer a child, and that, apparently, was the greatest sin of all.

And one day, while browsing through one of our many bookshelves, I found The Book.

Tuesday, December 6, 2011

The Honeymoon, pt 1 - Momofuku

Okay, boys and girls, let's get back on track! It's been an emotional and disorienting couple of weeks, as I have been without a computer: my laptop got stolen. I was at a café with my friends and took out my computer to show them my wedding pictures, which I had finally received. Then I put it back in my bag, which was on the floor right next to me. When I got up to leave, my bag was open and the laptop was gone. The amazing thing is that one of my friends was sitting right opposite me, and she didn't see a thing. Apparently this sort of thing happens a lot in the neighbourhood, with professional thieves preying on students. The worst part is, I practically never bring my laptop to work in cafés, there's too much noise and I'm always scared I'm going to spill something on it. It really was rotten luck...

Anyways, after the first twenty minutes of hyperventilating and being paralyzed by the sheer effort of wrapping my mind around what had happened, while my awesome friends took action on my part and talked to the staff and surrounding customers, after a weepy call to Laurent and a trip to the police station to report the theft, after a couple of days of feeling blue, and finally after taking advantage of Black Friday sales to order a new laptop (a fine piece of hardware which I'm typing this on), I started putting the incident behind me. Fortunately, I had backed up most of my important documents (including the wedding pics and my thesis), so there was no big personal loss. The thought of someone going through my data made me feel sick, but I knew the thieves would most likely be interested in the hardware, not my vacations photos or articles on Japanese pop culture...

And then, a few days ago, I got a call from the police informing me my laptop had been found! I'm picking it up tomorrow. Apparently, it's still in one piece, but they haven't tried to open it, so I don't know if the hard drive has already been wiped or not. Fingers crossed... But honestly, given that less than one in ten stolen laptops is recovered, I wasn't expecting mine to ever be found, so I'm happy either way. The good luck has balanced out the bad!

The moral of the story: always report stolen items, you never know.

So, on with our regular programming. Well, not that regular, as today's post is the first part of the Honeymoon Chronicles. Laurent and I couldn't get away for very long, so we decided to just spend a few days in New York. I grew up there, and Laurent has never really visited the city, so I was looking forward to showing him around. We had a wonderful time. I showed him the classics (the view from the Staten Island Ferry, Time Square, etc.), and also some places which were more personal to me (my old school, specific spots in Central Park). Over the course of five days, we pretty much covered the list of places I had compiled in my head.

My list of restaurants, however, was comparatively shorter. I was just a kid when I lived in NY, and fresh from Europe. At the age of five, I was impressed by things like grape juice, deli sandwiches, pizza, hot dogs, and frozen yogurt, most of which I had never tasted. Then we discovered ethnic takeout, especially Indian and Mexican food, which was not really available in Belgium at the time. My parents took me to a few restaurants, but I can't say I recall whether they really were good, or just conveniently close; and anyway, they've probably been closed for years. My parents lived in New York again several years ago, but none of us, myself included, really kept track of the food scene. No particular place stood out in my memory.


Our hotel was conveniently located near a Pain Quotidien, a chain I was familiar with, so Laurent and I often had lunch or breakfast there. It's ironic, because Le Pain Quotidien is actually a Belgian concept, so it kind of felt like eating, say, McDonald's in Tokyo. Except that Le Pain Quotidien is a million times tastier and healthier than McDonald's (and more expensive, unfortunately, but hey, we were on our honeymoon), and the setting is a billion times more attractive, with its wooden hues and cute little spreads. Besides, I have to admit I never feel bad about eating "foreign" food in North America, probably because immigrant cultures are such a huge part of this continent, and hence the concept of "local cuisine" has always seemed a lot looser here than it does in other regions.


Even though I don't really know much about the current New York restaurant scene, there was one place I knew we had to visit: Momofuku Noodle Bar. Back when I was making David Chang's ramen a few months ago, I took the time to read the non-recipe parts of the book, specifically how the restaurant came to be. I liked how things apparently really kicked off when the chefs decided to stop trying to be "authentic" and just started to make whatever they wanted, according to the seasons and their own whims. And the ramen I had whipped up in my kitchen had been really very good, so I could only imagine how great the real thing would be.


If we could get in, that is... I knew the place was hugely popular but not correspondingly huge, and fully expected to find people lined up in front. Which we did. I asked the hostess how long the wait would be for two people, prepared to wait for over an hour if need be (I've done it for Kazu on more than one occasion), and nearly fell over when she answered that she could seat us right away. And smack in the middle of the counter, no less! Luck of the newlyweds!


We started off with some shiitake buns. They were great, with very salty mushrooms, soft steamed buns, and crunch pickles.


But the real treat was watching the cooks prepping bowl after bowl of ramen. These guys were maintaining a serious rhythm!


I ordered the shoyu (soy) ramen, while Laurent ordered a miso version. I knew Chang had recently changed his broth recipe, to make it more environmentally and economically friendly, which I can only applaud; he now makes the broth with only chicken bones, no more pork bones. The result was still very good, with strong umami and smokiness compensating for the lack of meatiness. The noodles were awesome, firm bordering on chewy, as far from limp, sissy noodles as you can get. The pork was tender and deliciously seasoned. But... I have to say this: how I wish I could have tasted the original version! I get that it uses a lot of meat and generates a lot of waste, but I was honestly blown away by what I managed to make myself with the old recipe, and have no doubt the served far superior bowls at Momofuku back then. This new version is definitely great, but the difference is nonetheless felt...


Laurent's miso ramen, however, was spectacular. Neither of us had anything bad to say about it: it was simply perfection, with ideally balanced flavours. It's right up there with the burnt miso ramen we had in Tokyo and have been fantasizing about ever since. Maybe we just have a special weakness for miso... But Jesus, it was good.


So, that was one of the high culinary points of our trip. More to come!

Monday, September 5, 2011

When ingredients dictate the recipe - Jerk Chicken


Have you ever bought an ingredient on impulse, just because it caught your eye, without any specific idea of what you’re going to do with them? I did that a couple of weeks ago, with a basket of habanero chilis.

After staring at them for a while, then safely storing them in a cupboard, out of reach from my ever-curious cat, I launched an appeal on Facebook: what to do with way too many of the hottest chilis in the world? I was honestly expecting mostly suggestions for salsa, or maybe jellies, but instead got requests for beef jerky, preserves, and jerk chicken. Way to think out the box, people!

I opted to make jerk chicken, as suggested by Ken of A Food Year. I then planned to air dry the remaining chilis to preserve them, as suggested by Evelyne of Cheap Ethnic Eatz, then crush them and use them to make jerky, as suggested by a non-blogging friend of mine who loves food so much and has such a great imagination that he really should be blogging.

Unfortunately, the air drying process went terribly wrong. Now I know: next time I want to dry chilis, make sure they’re not touching each other. As for the jerk chicken… It was good, but definitely not the epic meal I was hoping for – although it turns out that was my fault.


I’d never made jerk chicken, and had eaten it maybe once in my life, too long ago for me to recall the flavour. I did some browsing, then opted for this recipe, because it seemed straightforward. I made a couple of alterations, such as using chicken pieces instead of halves, and honey instead of molasses. Also, following Ken’s warnings, I did NOT use a blender to make the entire marinade: it stands to reason that the habanero heat would be impossible to clean out, and would linger and taint any blended food for months.

I’ve had my share of chili burns, so I asked Laurent to bring me some latex gloves from his lab (sometimes, a fiancé who works in a lab is a cook’s dream come true). It’s funny how, despite having only ever been on the receiving end of surgery (and only wisdom teeth removal at that), wearing those gloves made me instinctively hold my paring knife the way a surgeon holds a scalpel. I guess all those medical TV dramas end up making an impression.

Everything went well, and the chicken tasted fine, but there’s no way I would rank it in my Top 5 Hottest Dishes ever. The latter, by the way, would probably include most of what I’ve eaten at Cuisine Szechuan (particularly the pork tongue with pickled chilis), chicken vindaloo from an otherwise unremarkable Indian restaurant, an eggplant dish at a Thai restaurant in Vienna, and the time I doused my enchilada with homemade salsa verde. This jerk chicken didn’t even come close to any of those. But then… I realized I had seeded the peppers, which explained everything. Next time, I’m leaving the seeds in.


It was also a tad too sweet for my taste, but it’s hard to say whether this was sweetness from the honey and dark rum, or if it was just an impression of sweetness, from the allspice and cinnamon (unlike most people, I’ve never been a huge fan of cinnamon). Hard to say, and since my remaining habanero chilis have sadly been destroyed, I can’t try the recipe again until I get my hands on some more, provided they’re still available somewhere. Just in case though, I’d reduce the cinnamon next time, from personal preference.

Nevertheless, it was still a very tasty meal, so here’s the recipe. I served it with plain white rice, cooked the Persian way. I’m guessing it’s not the way jerk chicken is served traditionally, but I wanted to try it. Gotta love that crust that forms on the bottom of the pan! But that recipe is for another post.


Jerk Chicken
Slightly adapted from Simply Recipes


For the marinade:
120 ml (1/2 cup) white vinegar
2 tbsp dark rum
2 habanero chilis, finely minced, with seeds (remove seeds for a milder version)
1 red onion, chopped
4 scallion tops, chopped
2 tbsp fresh thyme leaves, chopped
2 tbsp olive oil
2 tsp salt
2 tsp freshly ground black pepper
4 tsp ground allspice
2 tsp ground cinnamon
4 tsp ground nutmeg
4 tsp ground ginger
2 tsp honey

1 whole chicken, cut into 10 pieces, skin on
120 ml (1/2 cup) lemon juice
Salt and pepper, to taste


NOTE: It is important to wear gloves whenever handling habanero chilis, or anything containing chilis, such as the marinade. Avoid touching your eyes or any sensitive areas. Also, wash your hands after manipulating the chilis, and thoroughly wash your knife, cutting board, and utensils.


Put all the marinage ingredients, except the habanero chilis, in a blender and pulse until smooth. Transfer to a bowl and stir in the minced chilis.

Wearing latex gloves to protect your hands, rub the chicken pieces with the marinade Place in a non-reactive bowl or baking dish and cover (or put in a Ziploc bag and seal), and refrigerate overnight.

Preheat oven to 180ºC (350ºF). Place the chicken pieces skin side up on a baking sheet, and bake for 40 minutes, or until the chicken is cooked through (the breasts will typically cook faster than the thighs). For a crispy skin, broil for a few minutes, keeping a close eye on the chicken to prevent burning.

Serve with plain white rice.

Wednesday, August 3, 2011

Totally Worth It - Momofuku Ramen (or close enough)


I promised you a post about ramen. This is it.
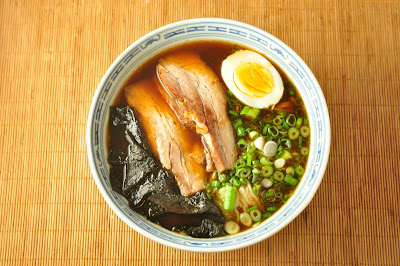

It all started when I found out about a Food Film Festival at Cinéma du Parc. I immediately bought tickets for a few select films. Among them was Delicatessen, about which I seriously wonder why it was included in this festival: it’s barely about food at all, although I suppose cannibalism is a type of gastronomy (and no, there was nothing about cannibalism in the synopsis, which makes the movie sound like a cutesie rom com - which, I assure you, it is not). We also saw Kings of Pastry, a documentary about pastry chefs taking the Meilleur Ouvrier de France exam. We witnessed some spectacular displays of sugar-pulling and sculpting skills – and some really nerve-racking brushes with catastrophe. It really makes you marvel at what people will put themselves through for their passion. There were also films I’d already seen, such as Chocolat and the exquisite Babette's Feast.

But my favourite discovery was Tampopo. I’d heard of it, and jumped at the chance to see it. It’s mainly about a woman who owns a ramen shop and is on a quest to make the best bowl of noodles ever. She enlists the help of a gruff trucker who really knows his way around a ramen kitchen, and other experts join along the way. But more than a film about ramen, Tampopo is a film about food and people who love food. There are various, seemingly random scenes inserted in the film focusing on anonymous characters and their relationship with food. Many of these scenes are absolute gold. This is one of my personal favourites. It's in Japanese, but basically the women are trying to learn how to eat pasta the "Western" way, without making any slurping noises, and... Well, see for yourself.

Ramen are still a major part of this film, though. The secret ingredients in the broth, the ideal resting time for the noodle dough, the ideal thickness of pork slices: everything is important. Even the way you eat your ramen is important. And here, I can’t resist linking to one of the film’s opening scenes, which addresses just this very question (and this one has subtitles).

I walked out of there with not much more than a vague idea of how to actually make good ramen (except that one must never let the soup boil – which I already knew from making pho), but a very strong desire to tackle this seemingly monumental task. So, I did some research. I came across a lot of recipes about how to make good broth and cook pork, but all of them used either dried noodles, or homemade egg noodles – and from what I understood, ramen noodles are supposed to be egg free (more on that in a minute). I read some good advice on the Chowhound forums, and some great posts on the blog No Recipes. And then, I discovered that David Chang’s Momofuku cookbook includes everything you need to know to make ramen from scratch. I found the book, flipped through it, drooled at nearly all the recipes, and took it home.

I lived in New York from 1988 to 1994, and my parents lived there again from 2003 to 2006. I visited them a lot during the latter period, but even though Momofuku Noodle Bar was already well known at the time, I never went there (I wasn’t nearly as interested in food as I am today). Having read the cookbook, this place is now on my list of musts for my next trip to NYC. The recipes seem full of bold flavours and unusual combinations, without a hint of pretension.

But my first concern was the ramen. The process was even more daunting than I’d expected. The first task was to make taré, which is described as “Japanese barbecue sauce.” Upon reading the ingredients, I realized this was basically what I and most people I know refer to as teriyaki sauce, only more complex: in addition to soy sauce, sugar, and mirin, this reduction had to include fond de volaille, made from roasting chicken bones. Ever since I learned to bone chickens, I’ve been buying whole birds and saving the carcasses to make stock, and I just happened to have one in the freezer. I’d never made fond before, and wasn’t too happy with the small quantity I ended up with. I’m not sure it made much of a difference in my taré.

The broth was next, an elaborate process of simmering chicken, dried and fresh vegetables, bacon, and pork bones for a combined total length of over eight – yes, eight – hours. I wasn’t sure I would be able to find pork bones: I was told most butchers probably wouldn’t have them on hand, because Western cooking usually revolves around stocks made with chicken and beef bones, and fond made from veal bones. Thank heavens for Asian supermarkets! I went to Marché Fu Tai and got some awesome-looking pork bones (leg and neck, from the looks of it), which the butcher sawed into segments for me. After the full eight hours, the stock was truly a thing of beauty: rich and fragrant, and as it cooled it turned into a gelatinous marvel. I seasoned it with the taré, following David Chang’s advice to keep flavouring until it’s “not quite too salty but almost.”


Chang uses two kinds of pork in his ramen, but I decided to skip the shredded shoulder and stuck to classic sliced pork belly. When I asked for pork belly at a butcher shop at Jean-Talon Market, the woman behind the counter apologetically said she only had a big, 4-pound slab, which was vacuum-packed and therefore couldn’t be divided. I lit up and told her that was perfect. The pork was rubbed with salt and sugar, then baked at high, then low temperatures (Chang writes that this method was born out of a mistake, but the result was so good he decided to keep doing it). It was mouth-wateringly tender and flavourful, and the leftovers were used for banh mi sandwiches.

And finally, there were the noodles. That was the part that had me most worried. I’d done research, and had learned that ramen noodles, contrary to what one may think, don’t contain eggs: they get their yellow colour from kansui, or alkaline water. Kansui also speeds up the production of gluten, and makes the noodles firmer. I found a comment on Chowhound that someone had managed to locate some of this hard-to-find liquid near Jean-Talon. I looked around and found some at Thai Hour. (On a side note, I was reminded never to judge a store by appearances: my first instinct was to check Marché Oriental, which is also in that neighbourhood. It’s the larger and better-lit of the two stores, so I thought I had a better chance. But no, I found the kansui across the street, at the much more modest-looking Thai Hour.)

I was tempted to hand-pull the noodles, as I had seen it done in the Oishinbo volume on ramen and gyoza (Oishinbo is an amazing manga about Japanese cuisine, which I have previously mentioned). The process just looks so bad-ass and impressive (this is unflipped manga, so read the panels right-to-left):


But I decided to save that experiment for another time, and just used the pasta roller, which is how Chang does it anyway. Incidentally, he commented on his own recipe by saying that the home cook didn’t really need to go to the trouble of looking for kansui, or even making noodles from scratch. But when people give me leeway in a recipe, I take it as a challenge to refuse said leeway. :-)

Okay, with all that done (it took about two days and a half), all that was left to prepare were the other toppings. Traditionally, ramen is topped with pork belly, half a hard-boiled egg, squares of nori, menma (softened bamboo shoots), scallions, and naruto (sliced fish cake). Naruto is usually storebought, and I knew where to buy some, but I could only get it in a relatively large chunk. Since I would only need a little bit, and have no use for this ingredient outside of ramen, the rest would have gone to waste. Besides, naruto doesn’t taste like much (although it does give ramen their distinctive “look”), so I had no qualms about skipping it. I also skipped the menma, mostly because I was tired of cooking and just wanted to eat the damn soup already.


I had to be reminded of how to boil an egg while avoiding that ugly grey ring around the yolk: put the egg in cold water, bring to a boil, turn off the heat, and let sit for 10 minutes, 8 minutes if you want the yolk to be ever so slightly creamy. (Chang tops his ramen with slow-poached eggs, which I also know how to make, but as I explained, I was kind of in a hurry to eat.)

It’s important for the broth to be hot when you ladle it, and the bowls should ideally be warmed in a low-temperature oven. The water for cooking the noodles should be simmering, not rolling: a full boil can strip away some of the flavour (Mind you, I haven’t tested this theory for myself, but that’s what Oishinbo says… Seriously, there’s a whole chapter about this). The cooking time varies depending on the noodles.

So, was it worth it? Oh hell, yes! It tasted out of this world. No, actually, it tasted like Japan, and took us right back to those narrow little ramen shops in Tokyo. The broth was amazing, the pork melted in our mouths… The noodles could have been more toothsome, but I’d had to improvise on them: the recipe called for alkaline salts, and all I had was alkaline water, so I had to guess the amount, and probably should have added a tiny bit more. But you can bet I’m going to keep tweaking this until I get it right.


So, that was my first foray into homemade ramen. I can’t wait to make more, and try other kinds of broths, especially miso. I faithfully followed the recipe for my first attempt, but now that I have a pretty food idea of the process, I want to come up with my own recipe, my own ideal ramen. Yummy days ahead!

Thursday, July 14, 2011

Daring Cooks' July Challenge - Homemade Noodles

Steph from Stephfood was our Daring Cooks‟ July hostess. Steph challenged us to make homemade noodles without the help of a motorized pasta machine. She provided us with recipes for Spätzle and Fresh Egg Pasta as well as a few delicious sauces to pair our noodles with!


This month’s Daring Cooks challenge couldn’t have come at a better time. I had been wanting to make pasta from scratch for a while now, and had already borrowed my father-in-law’s pasta machine even before the challenge was revealed (it also came in handy for the Daring Bakers’ baklava challenge).

I started off simple, by following the egg fettuccine recipe provided. The dough was very easy to work with. When cutting the pasta, the strands initially stuck together, and I had to finish separating them by hand. But I floured the next batches more thoroughly, and there were no other problems. I prepared the fettuccine very simply as well, a variation on aglio e olio: some garlic-infused oil, a crack of pepper, and some baby spinach thrown in with the pasta at the last minute. I would have liked the noodles themselves to be a little slicker, but I guess making pasta takes practice.


After that, I just had to make stuffed pasta: so many possibilities! My father-in-law had lent me a nifty little gadget to help with making ravioli.


Once the pasta is rolled, you place it over the cutters and stuff the pockets.


Cover with another sheet, run a rolling pin over, then turn over and press down.


And voilà! Just cut out the ravioli, and you’re done!

For the filling, I sautéed some finely chopped pancetta and portobello mushrooms, then mixed in some parsley, bread crumbs, and an egg. It wound up being a little too dry, and the sage-infused butter I used as a sauce did little to balance it. Normally, I guess one would have added ricotta, but nobody likes ricotta around here…


Ok, they’re not the most photogenic little morsels, either. Again, practice makes perfect.

I finished off this challenge with the dish I am proudest of: homemade ramen. Actually, I didn’t really think of this as part of the challenge: circumstances last week conspired to fill me with an irresistible urge to make ramen, and I spent four days running around looking for recipes and ingredients (when I get the urge to make something in particular, I tend to get a little obsessed). I didn’t think I would get this done before the deadline, but it turns out I was able to serve it for dinner last night.


I’m actually going to make a separate post about the making of this dish, so I won’t go into details here. I’ll just specify that I didn’t go so far as to pull the noodles by hand, which is the traditional way to make these. Instead, I used the pasta machine. So making the noodles themselves wasn’t much different from making pasta, except that the ramen dough was egg-free, and included a hard-to-find ingredient called kansui, or alkaline water.

This was definitely one of the most productive and inspiring challenges I’ve taken part in. Thank you, Steph! The rest of you can look at the challenge recipes here at the Daring Kitchen, and also go through the Daring Cooks’ blog roll to see what other kind of noodles were cooked up this month.

Monday, February 14, 2011

Daring Cooks February Challenge - Hiyashi Soba and Tempura


The February 2011 Daring Cooks’ challenge was hosted by Lisa of Blueberry Girl. She challenged Daring Cooks to make Hiyashi Soba and Tempura. She has various sources for her challenge including japanesefood.about.com, pinkbites.com, and itsybitsyfoodies.com

Lord knows I’m always up for making Japanese food. We had a big sushi party here, a couple of weeks ago. The guests pitched in and took a shot at rolling their own maki, while I looked over their shoulder and pretended to be an expert. It was fun!


So I was pleased to discover this month’s DC challenge: cold soba and tempura. Laurent and I have made tempura before, but it had been a while. And it had been even longer since we’d had soba at home. We usually prefer udon or ramen, which are less healthy, but milder tasting. And we usually serve them in hot soups, rather than cold. But I had hiyashi soba several times last summer in Japan, and they were a refreshing delight on a hot, muggy day.

I don’t have much to report this month. I mistakenly thought I had a pack of soba left in the pantry, and had to run out and substitute what I could find. Technically, I used buckwheat lomein, but I’m fairly sure they only differ from soba by their shape. I probably should have rinsed the cooked noodles a little more, as they stuck together a bit. But a little bit of spicy dipping sauce (very zippy, by the way!) did the trick and made them slurp-a-licious!


For the tempura, I was pleased to learn a couple of tricks to improve results, such as keeping everything cold prior to frying, and putting the fried pieces of food on a rack to drip their excess oil, instead of blotting them on paper towels. This was definitely the crispiest, lightest tempura we ever made! It was also our first time using shiitake and eggplants for this dish (we usually stick to shrimp), and we enjoyed both, especially the mushrooms.


Thanks, Lisa, for this challenge and for all the info!

Please check out the Daring Cooks’ blogroll to see what everyone else cooked up this week. And visit The Daring Kitchen to look at this month’s challenge recipes.

Sunday, November 14, 2010

Product Review - Dried Chanterelle Powder from O Gourmet


I was recently asked to do a product review for O Gourmet, an online food store physically located in Montreal. As their name indicates, they specialize in fine products. They have quite a selection, and their site is also very informative, even offering detailed guides about berries, plants, vinegars, mushrooms, and pâtés. They also offer a variety of local foods, which of course deserves a thumbs up.


Because I mentioned that I love cooking with mushrooms, they offered to send me some dried chanterelle mushroom powder. (By the way, these pictures were taken after I’d used up more than half of the powder for my test recipes – sorry about that.)


Although I’ve cooked with dehydrated mushrooms before, I had never used them in this form. I did some pondering before deciding what kind of dish to incorporate the powder in. Chanterelles aren’t all that easy to find in my neighbourhood (although you can find them in season at open-air markets), so I haven’t had the good fortune of tasting them very often, but I did know they had a fairly delicate flavour (especially when compared to shiitake or porcini), so I wanted something that wouldn’t overwhelm it. In the end, I created two recipes.

The first was a mushroom bread. I’ve been taking up bread baking more or less seriously again, after a lengthy break, and have been indulging in sandwiches made with homemade whole wheat bread on a nearly daily basis (I bake two large loaves every two weeks, slice them and freeze them for future use). Mushroom bread has always been on my list of things to make, and this seemed like a perfect opportunity. It was also the first time I attempted to create an original bread recipe: until now, I’d merely followed published recipes, tweaking them here and there. I can’t say this is a particularly daring recipe (I followed generally accepted guidelines), but it was a great experience to find my own balance, and tweak the dough so as to obtain the kind of bread that I’m most fond of.


I chose to make rolls, crusty on the outside and soft on the inside. I incorporated the chanterelle powder directly into the dough, and also added some rehydrated dried wild mushrooms, to add some texture and flavour contrast. The result was very satisfactory (heck, I was pleased as a peacock with my first original bread), and while the chanterelles’ taste was subtle, you could definitely taste the hazelnutty hint in the crumb.


The second recipe I tried was a mushroom risotto. Once again, I tried not to overwhelm the chanterelles’ flavour. I sautéed some portobello and shiitake mushrooms separately, and sprinkled in the chanterelle powder as I simmered the rice in chicken stock, before tossing in the cooked mushrooms. The powder added some colour to the rice, and once again, the flavour was there.


I enjoyed experimenting with chanterelle powder. And, being a mushroom fiend, I have a feeling I’m going to be experimenting with other powders very soon!


Mushroom Rolls

Yields 12 small rolls

2 tsp instant yeast
500 ml (2 cups) warm water (about 37.7 ºC, 100 ºF)
2 tbsp olive oil
560 g (4 cups) bread flour
2 tsp sea salt
2 tbsp dried chanterelle powder
25-30 g (1 oz) dehydrated wild mushrooms (e.g. shiitake, oyster mushrooms, boletes etc.)

Rehydrate the dried mushrooms according to the package instructions.

Pour the warm water into a large mixing bowl, sprinkle the yeast into it and whisk to dissolve.

Combine 140 g (1 cup) of flour with the salt and chanterelle powder, and whisk it into the water mixture, along with the oil and the rehydrated mushrooms. Gradually add the rest of the flour, stirring with a wooden spoon. Switch to kneading with your hands when the tough becomes too sticky and tough. The dough should be smooth, soft, and tacky by the end.

Oil the bowl and the dough with olive oil, cover with plastic wrap and let rise for 30 minutes.

Knead the dough for about 20 strokes, oil and cover again, and let rise for 90 minutes, or until doubled in size.

Separately tack two baking sheets on top of two other baking sheets. Cover the top sheets with parchment paper.

Transfer the dough onto a lightly floured surface. Divide it into 12 equal portions and form each portion into a ball. Place the balls onto the prepared baking sheets, cover lightly with plastic wrap, and let rise for 45 minutes.

Place a rack at the center of your oven, and another just below. Fill a heatproof baking pan two-thirds of the way up with hot water, place it in the lover rack of the oven, and preheat oven to 220 ºC (425 ºF).

Spray your rolls with water and put them on the center rack of the oven. Bake for 25-30 minutes, until golden brown, rotating the sheets halfway through the baking time. Remove the rolls from the baking sheets and let cool on racks.

You can freeze the baked rolls for future use.


Mushroom Risotto

Serves 2-3

150g (5 oz) fresh shiitake mushrooms, stemmed and diced
200 g (7 oz) fresh portobello mushrooms, stemmed and diced
3 tbsp olive oil
1 onion, diced
200 g (7 oz) carnaroli rice
1 litre (4 cups) homemade chicken stock
2 tbsp dried chanterelle powder
Salt and pepper, to taste


Heat the chicken stock over low heat.

Heat half of the olive oil in a skillet or wok, over medium-high heat. Add the diced mushrooms, salt lightly, and sauté until browned. Transfer the mushrooms to a plate or bowl, and reserve.

In a large saucepan, heat the remaining olive oil, over medium heat. Add the onion, and cook until soft and translucent, stirring quite often. Add the rice, and stir until the grains are coated with oil, about 1 minute. Pour in a ladleful of chicken stock, and stir constantly until all the stock has been absorbed. Pour in another ladleful of stock, then add the chanterelle powder, still stirring constantly. Continue adding the stock gradually, always stirring, until the rice is cooked al dente (if you run out of stock, add water instead). Toward the end of the cooking process, toss in the cooked mushrooms, and stir to combine and heat through. Adjust seasoning and serve immediately.

Wednesday, July 14, 2010

Daring Cooks' July Challenge: Nut Butters


The July 2010 Daring Cooks’ Challenge was hosted by Margie of More Please and Natashya of Living in the Kitchen with Puppies. They chose to challenge Daring Cooks to make their own nut butter from scratch, and use the nut butter in a recipe. Their sources include Better with Nut Butter by Cooking Light Magazine, Asian Noodles by Nina Simonds, and Food Network online.


I realize I have been really neglecting this blog this past month. But rest assured, I’ve pretty much been neglecting ALL my usual online activity these days, except for email. My apologies to all the beautiful bloggers whose posts I haven’t been reading as regularly as usual – I miss you! Let’s just say life has been… not hectic, exactly, but weird, and changing from day to day. Things keep happening that stop me from forming a routine.

So, getting my DB and DC challenges is pretty much all I can muster right now. And even then, just barely: I made this month’s dish yesterday.

This month’s Daring Cooks’ challenge was simple: make nut butter from scratch, and cook with it. Straightforward, yet so full of possibilities!


I had never made nut butter, but it turned out to be a breeze: just put your preferred nuts in a food processor and chop, adding oil if necessary, until you obtain the desired texture. I was somewhat afraid our old food processor, which is more than 20 years old, wouldn’t be able to handle it, but it came through with flying colours!


Our hostesses had given us several recipes, but given the temperature here these days, the cold Asian noodle salad really jumped out at me. Plus, Laurent and I often have to eat dinner fairly quickly these days, because the FanTasia film festival is going on right now: it’s when we make up for never going to the movies during the rest of the year, by bingeing on alternative Asian films and animations for three weeks. Since noodle salad can be made in advance, it was perfect for such a night.

(On a side note: I may be neglecting my blog, but I am still a hopeless foodie. The movie we saw yesterday was Le Grand Chef 2: Kimchi Battle, which, you guessed it, is about Korean chefs battling to make the best kimchi. I squealed during all the food shots, I drooled over the fancy knives and pretty equipment, and then… I cried. I cried during a food movie. To be fair, it was during an emotional, mostly food-unrelated scene. Still… I cried during Le Grand Chef 2.)


The noodle salad was a huge hit. I used Chinese egg noodles (despite being kind of frustrated that the ones I had in the pantry look like spaghetti), and mostly followed the recipe, except that I substituted sautéed mushrooms for cucumber (we’ve been eating cucumbers everyday, and I needed a change), and cut the garlic in the dressing (despite that, both of us still had vampire-repelling breath during the movie). Speaking of the cashew butter-based dressing, it was so good I felt like licking my plate. Laurent has declared that he wants this dish again, very soon.

So, despite being last minute, I thoroughly enjoyed this challenge. Thank you, Margie and Natashya! To see the challenge recipe, head on over to the Daring Kitchen, and check out the blogroll for some creative uses of nut butter!

Sunday, March 14, 2010

Daring Cooks' March Challenge - Risotto


The 2010 March Daring Cooks challenge was hosted by Eleanor of MelbournefoodGeek and Jess of Jessthebaker. They chose to challenge Daring Cooks to make risotto. The various components of their challenge recipe are based on input from the Australian Masterchef cookbook and the cookbook Moorish by Greg Malouf.

This month’s Daring Cooks’ challenge was pretty familiar to me: I’ve made risotto often. Although I have to admit, for the longest time I didn’t even consider making it: I used to think it was a fancy, complicated dish. But it’s actually fairly simple, albeit a little time consuming.

It’s also extremely versatile, which makes it convenient as hell. I’ve made risotto with smoked salmon and asparagus, aragula and gorgonzola, lemon and mushrooms… For this challenge, I decided to steer away from Italian flavours, and take the fusion road.


Fusion cuisine is not something I do often. I prefer discovering national cuisines and understanding how they work and blend flavours, before messing around with them. And since I always feel like I still have much to learn, I never get around to fusing. But I have come across fusion recipes that worked out extremely well. And it seemed like the perfect way to get creative with this challenge.

One of the requirements was to make our own stock. I delegated most of this task to Laurent, because he is the stock expert in the house. Me, I know how to make stock, but he seems to enjoy it so much more than I do – the exceptions being Asian stocks, such as Japanese dashi and Vietnamese pho broth: that’s my territory.

We used out usual stock recipe, since we know it works with any dish: one whole chicken, a couple of extra breasts, celery, carrots, onion, peppercorns and a classic bouquet garni (parsley, thyme, and bay). And quite a bit of salt. We simmered it at low heat for 3 hours, and ended up with 3 litres of deep, clear stock – along with loads of poached chicken meat, to use in salads.


For my first fusion experiment, I made a Tex-Mex Risotto, with sautéed bell pepper, black beans, corn, red Spanish onion, grated Monterey Jack cheese, jalapeno, and fresh cilantro. But, even though Tex-Mex cuisine tends to use long grain rice, I stuck with Italian Arborio rice, which works best for risotto. The result was really pretty good. And the fusion really didn’t taste weird at all: on the contrary, it felt natural. It might seem like I put a lot of stuff in there, but I always make risotto this way. To me, risotto is always an all-in-one meal, because I find it too filling to be a side-dish. So I always try to incorporate veggies and protein in there.


I took it a step further for my second try: Japanese risotto. Again, I used Arborio rice, because Japanese rice would probably have yielded a sticky mess. But instead of regular onions for the risotto base, I used scallions. And I deglazed the rice with sake, instead of the usual white wine. Finally, I replaced the chicken stock with diluted miso (not too much, otherwise the meal would have been way too salty – but enough to imbibe the rice with umami). I garnished the risotto with sautéed shiitake, and salmon teriyaki.


It came out great, I thought. The slightly salty rice contrasted well with the sweet-and-salty teriyaki – I made a point of not blending the ingredients too much, so as to prevent the sauce from getting everywhere and killing the miso. And the shiitake added a nice chewy texture to the mix. The rice was creamy and moist, very different from the usual sticky rice that comes with Japanese cuisine.

So, thank you to Eleanor and Jess for this fun, versatile challenge! Please check out the challenge recipes over at the Daring Kitchen: there are yummy risotto ideas, including preserved lemon, or pumpkin risotto! And don’t forget to check out the other Daring Cooks’ dishes!


Tex-Mex Risotto

Serves 3-4

For the risotto base:
2 tbsp olive oil
1 medium Spanish red onion, diced
200g (7 oz) Arborio rice
1 tbsp whole cumin seeds
120 ml (1/2 cup) dry white wine
1 litre (4 cups) homemade chicken stock

For the vegetable topping:
1 tbsp olive oil
1 red bell pepper, seeded, cleaned, and cut into strips
1-2 jalapeno peppers, seeded and finely chopped
250 ml (1 cup) cooked black beans, drained and rinsed
250 ml (1 cup) corn kernels, canned or frozen

Final touches:
80 ml (1/3 cup) shredded Monterey Jack cheese
A handful of fresh cilantro leaves, washed and chopped
Salt to taste


Heat the chicken stock in a separate saucepan, until steaming. Keep warm.

Prepare the vegetables:
In a skillet, heat 1 tbsp olive oil over medium-high heat. Add the bell pepper and the jalapeno, and stir-fry until tender. Add in the black beans and corn kernels and cook until heated through. Remove from heat and set aside.

Make the risotto base:
In a large, heavy-bottomed pot, heat 2 tbsp of oil over medium heat. Add the diced red onion and cook until tender. Add the rice and the cumin, and stir to coat each grain in oil. Pour in the wine and continue cooking until the liquid has evaporated or been absorbed.

Pour a ladleful of hot stock over the rice. Cook, stirring constantly with a wooden spoon, until all the stock has been absorbed. Repeat these steps until the rice is almost cooked to your liking.

Assemble the dish:
In the final minutes of cooking, add the cooked vegetables to the rice and stir them in. Continue cooking until warmed completely. At the last minute, stir in the shredded cheese. Adjust seasoning if necessary.

Serve immediately and garnish with chopped cilantro.


Japanese Risotto

Serves 2-3

For the risotto base:
2 tbsp olive oil
3-4 scallions, chopped
200g (7 oz) Arborio rice
60 ml (1/4 cup) sake
1 tbsp white miso, diluted in 1 litre (4 cups) warm water

For the salmon teriyaki:
60 ml (1/4 cup) sake
60 ml (1/4 cup) mirin
30 ml (1/8 cup) soy sauce
1 tbsp sugar
300g (10.5 oz) salmon fillet, skinned
1 tbsp olive oil

For the shiitake:
360 ml (1 1/2 cup) shiitake mushrooms, washed, stemmed and sliced
1/2 tbsp canola oil
Salt, to taste


Prepare the salmon teriyaki:
Combine the soy sauce, mirin, and sake in a small saucepan. Stir in the sugar and cook over low heat, until the sugar has dissolved. Transfer to a bowl or deep plate, and let cool completely. Add the salmon fillet and marinate in the fridge for 30 minutes.

Remove the salmon from the marinade, shaking off any excess liquid. Make sure to reserve the marinade. In a skillet, heat 1 tbsp olive oil over high heat and sear the salmon to your liking; do not let it get too dry inside. Remove the salmon from the pan, and cut it into chunks. Reserve.

Transfer the marinade into a saucepan and cook over medium heat, until the sauce has thickened considerably (it should form a slightly liquid glaze). Reduce heat and add the salmon, stirring gently to coat the chunks of fish. Keep warm over low heat and reserve.

Prepare the shiitake:
Heat 1/2 tbsp oil in a wok over medium-high heat. Add the shiitake and stir-fry until tender. Salt to taste, remove from heat, and reserve.

Make the risotto base:
In a large, heavy-bottomed pot, heat 2 tbsp of oil over medium heat. Add the sliced scallions and cook until tender. Add the rice, and stir to coat each grain in oil. Pour in the sake and continue cooking until the liquid has evaporated or been absorbed.

Pour a ladleful of hot miso broth over the rice. Cook, stirring constantly with a wooden spoon, until all the liquid has been absorbed. Repeat these steps until the rice is almost cooked to your liking.

Assemble the dish:
In the final minutes of cooking, add the sautéed mushrooms to the rice and stir them in. Continue cooking until warmed completely. Divide the risotto into individual servings, and top each plate with a helping of warm salmon. Serve immediately.

Wednesday, August 19, 2009

The Asparagus Series - Episode Four: Two Pasta Recipes


Help! We are being overrun by plants!


Yes, that’s what my living room looks like right now. Our building is having work done on all the balconies, and so we have been instructed to clear our balcony out. And this was the only place we could store all our herbs. I feel like I’m writing in a greenhouse. Hopefully, we’ll find a new home for the plants soon, because the lack of sunlight can’t be good for them.

Well, the living room may be a mess, but the kitchen, while cluttered, is still completely functional. Which means I still have much to share with you all. So, first things first, what do you say we finish our Asparagus Series? And the final dish (or rather, dishes) will be: pasta!

Originally, I only had one pasta recipe to share: lemon penne with asparagus, which we made a while ago. But, to my surprise, asparagus have made a comeback in the market stalls this week. They are more slender than the ones we had in the spring, but they are just as delicious. So last night, Laurent (who had decided it was his night to cook) made me a shrimp and asparagus pasta dish.


Recipe no 1: Lemon Pasta with Asparagus


Both are very simple recipes, which can of course be modified ad infinitam. In fact, they are themselves variations. The first is taken from Josée di Stasio’s acclaimed Pasta Et Cetera, with the only difference being that she makes it with spaghetti – which we actually did try once, and found that the lemon sauce didn’t adhere to the pasta as much as we would have liked (although, to be completely honest, we had diluted it too much). Josée di Stasio describes this recipe as “something to make when there’s nothing in the fridge,” and that’s about right – sure, it’s better if you have asparagus or mushrooms around, but if worst comes to worst, lemon and parmesan are all you need.

The second recipe is courtesy of another Montrealer, Stefano Faita and his wonderful cookbook Entre Cuisine et Quincaillerie, which translates are “Between Cooking and Hardware.” Despite the title, the recipes don’t require any special equipment, but the book itself is full of anecdotes and useful tips. I’ve borrowed from it a lot, and very few of these Italian-inspired recipes have ever let me down.


Recipe no 2: Pasta with Shrimp and Asparagus


The original recipe called for flambéing the shrimp and asparagus with brandy, but we decided not to go there. For one thing, we’ve never flambéed anything yet. And secondly, I’m still reeling from an experience where an otherwise perfectly tasty shrimp pâté was completely ruined by the fact that the shrimp had been marinated in brandy: it was seriously the only thing to have ever come out of my kitchen that I couldn’t bring myself to eat more than a few bites of. I’m all for incorporating spirits into desserts and cakes, but ever since that day I’ve been a little wary of adding them to savoury dishes. So, for this recipe, we simply deglazed the pan with white wine, and that was that. And we couldn’t find fresh marjoram, so we used dried. Fresh Italian parsley would also have been good.

So, there you go: two very different, but equally flavourful asparagus pasta recipes. And with that, I am officially ending the Asparagus Series, and I promise the next post will be all about sweetness. Stay tuned!


Lemon and Asparagus Pasta
Slightly adapted from Pasta Et Cetera: À la di Stasio

Serves 2

One bunch of asparagus
The zest and juice of 2 lemons
250g (1/2 pound) short pasta
120 ml (1/2 cup) grated parmesan
3 tbsp olive oil
A handful of fresh basil, chopped
Salt and pepper

Combine the lemon juice and zest, parmesan and oil in a large bowl. Set aside.

Trim the asparagus. Cut them into 4 cm (1 1/2 inch) pieces, separating the stems from the spears. Bring a large pot of salted water to a boil (you will be using the same water to boil your pasta). Boil the asparagus stems for 2-3 minutes, then add the spears and boil for an extra 1-2 minutes. Remove the asparagus from the pot with a slotted spoon or skimmer, run under cold water and reserve.

Boil the pasta according to the instructions on the box. One minute before the end of the cooking process, add the asparagus to the pot, so as to reheat them. Drain the pasta and vegetables, making sure to reserve about 120ml (1/2 cup) of the cooking liquid.

Put the pasta, asparagus and cooking liquid in the bowl with the lemon and parmesan mixture. Toss to coat. Salt and pepper to taste and garnish with fresh basil.


Pasta with Shrimp and Asparagus
Adapted from Entre Cuisine et Quincaillerie

Serves 2

One bunch of asparagus
250g (1/2 pound) short pasta (such as penne or farfalle)
250g (1/2 pound) raw medium shrimp, deveined and shelled
2 tbsp butter
1 shallot, minced
120ml (1/2 cup) white wine
1 tbsp fresh marjoram, chopped (can be replaced with flat-leaf parsley)
240ml (1/2 cup) heavy cream
Grated parmesan
Salt and pepper

Trim the asparagus. Cut them into 4 cm (1 1/2 inch) pieces, separating the stems from the spears. Boil the asparagus stems in salted water for 3 minutes, then add the spears and boil for an extra 2 minutes. Drain the asparagus, run under cold water and reserve.

Bring a large pot of salted water to a boil and cook your pasta following the instructions on the box.

Meanwhile, melt the butter in a large pan over medium-high heat. Cook the shallots until slightly translucent, then add the shrimp and asparagus. Cook for 3-4 minutes, then add the white wine and continue cooking until mostly evaporated.

Season with herbs, salt and pepper. Add the cream and continue cooking, stirring often, until thickened.

Drain your pasta and add it to the pan. Toss to combine ingredients and coat the pasta with cream, and sprinkle with parmesan.

Friday, August 14, 2009

Daring Cooks' August Challenge - Rice with Mushrooms, Cuttlefish and Artichokes


This month’s Daring Cooks’ Challenge, hosted by Olga from Las Cosas de Olga and Olga’s Recipes, was a pretty straightforward recipe – especially compared to last month’s fascinating, but oh-so-scary molecular cuisine challenge. No powders, no special equipment, just regular pots and pans, with rice, vegetables, and seafood. Olga challenged us to make a wonderful Spanish recipe by chef José Andrès: rice with mushrooms, cuttlefish, and artichokes.

But, because each challenge is so carefully selected, I still learnt something. Several things, in fact.

The first thing I learnt is that fresh artichokes are mean little bastards.


I’ve had artichokes before, many times. But they were always boiled artichokes, which someone else had prepared for me. Or artichoke hearts, marinated in oil and vinegar. Hence, I had no idea fresh artichokes could be so… cactus-like.

But I soon found out. In fact, I found out before even paying for the evil veggies: as I handed them to the cashier at the market, I let out a loud yelp that made everyone nearby turn around. The artichokes had managed to prick me through their plastic wrapper, thanks to their Stingers of Death.


Prickly little buggers… Predictably, I encountered quite a few further injuries while trying to cut through the artichokes. “Trying” is the word, because my dull kitchen knives were no match for the artichokes’ Leaves of Steel. Fortunately, Laurent gave me a hand – literally – and helped me pluck out all the outer leaves, until the artichokes were left vulnerable enough for my knife to penetrate them.

That was actually the hardest part of the challenge, for me. Well, except for the allioli.

But let me first tell you a bit more about this month’s challenge recipe. The basic dish consisted in sautéed artichokes, mushrooms and cuttlefish (which I replaced with calamari), which were then simmered with short-grain rice in fish stock. However, there were two additional seasonings, to be prepared separately: sofregit (a simmered tomato sauce with optional mushrooms and bell pepper), and allioli (a garlic-based mayonnaise-type sauce). We were encouraged to use Spanish rice and olive oil if possible, but... well, I live with an Italian. :-)

The sofregit was no problem. The allioli, however, was a different story. We were encouraged to try the traditional method, which consisted in crushing garlic with a mortar and pestle, then adding olive oil drop by drop, stirring constantly with the pestle, until a thick sauce formed. Until then, I had always been under the impression that allioli was just mayonnaise with added garlic. I was very intrigued by how mere oil and garlic would ever become a mayonnaise, and so I took up the challenge.

I crushed the salted garlic into a smooth paste, then began adding the olive oil. After 10 minutes, it started to look like a sauce was forming. In my excitement, my wrist slipped, and I poured in too much oil at once. Big mistake: the sauce seemed to be lost forever. I kept on stirring for 20 more minutes, but the oil and garlic remained separated.

Fortunately, if there’s one thing I know how to make, it’s mayonnaise from scratch. It was literally the first thing my Belgian grandmother taught me to make in the kitchen. Other kids learn to make cookies, I learnt to make mayonnaise. So, I took an egg yolk, added some vinegar (normally, I would have added mustard, but I didn’t want to alter the allioli’s taste too much), and began whisking in some olive oil. It was a hot day, and I hadn’t refrigerated my utensils, so for a while it looked like this mayonnaise wouldn’t take either. But with the last of my elbow-grease, it finally came together, and all I had to do was add the garlic paste. Not quite traditional, but it would have to do.


The rest of the challenge was a breeze. The vegetables and calamari were perfectly cooked, the rice was just barely al dente, and the whole dish was fragrant with tomato sauce and saffron: it was a hit. I was pleasantly surprised at how flavourful the end result was. Reading the instructions, it had seemed to me that the recipe was lacking some zip, and so I had bought some lovely black olives (Spanish, for once) to add to the rice at the last minute. But as it turned out, they weren’t needed: the flavour was perfect as it was.

However, after dinner, while clearing the table and putting away the leftovers… I saw the allioli which I had left in the fridge and forgotten to serve with the rice. D’oh.


Since I had put so much effort into making the damn sauce (my arms were still shaking), we immediately tried it on croutons, with a bit of extra rice (and I used more leftovers to take the pictures). Personally, I’m not convinced the allioli was necessary. I love garlic, and I love mayonnaise, but the allioli (at least, the one I made) tasted bitter to me. I’d have guessed it was the crushed raw garlic, but Laurent tells me it might have been the olive oil: we usually make our mayonnaise with canola oil, which gives it a milder taste.

I made the recipe for four people, and there are only two of us here. So, with the leftovers, I decided to have a little fun, and made an omurice. Omurice (also spelled omrice, or omuraisu) is a Japanese dish, typically consisting in chicken rice wrapped in a thin sheet of omelette: hence the name, which is short for omelette-rice. Usually, the rice is simmered with ketchup, and the omelette is topped with more ketchup. But for this version, I used – you guessed it – the leftover sofregit tomato sauce! And, since there was still allioli left, I threw that in too (although I’m still not convinced).


Normally, omurice would be wrapped more prettily than this, but I was hungry and had burnt my hand on the stovetop (and on the omelette, while trying to arrange it). It’s a miracle I didn’t break the omelette completely.

The result tasted really good – more Spanish than Japanese, to be sure. I’m not sure what to call it though… Omurice à la Spaniard? Omupaella? Omuarroz? What do you think?

It’s quite likely I will make this kind of rice again, or some variant on it. However, I think I’m more comfortable with the risotto method: I always feel the urge to stir rice, while it’s cooking, but with Spanish rice you’re supposed to avoid overstirring – which was very hard for me.

But there’s one thing I’m sure of: if I ever need artichoke hearts again, you can bet I’ll buy them canned!

You can download the full recipe and instructions at The Daring Kitchen, and be sure to check the other participants' dishes while you're at it! A great thank you to our hostess for this lovely challenge!