Sunday, October 31, 2010

Don't Judge a Book By Its Cover - Cauliflower and Ham Casserole


I’ve been on the fence about whether or not to post today’s recipe. Mostly because of the way it looks.

See, if I try to shoot it before cutting it open, it looks like a perfectly nice, comforting, but unfortunately anonymous cheesy casserole. It could be anything hiding under that layer of cheese.


However, if I try to photograph it after cutting a piece out, it looks like… Well, it looks like this. And I don’t think I need to tell you what else it resembles, I think it’s crossed all of your minds.


So, lesson learned: it’s pretty much impossible to make this cauliflower casserole look good on a picture. Trust me, it looked even worse when served on a plate. And closeups? Forget about it. It’s just not a photogenic dish. I could lose the béchamel on the bottom layer, which would make it less liquid and less… un-food-like-looking; but then I would lose all the creaminess and richness. Although in all fairness, I added too much milk to my sauce: there shouln't have been that much liquid. Another lesson learned.

However, in spite of its appearance, this casserole is pretty great. It’s a one-dish meal, with all the vegetables, protein and calcium you’ll need for dinner. Running some ham through a food processor and adding it to the sauce really boosts the flavour.

So, for once, don’t look too much at the picture. I can guarantee that the smell of this baby coming out of the oven will make you forget all about its looks.


Cauliflower and Ham Casserole

Serves 4-6

2 heads cauliflower
5 medium slices of ham
80g (3 oz, 3/4 cup) smoked cheese, grated (e.g. mozzarella or Jarlsberg)
80g (3 oz, 3/4 cup) cheddar cheese, grated
4 tbsp flour
A pinch of nutmeg
Milk, as needed
Freshly ground black pepper, to taste


Preheat your oven to 180ºC (350ºF)

Wash and cut the cauliflower into fairly thick florets. Bring a pot of salted water to a boil and blanch the cauliflower, until al dente. Drain and dunk into cold water to cool. Once cooled, pat dry with a clean towel or paper towels. Reserve.

Run the ham through a food processor, until it is cut very thin, almost crumb-like. Reserve.

In a skillet, melt the butter over medium heat. Stir in the flour, and cook, stirring constantly, until the mixture begins to brown. Whisk in milk gradually, a little at a time, until your béchamel sauce has acquired a smooth, but still rather thick consistency (it will liquefy more in the oven).

Toss in the ham and cheddar with the sauce and stir to combine. Add the cauliflower and coat the florets with the sauce. Season with pepper (salt will probably not be necessary, given the ham and cheese.)

Transfer the mixture to a casserole or baking dish, in an even layer. Sprinkle with the smoked cheese. Bake, uncovered, for about 20 minutes, or until cheese is melted and bubbly. Let cool 5 minutes before serving.

Wednesday, October 27, 2010

Daring Bakers' October Challenge - Doughnuts


The October 2010 Daring Bakers challenge was hosted by Lori of Butter Me Up. Lori chose to challenge DBers to make doughnuts. She used several sources for her recipes including Alton Brown, Nancy Silverton, Kate Neumann and Epicurious.

I had such a blast with this month’s challenge. It was just plain fun. There’s just something about homemade doughnuts that brings a smile to my face – and people around me.

Growing up in New York, I had my share of Dunkin Donuts as a kid. I always had a soft spot for factory doughnuts: the sweet, sticky icing, the sprinkles, the dough that somehow managed to be super soft and somewhat chewy at the same time…

And then, there were Belgian doughnuts, also known as croustillons, or oliebollen. They are merely balls of dough (sometimes made with beer), deep-fried to a crisp and served piping hot with a sprinkling of icing sugar. They are sold from carts on the street or during fairs, and served in large paper cones. They are one of my fondest sweet memories, and I really wanted to try making them this month. Unfortunately, time ran out, and I was only able to make American-style yeast doughnuts, following the Alton Brown recipe our hostess Lori had given us.


Like I said, these doughnuts were just fun to make – fun, and easy. The dough was soft and forgiving, and the only mildly scary part of the process was the deep-frying. I’ve said it before: I know how to deep-fry, I’m just always nervous when I have to do it on my own. But I was home alone on the day I was doing the challenge, so it was just me and the frying pan. However, these doughnuts fried up so quickly, they barely made a splash in the oil. I’ve honestly never seen my stove so clean after a deep-frying session.

I made two kinds of butter-based sweet icing: one vanilla, and one chocolate. Because I like to get extreme when it comes to chocolate, I added chocolate sprinkles to the latter. Actually, those doughnuts were supposed to be triple chocolate (oh yes, I would’ve gone there!), but I forgot to split the dough in two and add cocoa to one half. Oh well…


The doughnuts were very good, although I would’ve liked them to be a bit fluffier. But I think I deflated my dough too much when I rolled it to cut out the doughnuts. But they were still light, and tasty, and impressed people. I love learning to make things that I never would’ve considered tackling before. Thanks, Lori!

Don’t forget to check out the challenge recipes and the other Daring Bakers’ creative doughnuts!

Thursday, October 14, 2010

Daring Cooks' October Challenge - Stuffed Grape Leaves


Our October 2010 hostess, Lori of Lori’s Lipsmacking Goodness, has challenged The Daring Cooks to stuff grape leaves. Lori chose a recipe from Aromas of Aleppo and a recipe from The New Book of Middle Eastern Food.

I think I cursed when I first saw this month’s challenge. Stuffed Grape Leaves. My nemesis.


Okay, maybe “nemesis” is too strong a word. The truth is, I only attempted to make dolmas once, for the February DC challenge on the theme of mezze. It had been a fairly epic fail, with my bundles unravelling as they simmered, and the result tasting watery and bland. I had more or less decided that the whole thing wasn’t worth the time and effort.

But after my initial reaction upon discovering the challenge, I decided to give stuffed grape leaves another shot this month. After all, the recipes provided by our hostess, Lori, were more detailed than what I’d used on my own, and they looked tastier, too. And the Daring Cooks are all about challenging ourselves.

But then I left on my trip. When I got back last week, I figured I had plenty of time. And then, I set my mind on various thing, and before I knew it, I was wondering what day it was, and “Huh, today’s the 13th… Oh, crap.”

So, I made them today. Still somewhat wary of dolmas (the rice-filled version), I tried the yebra, a version filled with meat, rice, and spices. It was fairly easy to prepare, with minimal chopping required. Then I rolled everything carefully, briefly cooked the rolls in oil with a few dried apricots, and finally, after taking a deep breath, covered them in lemon juice, salt, and water. Then I quickly placed a plate over them to keep everything in place and prevent what had happened last time.


The verdict? I can’t even begin to tell you how much better these were than the mess I’d created in February. The filling held together much more, which must have helped the rolls maintain their shape. And they had much more flavour than my previous attempt, thanks to the spices and the added ingredients in the simmering water. The recipe suggested adding tamarind to the liquid, but, while I had tamarind paste on hand, I chose not to use it, because I was using a non-stick pan, and tamarind tends to have a corrosive effect on those; but I can imagine that it would have worked well with everything else.


So, I want to give a great big “thank you” to Lori for pushing me to give stuffed grape leaves another shot. I can honestly see myself making these again: I’ve decided they are definitely worth the time and effort. In the meantime, I’ve frozen most of the ones I made today, and I’m looking forward to serving them again soon.

Don’t forget to check out the other Daring Cooks’ creations, and well as the challenge recipes.

Friday, October 8, 2010

I'm back! - Wakame Salad


Greetings, all! My apologies for the prolonged silence, but life once again conspired against me. I had comprehensive predoctoral exams to deal with, and then I went to visit my parents for two weeks. I did cook a little with my mother while I was there, including some blogworthy dishes – but somehow, I kept forgetting to photograph and document them. You know how it is when you’re on holiday.

Anyways, I’m back now, and ready to try and breathe some life back into this blog. Although I’ll admit my choice of topic for this first entry in a long time is not necessarily the most alluring, at least for a lot of people: I’m talking about wakame, a.k.a seaweed, salad.

I can hear the groans and feel the shudders: “Seaweed, ewww!” Or not… A decade ago, definitely, but now? Most people living in large (and not so large) Western cities have tasted seaweed, albeit mostly under the guise of nori-wrapped sushi. And I’m fairly confident most foodies have given other types of seaweed a whirl – and that a reasonable proportion must have liked it.

My mother, who grew up in Vietnam, tells me that she used to eat seaweed all the time as a child, namely in the form of dessert (I haven’t yet attempted to make the sweet dish she described to me, but it has coconut milk in it, and it sounds quite tempting). I, however, like most Western-raised kids, scrunched up my nose at the very idea. Seaweeds were slimy, disgusting things that grew on the icky bottom of the sea and tickled your feet in the most repulsive way as you swam over them. Well, I still very much dislike being brushed by seaweed while taking a dip in the ocean (I don’t like to think too much about what lurks under the water), but I’ve become a true fan of eating seaweed. So has Laurent, who has taken to snacking on nori strips, instead of chips. He’s even tried out a recipe by Laure Kié, which is basically a pizza margherita sprinkled with arugula and nori strips at the last minute. Sound weird? I thought so too. But it was surprisingly good, which makes sense when you remember that tomatoes, like nori, have high levels of umami.


I, for my part, am partial to wakame. I overload my miso soups with them. And before leaving on holiday, I would eat them as a salad at least a couple of times a week. I usually use this recipe, which includes quick cucumber pickles (basically cucumbers that have been salted and pressed). The awesome thing about this salad, apart from the addictive flavour, is that it is really, really low in fat (even more so it you omit the sesame seeds, which are my own addition). The dressing, a mixture of rice vinegar and sugar, contains no oil whatsoever, and yet it’s full of flavour. Of course, if you really wanted to add some richness, you could probably add some sesame oil, which would definitely work well with the other flavours; soy sauce would fit in, too. But if you ask me, that’s not even necessary: the light sweet-and-acidic flavour already works. I also love the textures in this salad: the chewy wakame and the still-crunchy cucumbers are a real party in my mouth.

Granted, some people don’t, and never will, like seaweed. Which is fine, as long as they dislike it for its taste, and not because of what it is. I’m not going to run the list of common foods that should technically gross us out, because you all probably have a list in your head already. And I have my own hang-ups about certain kinds of food (I’m not going to tell you which, though – knowledge is power, and some of my friends love a good dare). But my disgust of seaweed is definitely one which I am glad I overcame.

Tuesday, September 14, 2010

Daring Cooks' September Challenge - Food Preservation


The September 2010 Daring Cooks’ challenge was hosted by John of Eat4Fun. John chose to challenge The Daring Cooks to learn about food preservation, mainly in the form of canning and freezing. He challenged everyone to make a recipe and preserve it. John’s source for food preservation information was from The National Center for Home Food Preservation.

This month’s Daring Cooks’ Challenge was a bit different than usual: it was focused around techniques, rather than recipes. This challenge was all about preserving food, either through freezing or canning. I’m a big fan of freezing, but canning was entirely new to me. The process seemed long and scary, and I’ve just never felt the need for it. Truth be told, we don’t have a lot of shelf space around here, what with all the kitchen gadgets and pantry staples like rice, oil, and sugar (not to mention four different kinds of flour). Recently, I’ve taken to making my own pickles, but I’ve never bothered to sterilize and seal them – simply because pickles around here never seem to last long enough to warrant the trouble!

Still, canning has always felt like something I should at least do once. So I went for it. Our host, John, had given us recipes for apple butter and bruschetta, but I chose to go a slightly different route (I hope that’s okay). I wanted to can something I knew I would use often, for different things: so I went for simple Italian tomatoes.


I got the “recipe” (more like a process) from Josée di Stasio’s book Pasta Et Cetera. Tomato season is winding down here, but I was still able to get my hands on some gorgeous red tomatoes. Prepping them for canning was easy, just a little time consuming: make a small, cross-shaped incision at the base of the tomato, then put them into boiling water for about a minute, until the skin begins to come off. Then dunk them into ice water. When they are cool enough to handle, peel them and remove the peduncle. Finally, cut them in half and remove the seeds.I ended up cutting them into large chunks, for easier future use.

Then, you have to put the tomatoes in jars, with a couple of basil leaves, pushing down to remove air pockets, and leaving a headspace of about 1 inch (2.5 cm). FYI, I counted about thirty tomatoes for eleven 125 ml (1 cup) jars. Then you put the closed jars (don’t wind the lid too tightly) into the canner.

In my case, the “canner” was a large pot of boiling water, lined with a dishcloth. NOTE: make sure to put the jars into the cool or lukewarm water first, and then bring to a boil (otherwise, the jars might crack from the thermal shock) Unfortunately, two of my jars were underfilled (I ran out of tomatoes), and started to float. This was not good, because the jars needed to be submerged with boiling water. Fortunately, we figured out a solution: more jars on top!


After 20 minutes of boiling, I took the jars out and let them cool overnight. Within minutes, they all made the characteristic “ping” sound that indicates all the air has been sucked out of the jar. And now, I have a stock of summer tomatoes to keep me through the winter! Now, if only I could find room to store the jars


Thanks, John, for this very interesting challenge, and also for all the information you provided! I learned a lot, and it was definitely worth the effort!

Friday, September 10, 2010

Last Summery Meal - Tuna Bean Salad


Fall has definitely arrived. I quite like this time of year, actually, and can’t wait for the leaves to start changing. Fall also signifies the return of my appetite for hearty comfort food, like stews, chunky soups, hot pots… Good bye gazpacho, hello osso bucco!

But, in memory of summer, here’s one last summery dish. Okay, actually, it’s something I made months ago, and completely forgot to post about. But I didn’t want it to go to waste. Plus, it can still make a nice side dish during the rest of the year.


This tuna bean salad is as simple as can be, and there are probably hundreds of it like it all over the food blogosphere, but it’s still a winner. This was pretty much an ad-lib, so proportions are approximate. This is one of the few recipes in which I use tuna canned in oil (Rio Mare brand, to be precise). I’m usually more of a water-canned kind of person, but this salad is really boosted by the oily richness. You can add salt if you wish, but the olives should be enough.

Anyways, let’s give summer a proper send-off, in order to welcome fall!


Tuna Bean Salad

Serves 2 as a meal, 4 as a side dish

One 540 ml (14 oz) can of cannellini beans, drained and rinsed (or substitute with any other kind of white bean)
One can of tuna marinated in olive oil
Juice of one lemon
A big handful of fresh basil leaves, chopped
120 ml (1/2 cup) green olives, sliced
Freshly ground black pepper, to taste

Combine all the ingredients in a large salad bowl, making sure to include the oil from the tuna can, and toss.

Tuesday, August 31, 2010

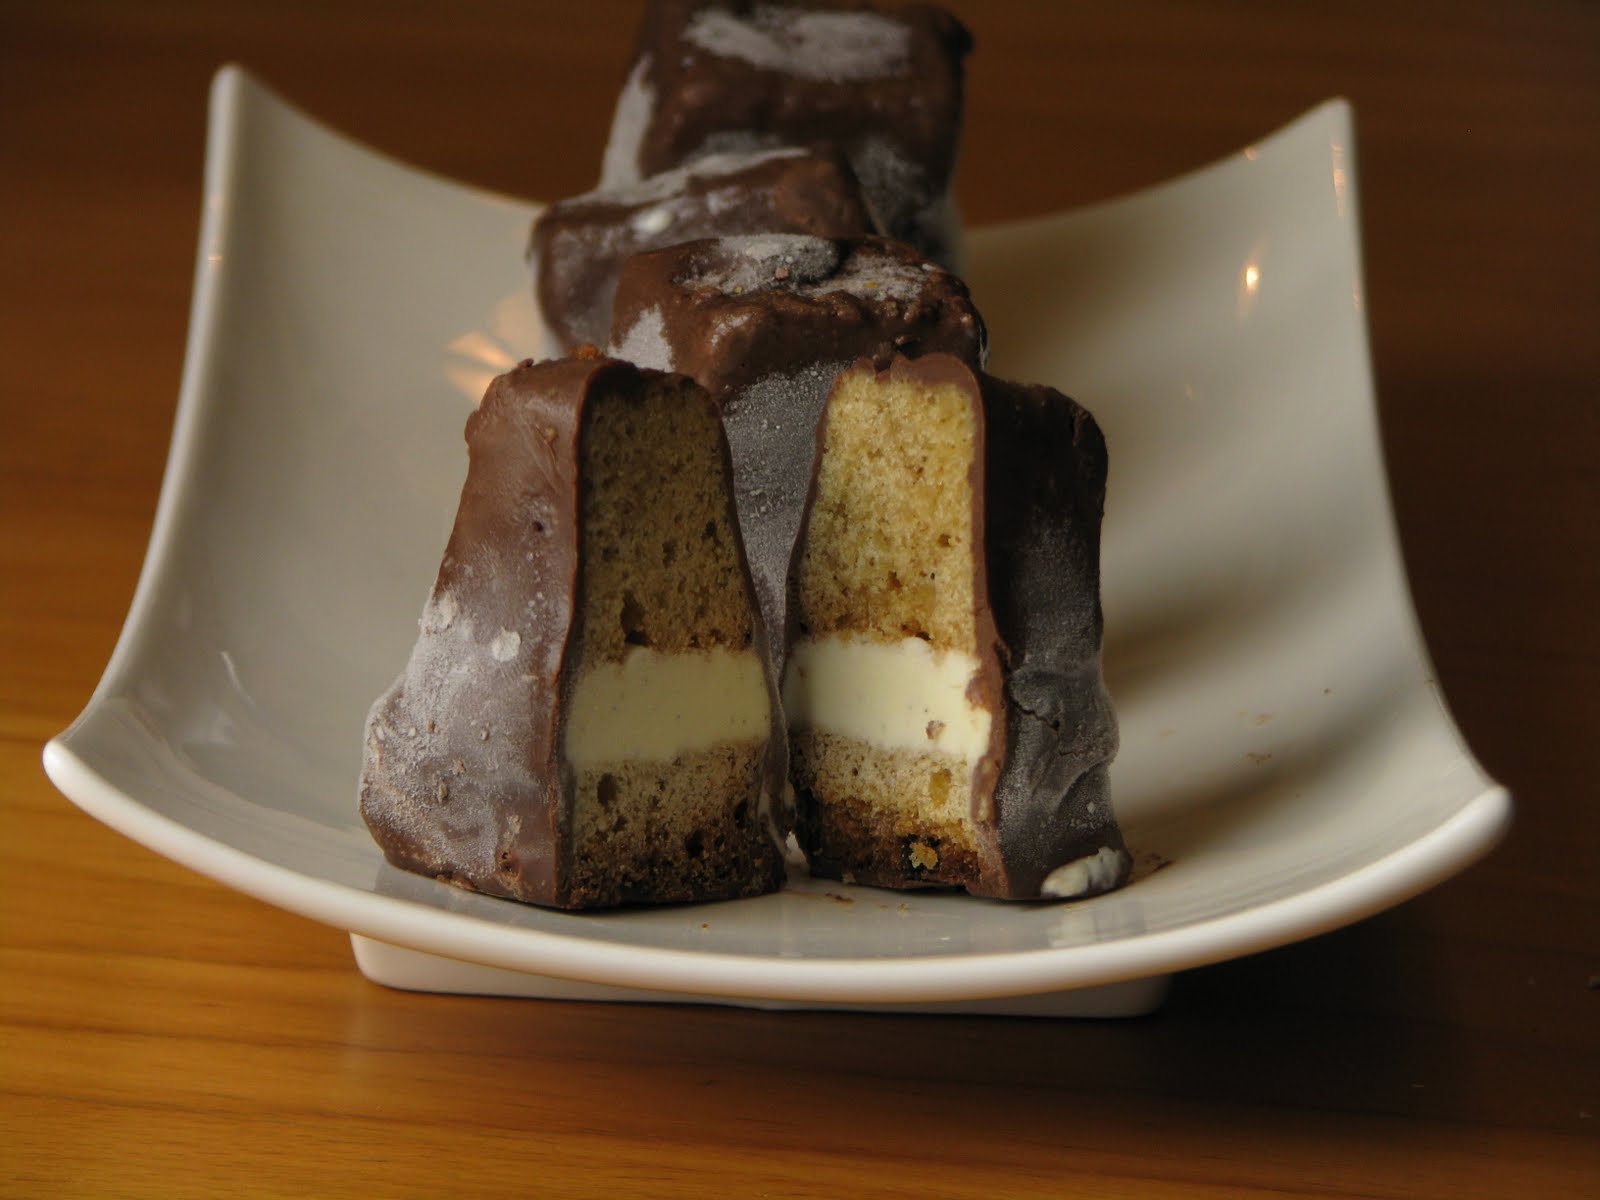
Daring Bakers' August Challenge - Browned Butter Pound Cake and Ice Cream Petits Fours


The August 2010 Daring Bakers’ challenge was hosted by Elissa of 17 and Baking. For the first time, The Daring Bakers partnered with Sugar High Fridays for a co-event and Elissa was the gracious hostess of both. Using the theme of beurre noisette, or browned butter, Elissa chose to challenge Daring Bakers to make a pound cake to be used in either a Baked Alasa or in Ice Cream Petit Fours. The sources for Elissa’s challenge were Gourmet magazine and David Lebovitz’s “The Perfect Scoop”.

I’m here! I’m here! I’m four days late and probably nobody cares at this point – but I do! The challenge is done!

For the second time in a row, the monthly Daring Bakers’ challenge featured ice cream. Which finally gave me the push I needed to go buy an ice cream maker. It’s a purchase I’d been meaning to make for a while, and every time I came upon a fellow blogger’s post featuring delicious homemade ice cream I would feel the urge to finally go for it… and then I’d put it off again. But now, it’s here, and Laurent is making his first batch of raspberry sorbet as I’m typing. (He’s really happy about the new gadget – had I known, I’d have gotten one months, maybe even years ago.)


This month’s challenge was a bit long, but worth the effort. Let’s start with the browned butter pound cake. We were supposed to make it and then pair it with ice cream, but it was so delicious I was tempted to just keep it plain and eat it as it was. I’d been hearing people rave about how insanely good browned butter made everything – they weren’t kidding!

But, well, I had the ice cream machine and everything, so I carried on. I stuck with vanilla ice cream, because I’ve never been a huge vanilla fan, and was curious as to whether the homemade variety would win me over. And I had some good vanilla beans lying around. The verdict: not bad at all! I still think vanilla ice cream is at its best when paired with chocolate sauce, but then, I’m a chocolate lover.

I’d made Baked Alaska once (one of my most memorable kitchen disasters), but the Petits Fours seemed more attractive to me – not to mention easier to store and eat in small portions. I have to say, cutting the frozen cake and ice cream into bite-sized pieces was hard work, and I ended up hurting my hand from the pressure. Glazing the pieces was literally a balancing act: my petits fours were a tad too tall, and kept tipping over from the edge of my fork and diving into the (very yummy) chocolate glaze. I also had issues with the ice cream melting while I was working. There were definitely some logistics to work out here.

The results were worth it, though. These petits fours are a great snack or dessert, and the different textures are great together. Not to mention that it’s muggy and humid as hell right now, so frozen treats are more than welcome!

Thanks, Elissa, for this lovely challenge! And my apologies to the Daring Bakers for being so late!